


 In this post we will deploy our Tier-1 site specific gateways and create some network segments for our VMs.
This post is part 7 of a multipart series. Find the other parts here:
- Part 1: Lab Setup and Overview
- Part 2: Site A Build
- Part 3: Automated Site B Build
- Part 4: NSX-T Site Federation
- Part 5: Remote Tunnel Endpoints
- Part 6: Federated Tier-0 Gateway
- Part 7: This Part: Federated Tier-1 Gateways
- Part 8: Egress Traffic and MEDdling with BGP
As a reminder, in this series we will be building the following lab:
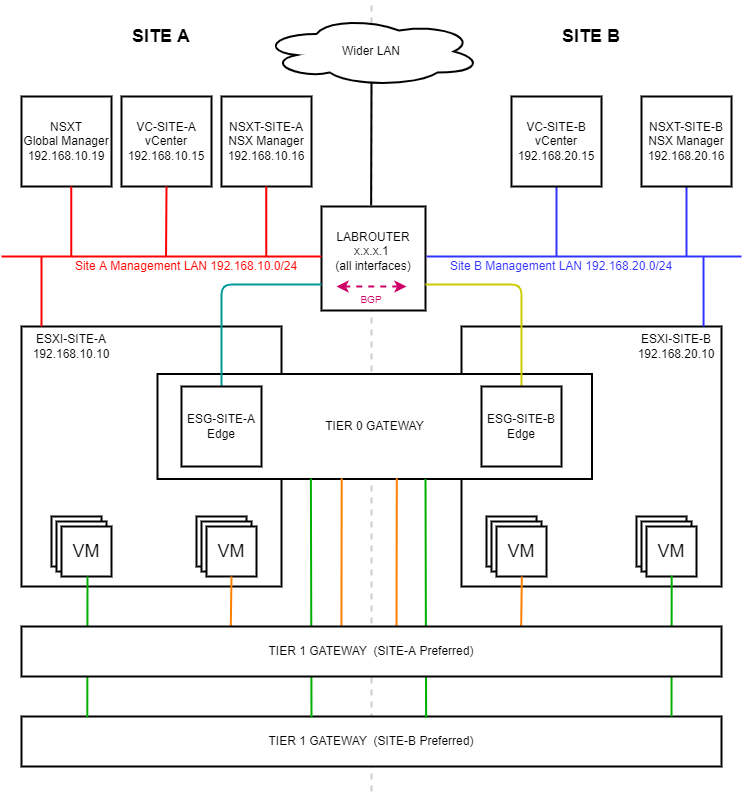 (Click image to zoom in)
Overview
What is a Tier-1 Gateway?
A Tier-1 gateway performs the functions of a Tier-1 logical router. It processes traffic between the Tier-0 router and the logical network segments used for VM connectivity. A tier-1 gateway can also be configured to span multiple sites. As with a tier-0 gateway, you can configure a site’s location as primary or secondary for the tier-1 gateway.
Using a tier-1 gateway enables more granular control on logical segments in the locations where it is deployed. You can also deploy multiple tier-1 gateways in any one location.
Create Tier-1 Gateway
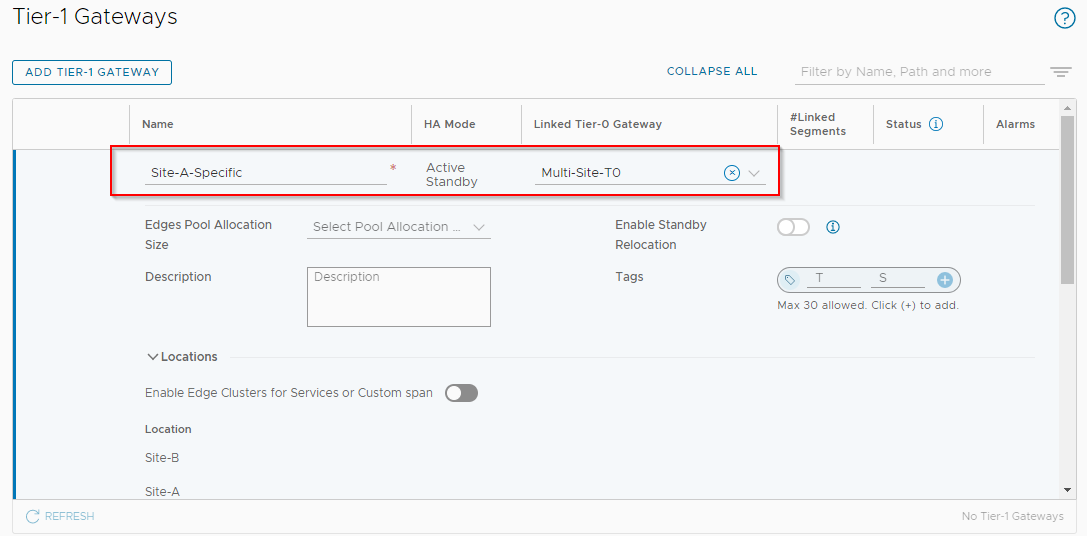
Lets create our first Tier-1 gateway. Select the Global Manager from the NSX web manager task bar drop down. From there, select Networking > Tier-1 Gateways. Select Add Tier-1 Gateway.
NOTE: NSX 4.0.0.1+: Set Tier-1 to HA Mode to Distributed Only. This allows the Tier-1 to become Active across all sites, but removes services such as NAT and Gateway Firewalling.
Name the Gateway Site-A-Specific and link it to Multi-Site-T0:
Scroll down to Route Advertisement, open and enable All Connected Segments & Service Ports:
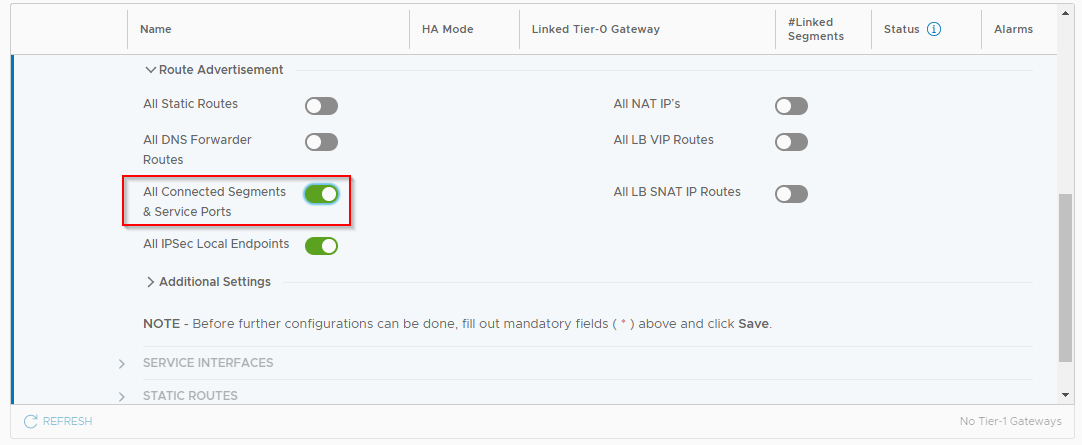
Click Save and No to complete the creation. Click Check Status and confirm that that gateway has successfully been created:

Repeat the above steps for the Site-B-Specific tier-1 gateway. Click Check Status and confirm that that gateway has successfully been created:

Create Segments
We can create as many segments in each of our sites as we like. It is these segments that we will be connecting our VMs into.
Initially however, we will create just two:
- Site-A-APP - 192.168.40.0/24 - For application servers primarily located on Site-A.
- Site-B-APP - 192.168.50.0/24 - For application servers primarily located on Site-B.
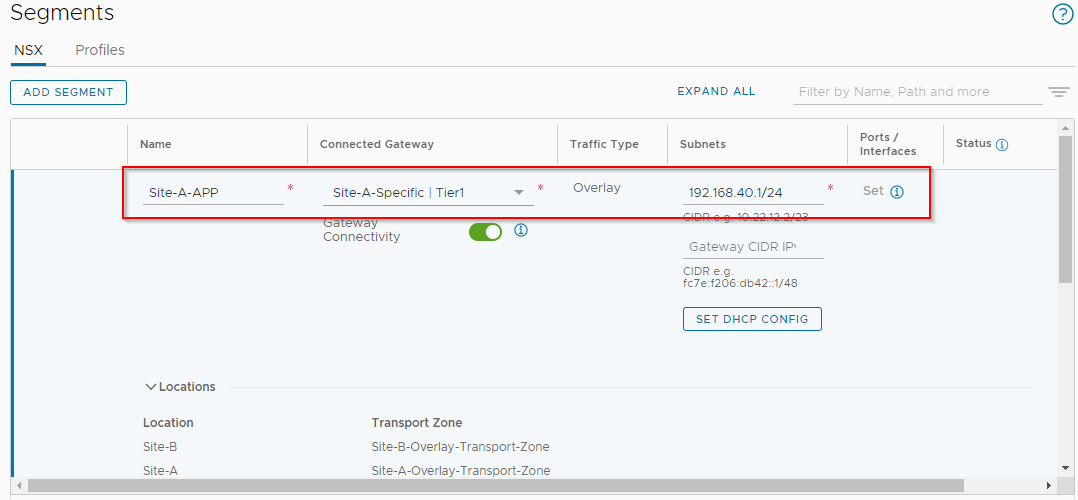
Select the Global Manager from the NSX web manager task bar drop down. From there, select Networking > Segments. Select Add Segment.
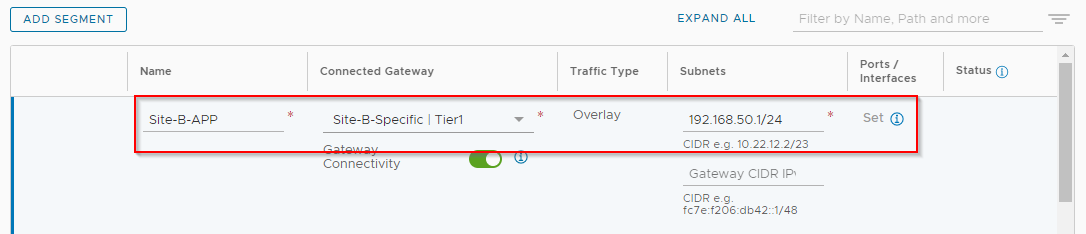
Name the Segment Site-A-APP, connect it to Site-A-Specific tier-1 and give it a gateway IP of 192.168.40.1/24:
Repeat for Site-B-APP, connecting it to Site-B-Specific tier-1 and give it a gateway IP of 192.168.50.1/24:
NSX-T Manager Diagrams
To help visualise this further, lets take a look at the diagrams as shown in our NSX site managers.
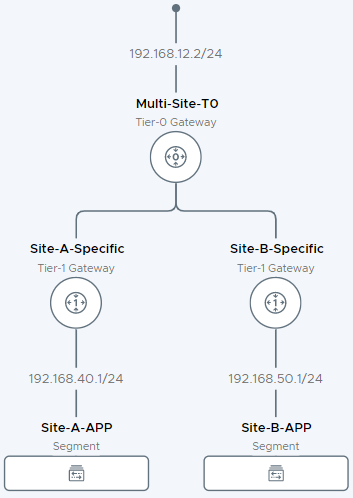
Site A - Topology View
Using the topology view from the Site A NSX-T manager we can see the following:
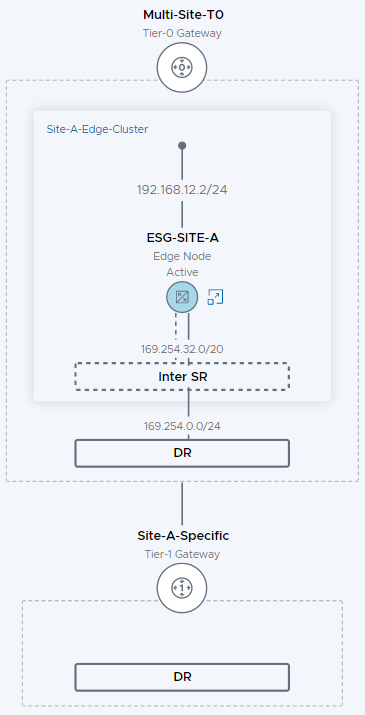
Site A - Fabric View
Looking at the fabric view we see our Site-A edge server:
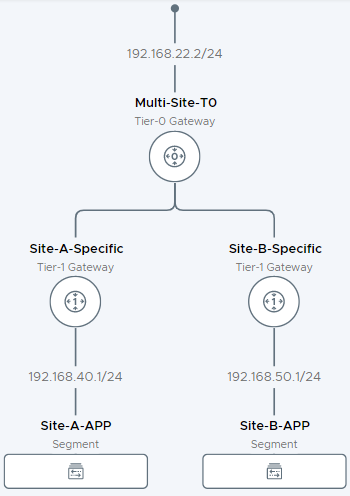
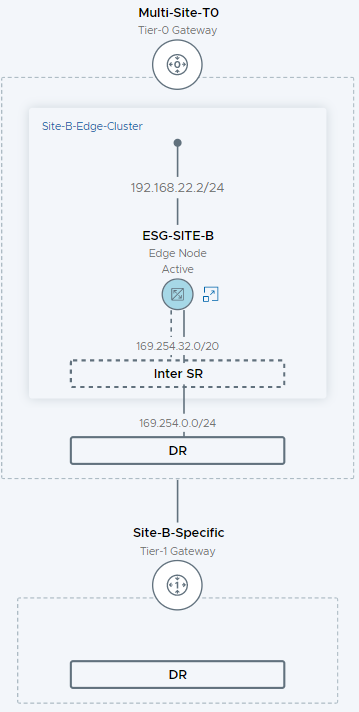
Site B - Topology View
Likewise, using the topology view from the Site B NSX-T manager we can see the following:
Site B - Fabric View
Checking Site B’s fabric view:
All looking good.
Route Propagation via BGP
Now that we have two networks that we can connect VMs to, we need to confirm that BGP is doing its thing and propagating route information though to our Lab Router.
After logging into LABROUTER, checking Routing > Diagnostics > BGP > IPv4 Routing Table (See Configure BGP and BFD for further details on OPNsense BGP configuration), the following can be seen:
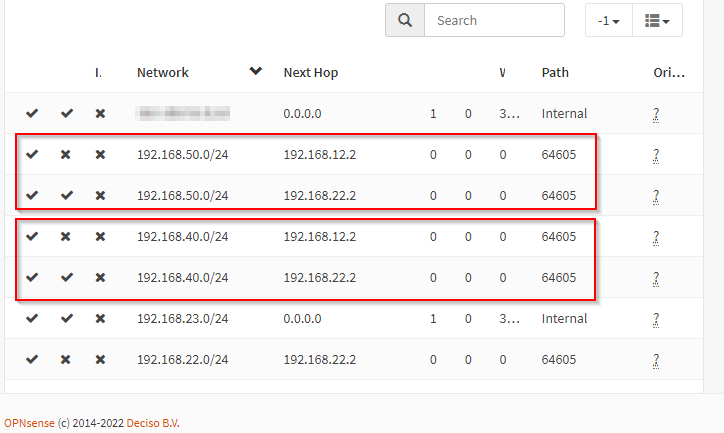
Two routes to our two networks via 192.168.12.2 and 192.168.22.2 connections on sites A and B respectively. Keen readers see my BGP Note below.
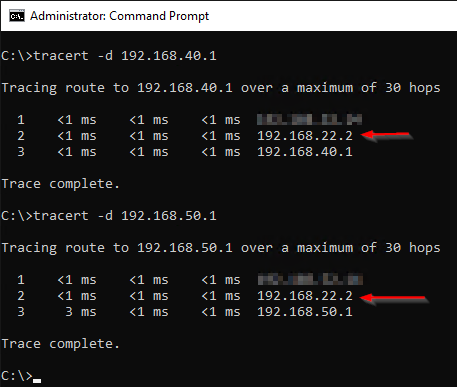
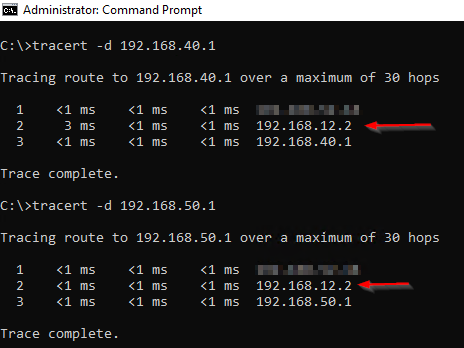
Tracing Traffic Flows
Using trace route, lets see how traffic makes its way to out Site-A-APP and Site-B-APP VM networks:
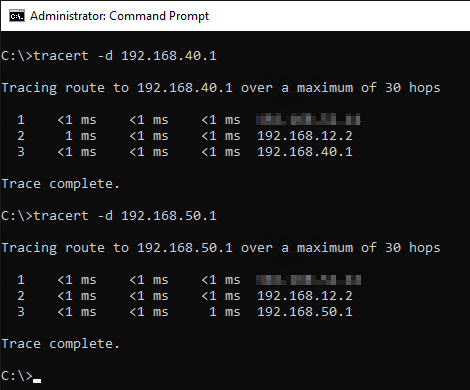
Nice. Traffic is making it to our VM gateway IP addresses configured on our Tier-1 gateways earlier.
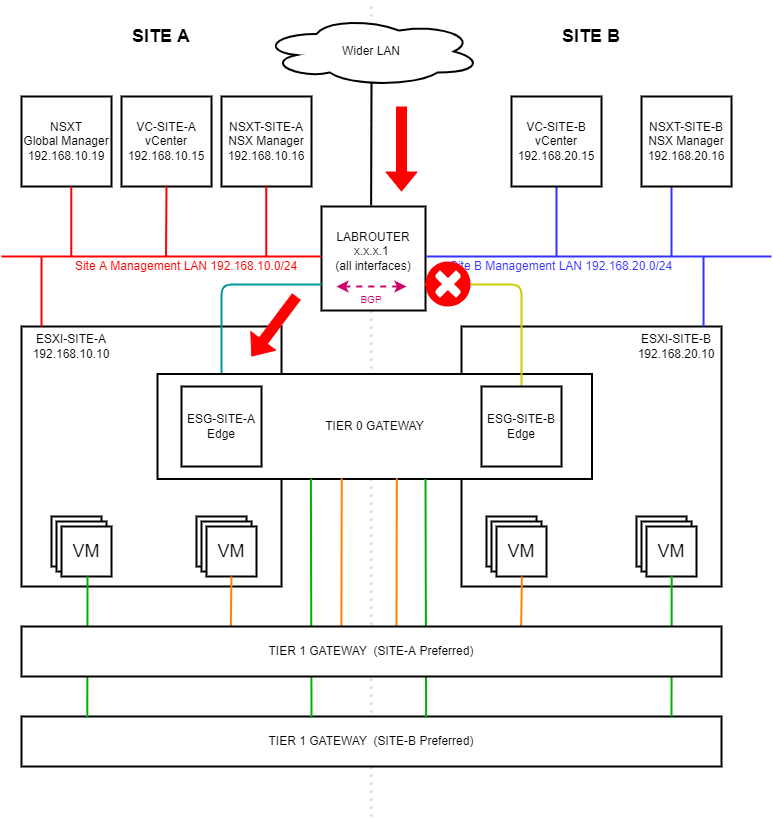
Simulating Failure
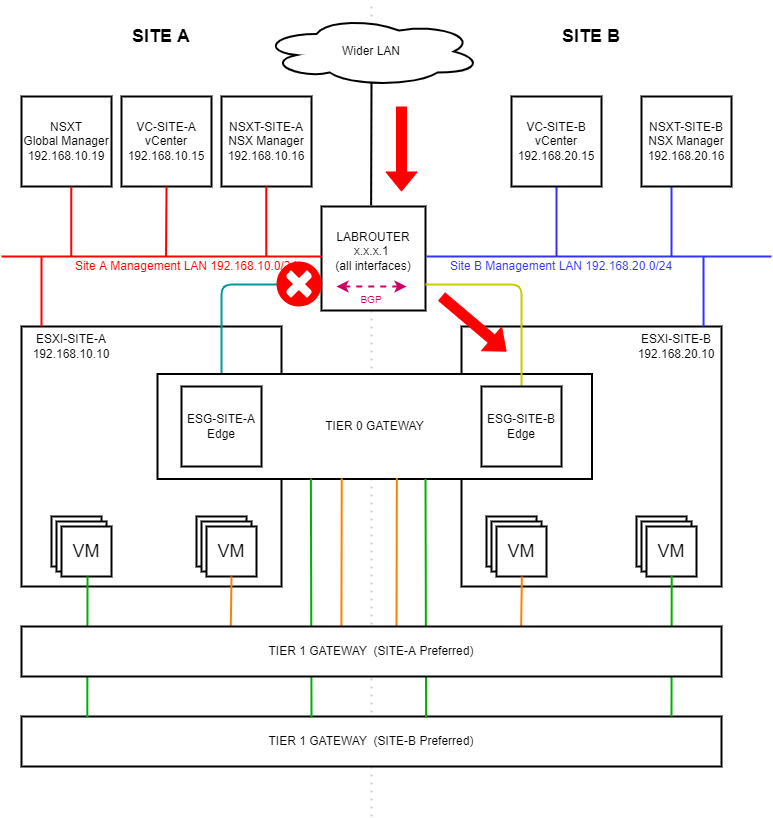
Lets simulate the failure of the Site A uplink by disconnecting the connection shown in blue below. Traffic should still be able to flow via Site B as shown by the red arrows below:
Disabling (un-enabling) the Site A uplink OPNsense interface:
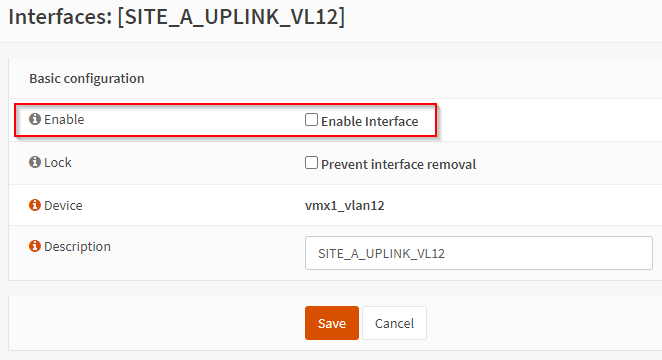
Traffic is indeed able to route via Site B instead:
BOOM!
After re-enabling Site A’s uplink, let’s fail Site B’s uplink shown in yellow below. Traffic should still be able to flow via Site A as shown by the red arrows below:
Disabling (un-enabling) the Site B uplink OPNsense interface:
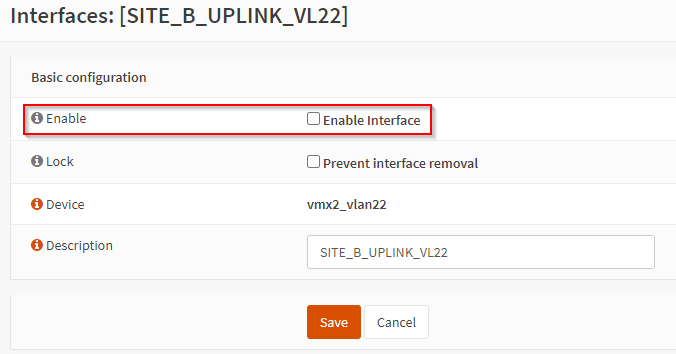
Traffic is indeed able to route via Site A instead:
DOUBLE BOOM!!
Quick Note About BGP
As alluded to above, keen readers will spot that traffic is ingressing via one site at a time. That is traffic bound for Site-B-APP (192.168.50.1) is, under normal circumstances entering the environment via Site A.
Yes this is true.
However this is wholly a problem with the BGP configuration on the Lab Router. A fix lies somewhere in the prefix lists and route maps configuration. Unfortunately understanding BGP is hard. Just ask Zuk.

Conclusion and Wrap Up
So there we have it. Our Tier-1 routers have been deployed and configured. Our VM segments are up accessible from the wider LAN. We’ve even done a bit of failover testing and everything works as configured.
This was part 7 of a multipart series. Find the other parts here:
- Part 1: Lab Setup and Overview
- Part 2: Site A Build
- Part 3: Automated Site B Build
- Part 4: NSX-T Site Federation
- Part 5: Remote Tunnel Endpoints
- Part 6: Federated Tier-0 Gateway
- Part 7: This Part: Federated Tier-1 Gateways
- Part 8: Egress Traffic and MEDdling with BGP
Will there be a part 8?
I’d love to fix the very minor BGP config issue, although ultimately as this is a lab it is not the end of the world if not. I’m sure those with more BGP knowledge than I can have this fixed quicker than a quick thing. Please comment below!
We also need to look at traffic egress from the environment… Stay tuned!
-Chris