


 The new v7.0 version of vSphere was released late last week and like many others I am keen to play with all the shiny shiny new features:
- Kubernetes Integration
- Assignable Hardware
- vSphere Lifecycle Manager
- Intrinsic Security
- Improved DRS
- Refactored vMotion
First step is to install ESXi 7.0 into a Virtual Machine (VM) and have a little look see before we go any further.
This post is part 1 of a multipart series. Find the other parts here:
- Part 1: This part (Be gone CPU_SUPPORT Error!)
- Part 2: CPUID and EAX Between Friends
- Part 3: Lets Get Virtual to Physical
Problem 1 - Boot Drive Size
Being the same old, same old frugal VM admin, I assigned my usual 1GB boot drive hard disk to my ESXi 7.0 VM. Boot up answer the first couple of installer questions… Hmmm this is new:
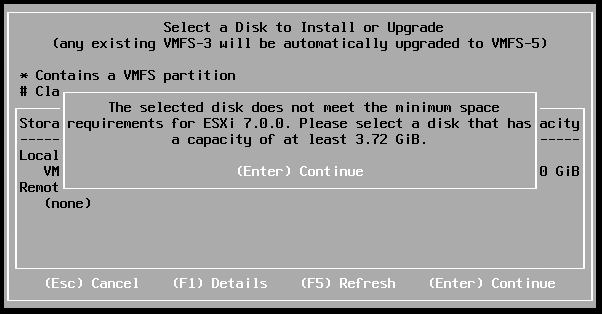
From the ESXi Hardware Requirements page:
ESXi 7.0 requires a boot disk of at least 8 GB for USB or SD devices, and 32 GB for other device types such as HDD, SSD, or NVMe. A boot device must not be shared between ESXi hosts.
Ah, OK, well this is a test VM, so it can have a 4GB boot HDD and like it. Simple fix. ![]()
Problem 2 - CPU_SUPPORT Error
VM rebooted and on we go with the install. Oh, so that’s not nice:
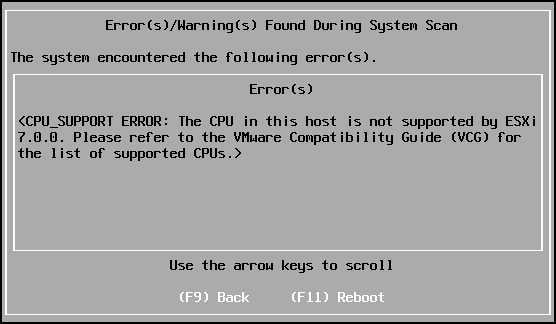
My ESXi server has two Intel Xeon E5640 CPUs in it. Whilst I was lucky to be able to upgrade to ESXi 6.7 without issue, it looks like VMware have finally caught up with my ageing hardware.
Ah yes, from the vSphere 7 release notes:
Comparing the processors supported by vSphere 6.7, vSphere 7.0 no longer supports the following processors:
- Intel Family 6, Model = 2C (Westmere-EP)
- Intel Family 6, Model = 2F (Westmere-EX)
Boo! no support for my CPU. ![]()
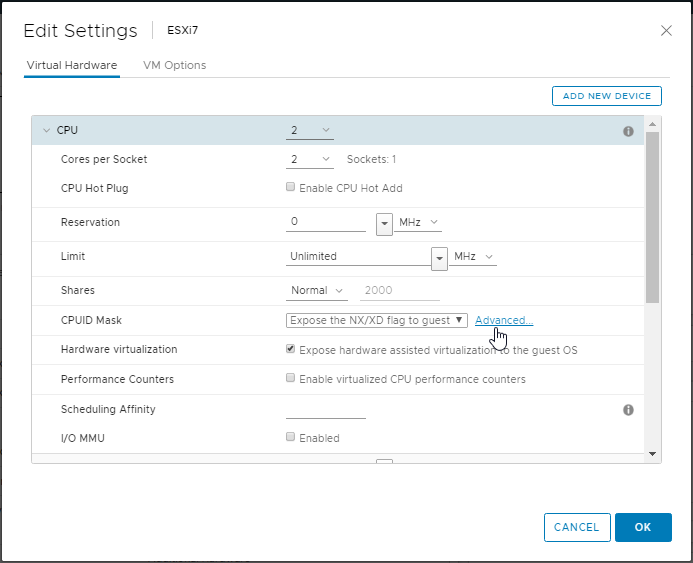
CPU_SUPPORT Error - The Fix
So the ESXi installer is looking at physical processor in the server to determine whether to continue installation. Luckily for us, as this is a VM, we can make some adjustments to the VM to allow the ESXi 7.0 installer to continue with the install.
To accomplish this, we can use a CPU “mask” to hide the identity of our server’s actual CPU and pass through the identity of a supported CPU instead. Standard disclaimers apply:
- YES this is unsupported by VMware
- YES what follows should not be attempted on production equipment
- YES you are on you’re own (but hey, you knew that already. This is cheaper than purchasing a new motherboard, CPUs, RAM etc)
Power off the ESXi 7.0 VM, edit the settings, expand the CPU settings and click Advanced:
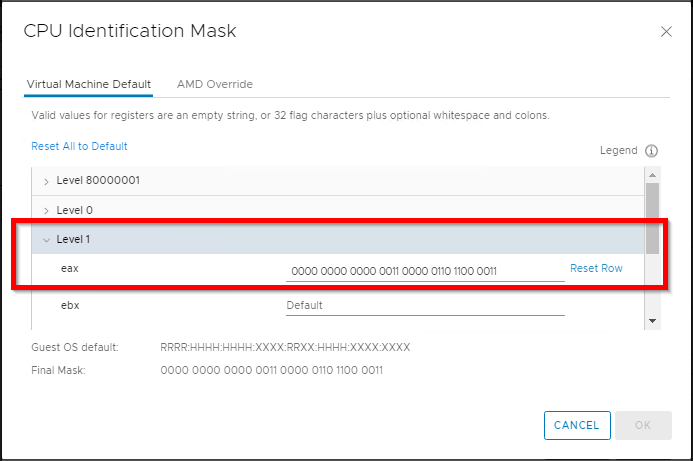
From there expand Level 1 and paste the following into the EAX field:
Identification for Intel CPUs: 0000:0000:0000:0011:0000:0110:1100:0011
Identification for AMD CPUs: 0000:0000:0110:0000:0000:1111:0001:0000
My CPU is an Intel, so I’ll paste in the Intel ID:
Click OK twice, boot up the VM and kick off the ESXi installer again. Third time’s a charm? ![]()

Oh yes! ![]()
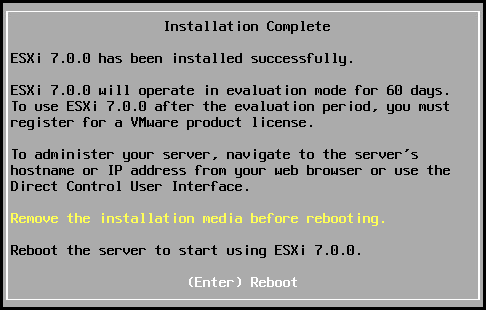
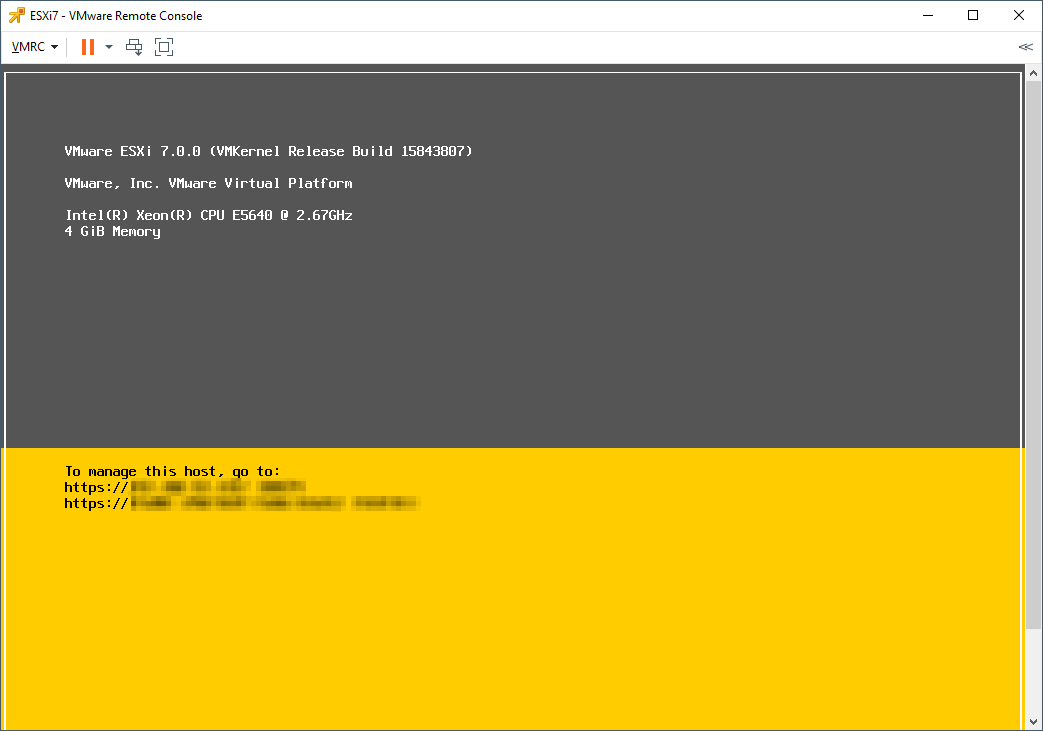
Install complete. Let’s boot the VM up just to see if it boots. Yep looks good:
We can now remove the CPU ID set above. After all, the installer has done it’s work and we are all good.
Shut down the ESXi 7.0 VM, edit the settings, expand the CPU settings and click Advanced: From there expand Level 1, click Reset Row and click OK twice to save.
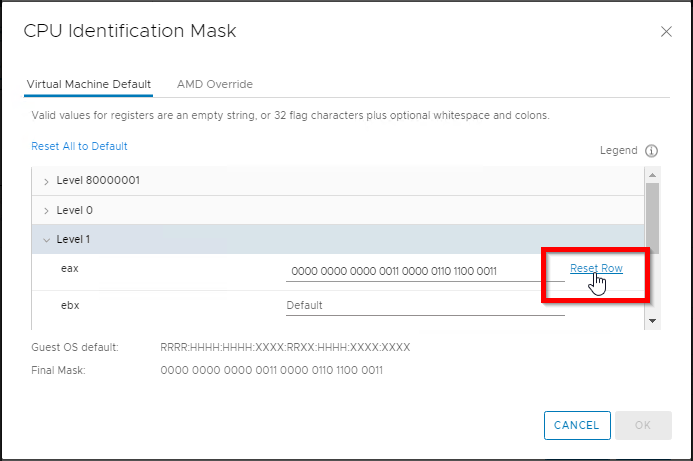
Job done. ESXi7 installed, CPU ID returned to normal.
Next time in part 2, we’ll take a closer look at EAX numbers and I’ll detail how I arrived at the working EAX numbers.
-Chris