


 Last time we looked at a workaround to install ESXi 7.0 into a VMware virtual machine hosted on physical hardware that contains an unsupported CPU. If you’ve not seen that post, catch up now. It’s a great read.
As mentioned, this post is part 2 of a multipart series. Find the other parts here:
- Part 1: Be gone CPU_SUPPORT Error!
- Part 2: This part (CPUID and EAX Between Friends)
- Part 3: Lets Get Virtual to Physical
To recap, the ESXi installer uses the CPUID instruction to identify the CPU(s) installed in the system. From the value obtained the user is told that their processor is either:
- Unsupported. At which point the installer quits. No ESXi 7.0 for you!
- Will be unsupported in a later ESXi version. The installer will allow install continuation.
- Nothing. The installer accepts that a valid CPU is present and silently continues the installation.
Overview
CPUID and the EAX Value
The CPUID instruction returns processor identification and feature information held in the EAX registers of the CPU in the system.
You can read more about the construction of the EAX value at x86 Instruction Set Reference - CPUID and CPUID — CPU Identification.
Determining a CPUID
As luck would have it, Intel publish CPUID’s of their processors (or Processor Signatures as some of their literature calls it) in Intel Architecture and Processor Identification With CPUID Model and Family Numbers and Intel Xeon Processor Scalable Family Update March 2020.
Let’s put that aside for the moment and single step through determining the CPUID of processor.
1. Find the Processor Model Number
Simple. Check in Configure - Hardware - System of the host system that is to run the ESXi 7.0 VM. For example:
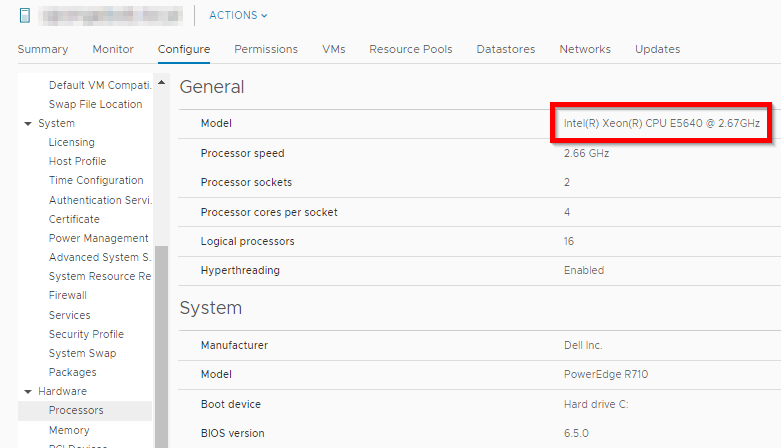
In my case, my ESXi 6.7 host is running E5640 CPUs.
2. Use CPU-World
Next, use the search function of CPU-World to obtain further information on the processor model found in step 1. For example:
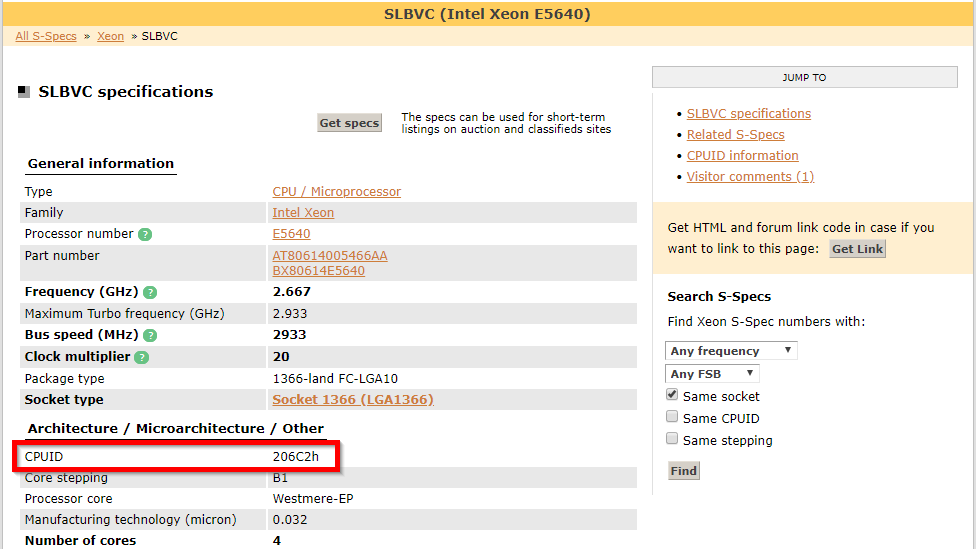
Looks like the E5640 CPUs have a CPUID of 206C2h (h = hex notation), so 206C2.
3. Cross Check
Lets check the Intel Architecture and Processor Identification With CPUID Model and Family Numbers, paper from above and sure enough, we can see that Gulftown and Westermere-EP CPU’s have and CPUID of 0x206Cx (the “0x” prefix = hex notation, “x” suffix = variable):
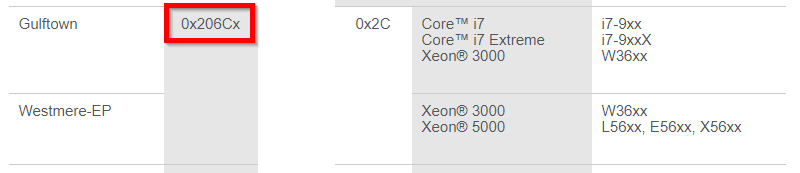
So yes, 206C2 is a valid CPUID.
4. The Quick Way
Connect via SSH to your ESXi host and issue the command
esxcli hardware cpu cpuid raw list -c 0
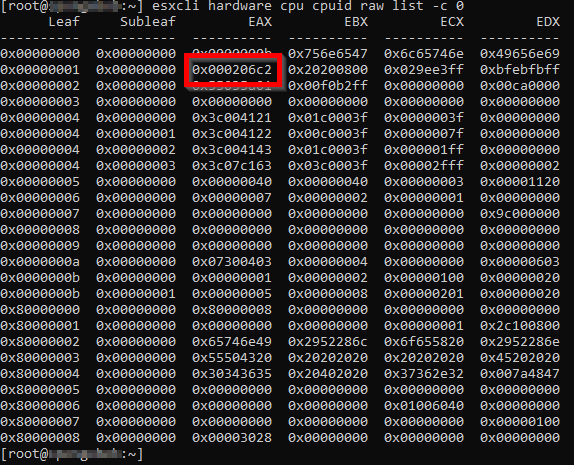
A confirmed CPUID of 206C2 padded with three zeros! Nice ![]()
Converting a CPUID to an EAX Value
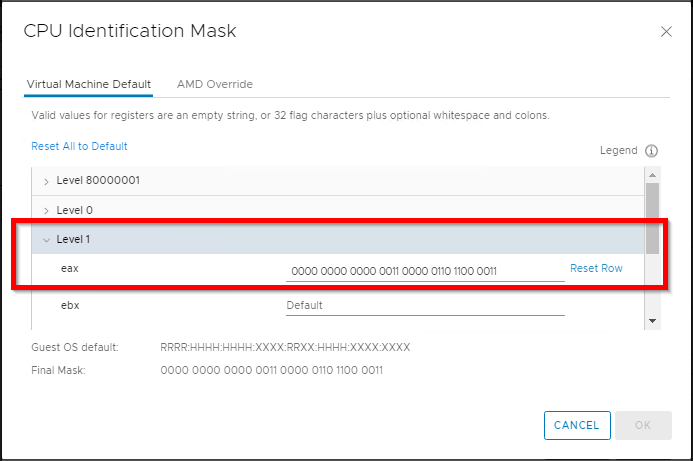
As we saw in Workaround ESXi CPU Unsupported Error - Part 1, an EAX number must be entered into the vSphere CPU Identification Mask setting in binary:
Conversion is easy. Use an online hexadecimal to binary converter.
Again, using the three zero padded 000206C2 example from above:
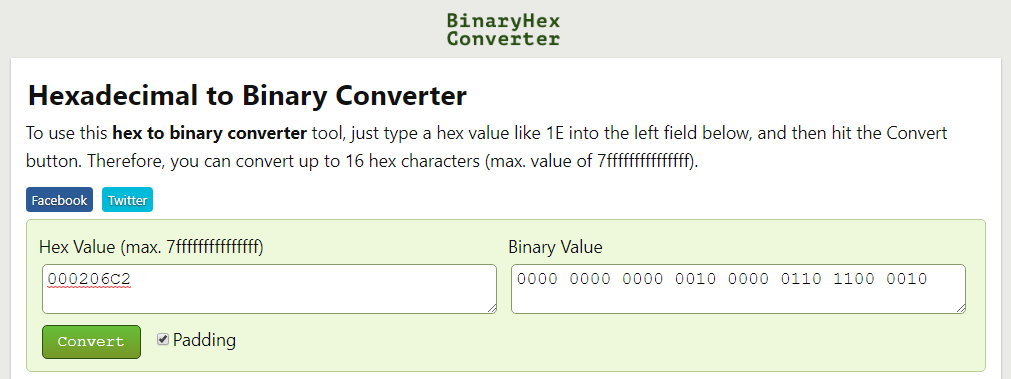
The binary EAX value we need to enter to pass through to the VM a CPUID of a Westermere-EP CPU is 0000:0000:0000:0010:0000:0110:1100:0010 when using colons instead of spaces, as vSphere expects it.
Pulling It All Together
So I present to you a list of processors, their CPUIDs, their binary EAX numbers and the result of installing ESXi 7.0 into a VM configured with the corresponding EAX number.:
Intel CPUIDs and Binary EAX Values
| Processor Generation | CPUID | Binary EAX Value | ESXi 7.0 Installer Action |
|---|---|---|---|
| Westmere-EP | 206C2 | 0000:0000:0000:0010:0000:0110:1100:0010 |
Fail |
| SandyBridge | 206A2 | 0000:0000:0000:0010:0000:0110:1010:0010 |
Warning |
| IvyBridge | 306A2 | 0000:0000:0000:0011:0000:0110:1010:0010 |
Warning |
| Haswell | 306C3 | 0000:0000:0000:0011:0000:0110:1100:0011 |
PASS |
| Broadwell | 406F1 | 0000:0000:0000:0100:0000:0110:1111:0001 |
PASS |
| Skylake | 50654 | 0000:0000:0000:0101:0000:0110:0101:0100 |
PASS |
| Kabby Lake | 806E9 | 0000:0000:0000:1000:0000:0110:1110:1001 |
PASS |
Eagle eyed readers will recognise that in Part 1, we used the Haswell processor EAX value to enable ESXi 7.0 installation. ![]()
AMD CPUIDs and Binary EAX Values
| Processor Generation | CPUID | Binary EAX Value | ESXi 7.0 Installer Action |
|---|---|---|---|
| Opteron 6124HE | 100F91 | 0000:0000:0001:0000:0000:1111:1001:0001 |
Untested* |
| Opteron 6212 | 600F12 | 0000:0000:0110:0000:0000:1111:0001:0010 |
Untested* |
| Opteron 6320 | 600F20 | 0000:0000:0110:0000:0000:1111:0010:0000 |
Untested* |
| Epyc 7251 | 800F12 | 0000:0000:1000:0000:0000:1111:0001:0010 |
Untested* |
| Epyc 7371 | 800F12 | 0000:0000:1000:0000:0000:1111:0001:0010 |
Untested* |
*As server used for testing is Intel CPU based, I’m unable to test EAX values for AMD CPUs.
The environment used for the above testing:
- Server: Dell R710, fitted with two Xeon Westmere-EP CPUs
- Host ESXi: ESXi 6.7 build 15160138 installed
- Managed by: vCenter 6.7 build 15129973
- Test VM compatibility: ESXi 6.7 Update 2 and later (VM version 15)
- Test VM guest OS: VMware ESXi 6.5 or later
- ESXi 7.0 installer: VMware-VMvisor-Installer-7.0.0-15843807.x86_64.iso
Conclusion and Wrap Up
In this post we looked at CPUIDs, how to obtain them from online sources and how to find them by querying physical hardware. From there we looked at how to convert a CPUID into a binary EAX value.
Finally, we applied the generated EAX values to a VM and ran the ESXi 7.0 installer, with results as detailed above.
Next time, in part 3, we’ll look at using what we’ve learnt in parts 1 and 2 in the physical world. Stay tuned..! ![]()
![]()
-Chris