


 Today I want to take a look at Nutanix Flow.
For those unfamiliar with the Nutanix product line up, Flow is Nutanix’s software-defined virtual networking solution. Flow is roughly analogous to VMware’s NSX-T.
The Flow suite consists of two products:
- Flow Virtual Networking
- Flow Network Security
From the product documentation, the functionality of each Flow product can be broken down as follows:
Flow Virtual Networking is a software-defined networking solution that provides multi-tenant isolation, self-service provisioning, and IP address preservation using VPCs, subnets, and other virtual components that are separate from the physical network, for AHV clusters. It integrates tools to deploy networking features like Virtual LANs, Virtual Private Cloud (VPC), Virtual Private Network (VPN), Layer 2 Virtual Network Extension using VPN or Virtual Tunnel End Point (VTEP), Border Gateway Protocol sessions to support flexible app-driven networking that focuses on VMs and applications.
To learn more the Flow Virtual Networking Guide is publicly available.
Flow Network Security is the next-generation Nutanix microsegmentation solution with an enhanced policy model, advanced policy operation, and enterprise readiness features (v4 APIs, RBAC, and improved scale performance and resiliency).
Again, to learn more the Flow Network Security Next-Gen Guide is also publicly available.
Importantly, either Flow product can be implemented and used without the need for the other.
Overview
The Problem and Solution
PolarClouds Hosting Co. is proud to announce that it has won twin contracts to provide cloud hosting for both The Globex Corporation and Initech LLD. Click the company links to learn more about each company.
Due to various constraints (did you click the company links yet?), neither company requires a “Rolls-Royce” cloud hosting solution. They both require a simple solution based on Nutanix products.
Hey that’s lucky because that’s the purpose of this post! ![]()
Consider the following design:
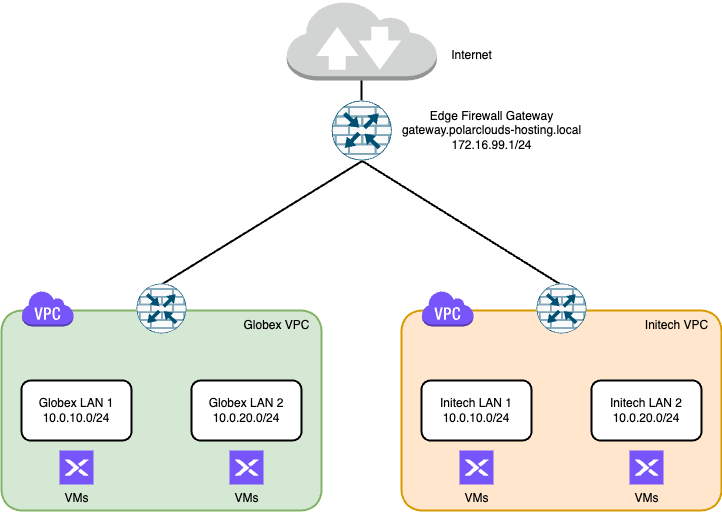
Salient points of the design are as follows:
- Each company has their own Virtual Private Cloud (VPC) that they can grow depending on their individual business needs.
- Globex and Initech are free to use the same IP addressing schema inside their respective VPCs
- Infrastructure management (AHV cluster, Prism Central) will reside on a separate VLAN not shown in the above diagram
- It’s a simple deployment!
Again, remember this is the non Rolls-Royce solution. Simplicity is paramount at this stage. Future expanded functionality could include:
- Direct VPN access to each VPC for each company
- Separate non-shared VLAN access from the edge firewall gateway to each VPC for additional security and segregation
- Disaster Recovery
- Cross cluster live migration
Stay tuned for possible future posts on these options!
Build Pre-Requisites
Nutanix Software Stack
For this build we will be deploying the following:
- AHV cluster running AOS v6.7.17
- Prism Central running pc.2023.4
- Flow Network Controller v3.0.1
- Flow Network Security v4.0.1
The above are the latest available versions at time of writing.
Stack Deployment
I’ve previously covered AHV cluster installation and Prism Central deployment, so I won’t cover them again here.
Whilst both Flow products are shipped with Prism Central, they should be updated via Prism Central Life Cycle Manager (LCM) in the normal way.
MTU (aka Jumbo Frames)
As we are going to use GENEVE (Generic Network Virtualization Encapsulation) overlay networking for our VPC based client VM subnets, we need to ensure that our network Maximum Transmission Unit (MTU) size is set correctly on our AHV hosts and physical switches:
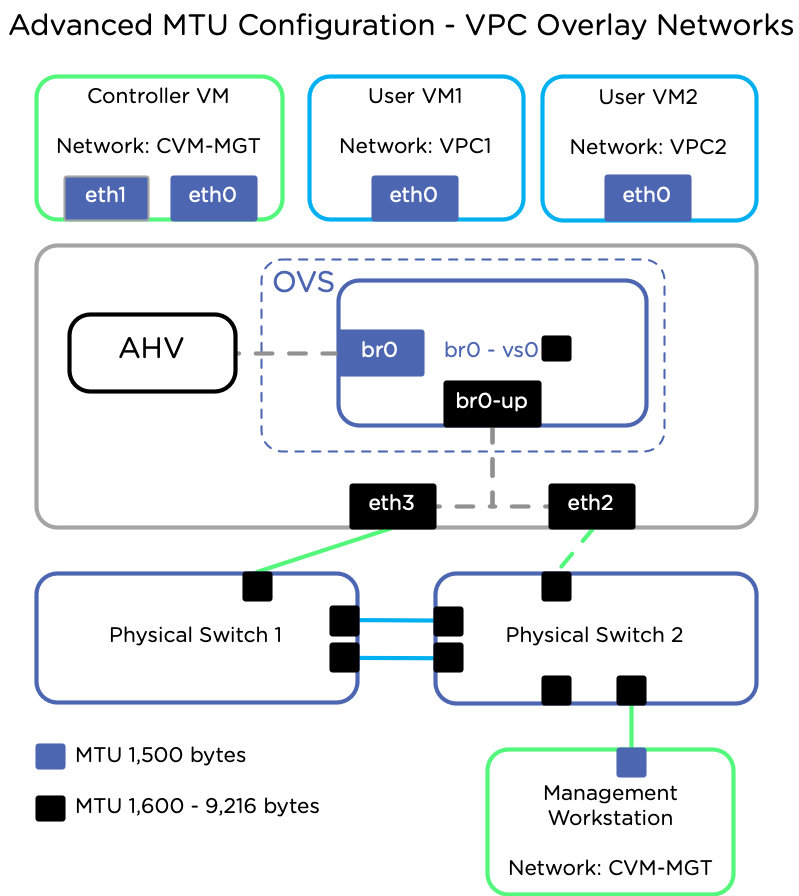
Read more about this in the Prerequisites for Flow Virtual Networking section of the documentation.
For this build, I’ll be using an MTU of 9000 on our AHV hosts and network switches.
The Build
With the pre-amble out of the way, lets get on with the build!
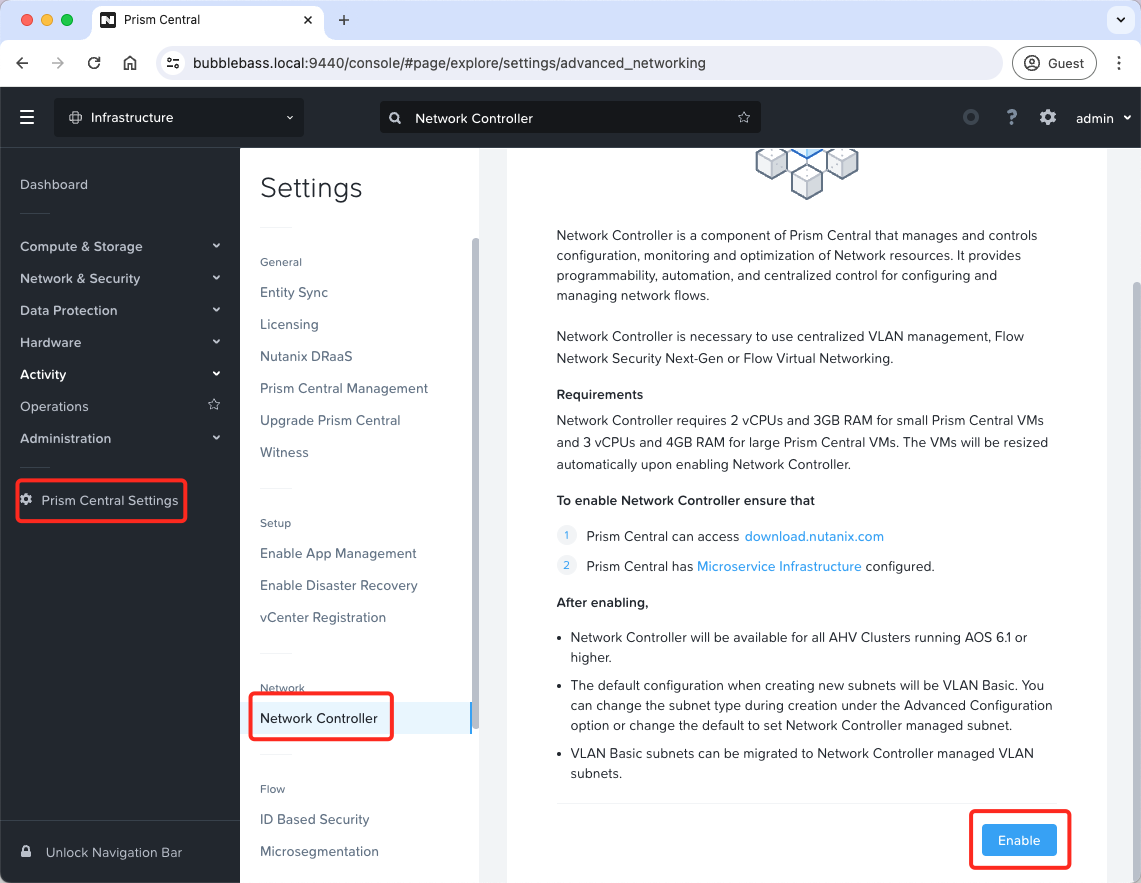
Enable Network Controller
Whilst flow is centrally managed from Prism Central, we will need to enable the network controller functionality. From the Prism Central dashboard, choose Prism Central Settings > Network Controller > Enable
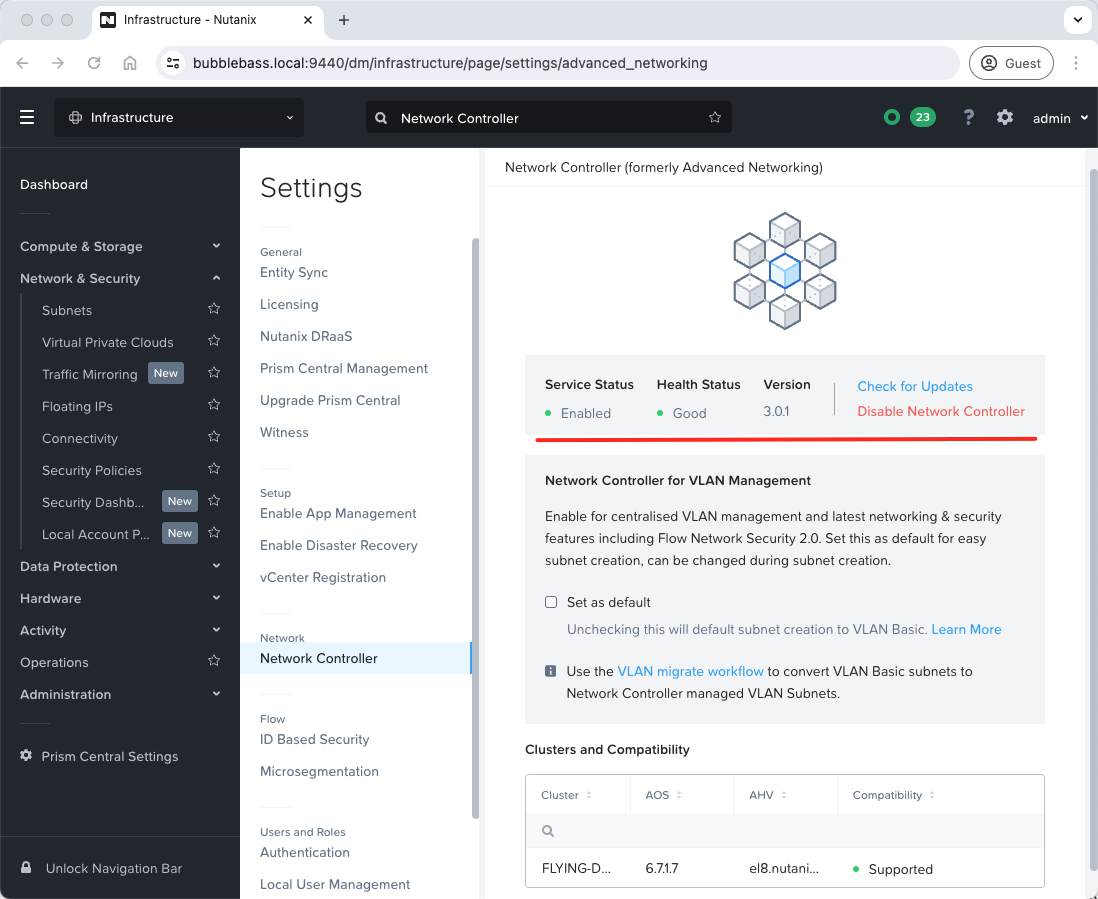
Once enabled (and updated via LCM if required), we should see the following:
Create VPC Uplink VLAN
Again, as we are going for the simple setup, we are going to use just one shared VLAN for our VPC to Edge Firewall Gateway connectivity.
From the Prism Central dashboard, expand Networking and Security and select Subnets:
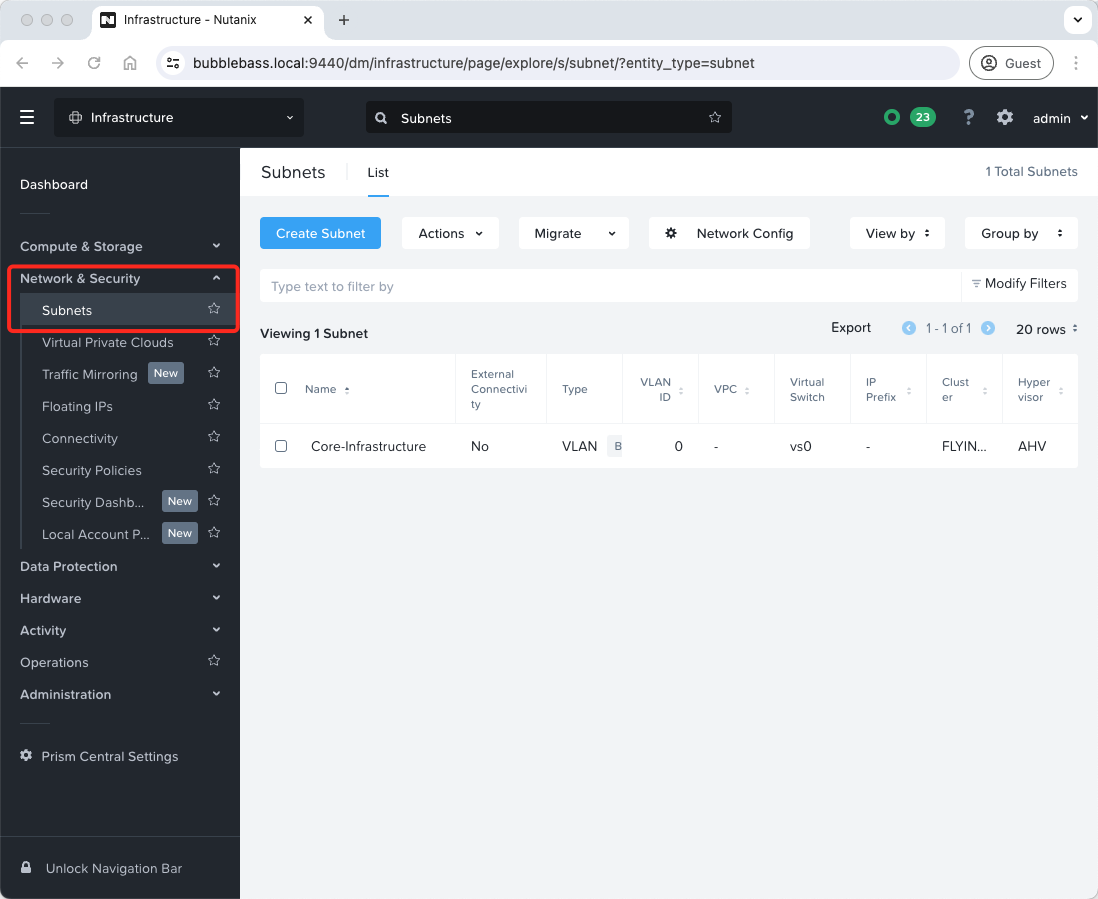
As you can see, we already have our Core-Infrastructure subnet defined. This was created at cluster deployment time. This subnet also houses our Prism Central instance.
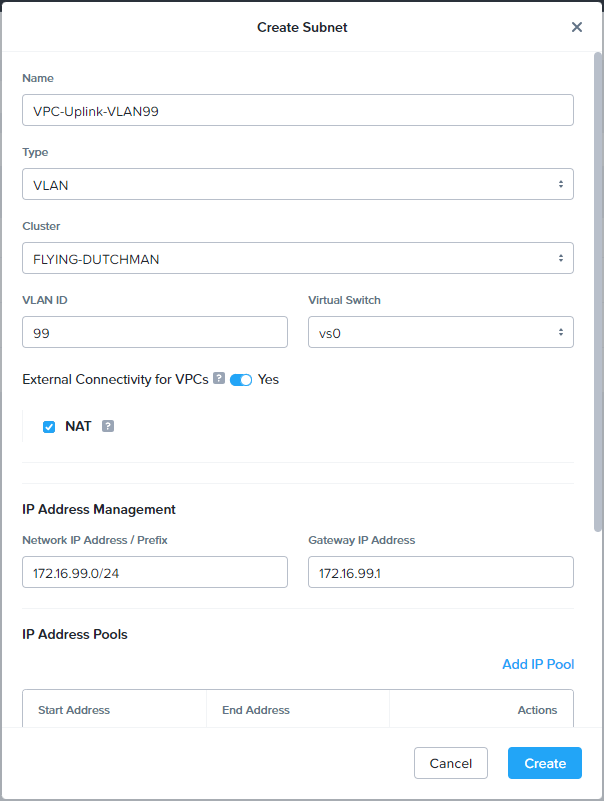
Click Create Subnet. Complete the following configuration:
- Name = VPC-Uplink-VLAN99
- Type = VLAN
- Cluster = Name of our Cluster (mine is named after this guy)
- VLAN ID = ID to match our uplink VLAN (I’m using 99)
- Virtual Switch = vs0
- External Connectivity for VPCs = Yes
- NAT = Ticked
- IP Address Management = To match our uplink VLAN
Scroll down and complete the following:
- IP Address Pool = I’ll initially allocate fifty IPs into my pool. I can add more later if needed.
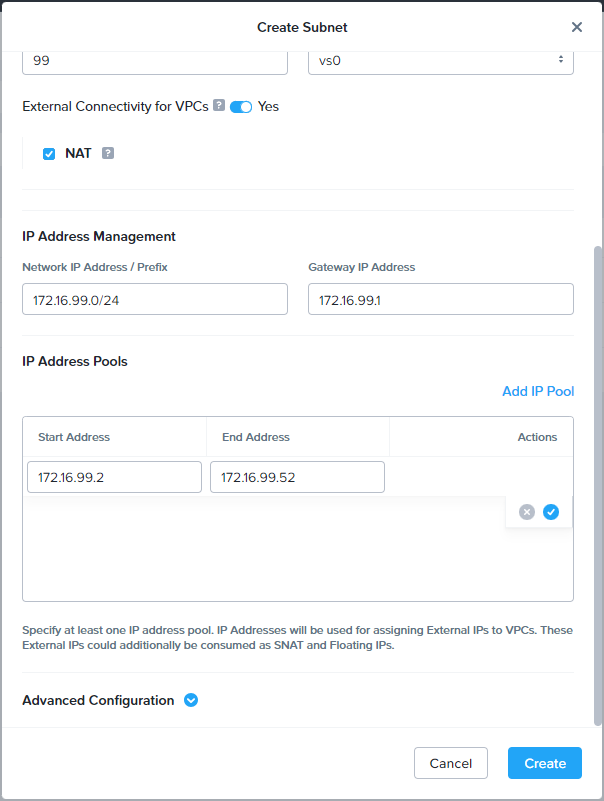
Click Create when done.
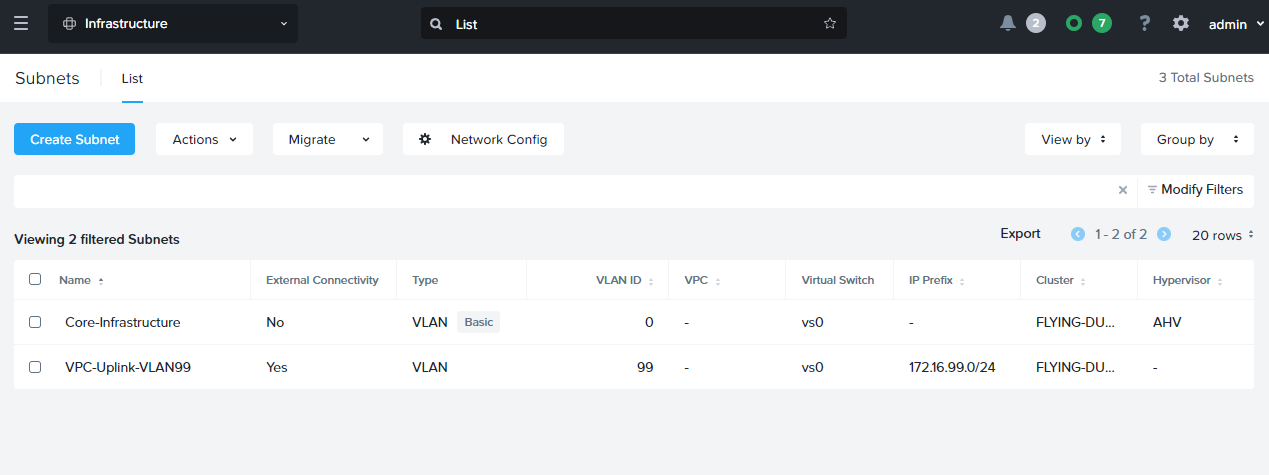
So that is our VPCs to edge firewall gateway VLAN created.
Create VPCs
Right, lets create our VPCs.
From the Prism Central dashboard, expand Networking and Security, select Virtual Private Clouds and Create VPC. Complete the following configuration:
- Name = Globex-VPC
- External Connectivity = Ticked
- External Subnet = VPC-Uplink-VLAN99
- Externally Routable IP Addresses = (blank)
- DNS Server = IP of our DNS server (the edge firewall gateway also provides DNS)
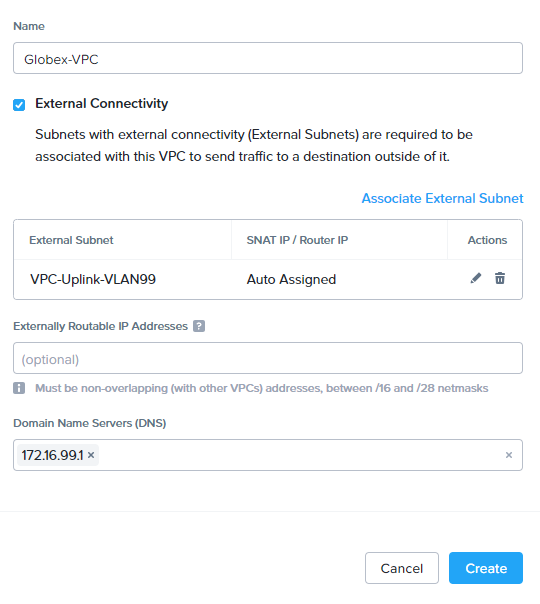
Click Create when done. Repeat for Initech’s VPC:
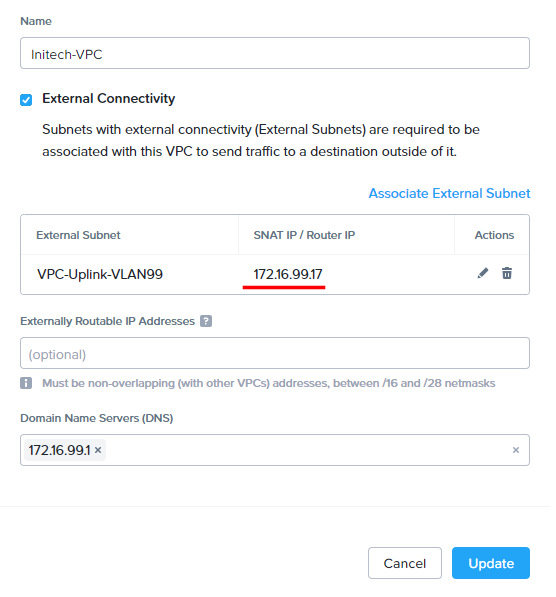
To find the VPC router IP address for either VPC, right click a VPC and choose Update. The source NAT / router address will be listed in the centre of the dialogue box. For example:
VPC Static Route
Next, lets add default static routes to our VPCs. This will direct all outbound traffic from VMs in our VPCs up to the edge firewall gateway.
From the Prism Central dashboard, expand Networking and Security, select Virtual Private Clouds. Select a VPC, select Routes and Manage Static Routes.
Add 0.0.0.0/0 as a Destination Route and select VPC-Uplink-VLAN99 as Next Hop:
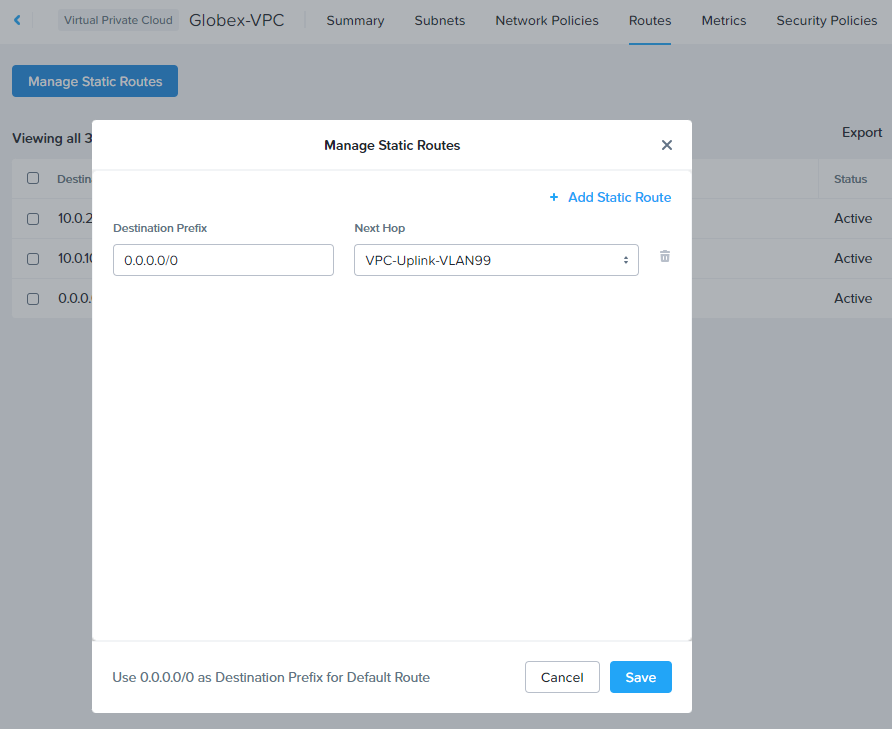
Click Save when done and repeat for the remaining VPC.
Client VM Subnets
Next, let’s create our client subnets “inside our VPCs” for our client VMs to attach to.
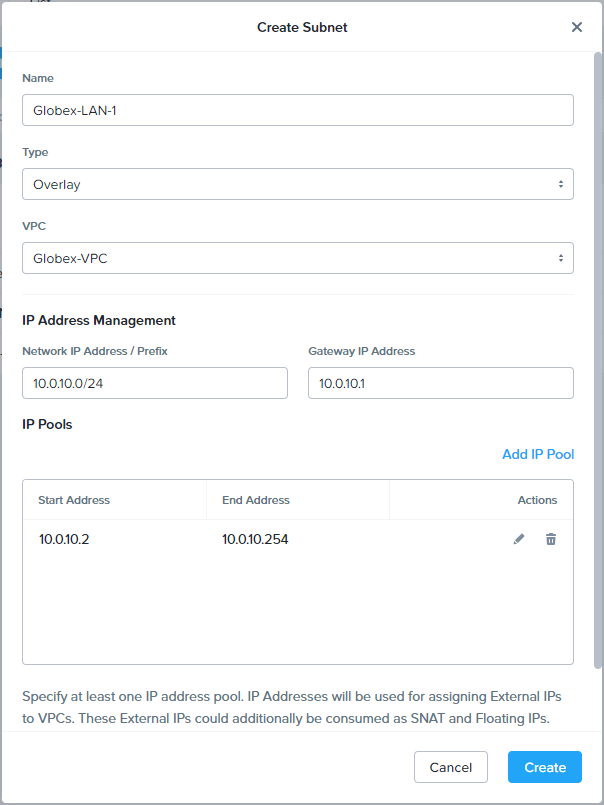
From the Prism Central dashboard, expand Networking and Security, select Subnets and click Create Subnet:
- Name = Client LAN Name
- Type = Overlay
- VPC = Corresponding Client VPC
- IP Address Management = Corresponding subnet details
- IP Pool = Corresponding Client IP pool (may as well use full allocation)
For Globex LAN 1, I’ve used the following settings:
Scroll down and configure domain settings. For the time being, we’ll use the shared DNS server provided by PolarClouds Hosting on the VPC uplink gateway:
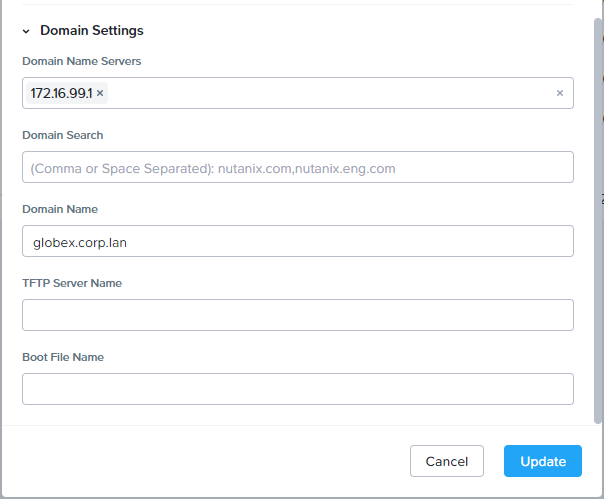
Repeat for the remaining client VM subnets.
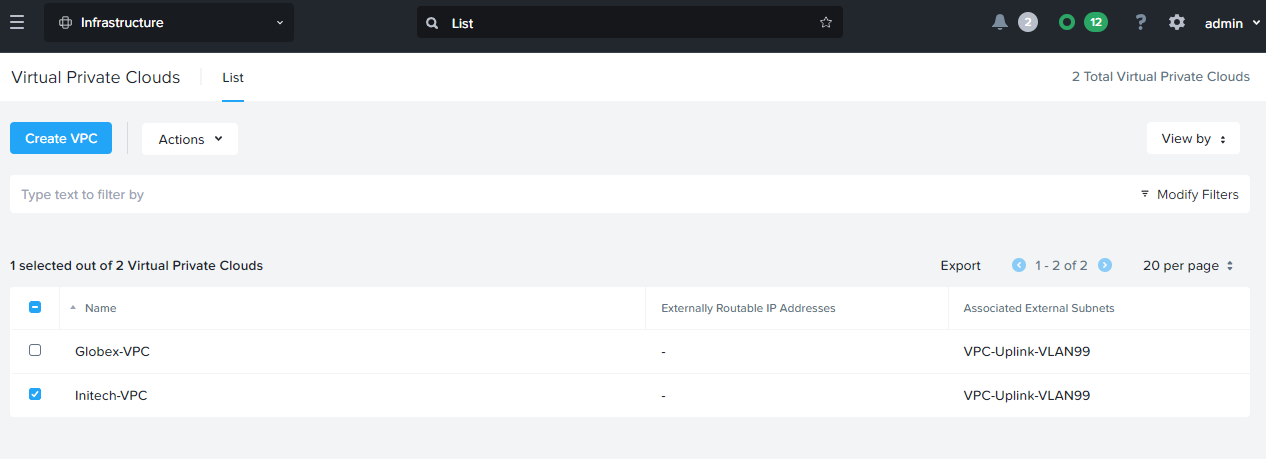
Once complete, the subnet list resembles the following:
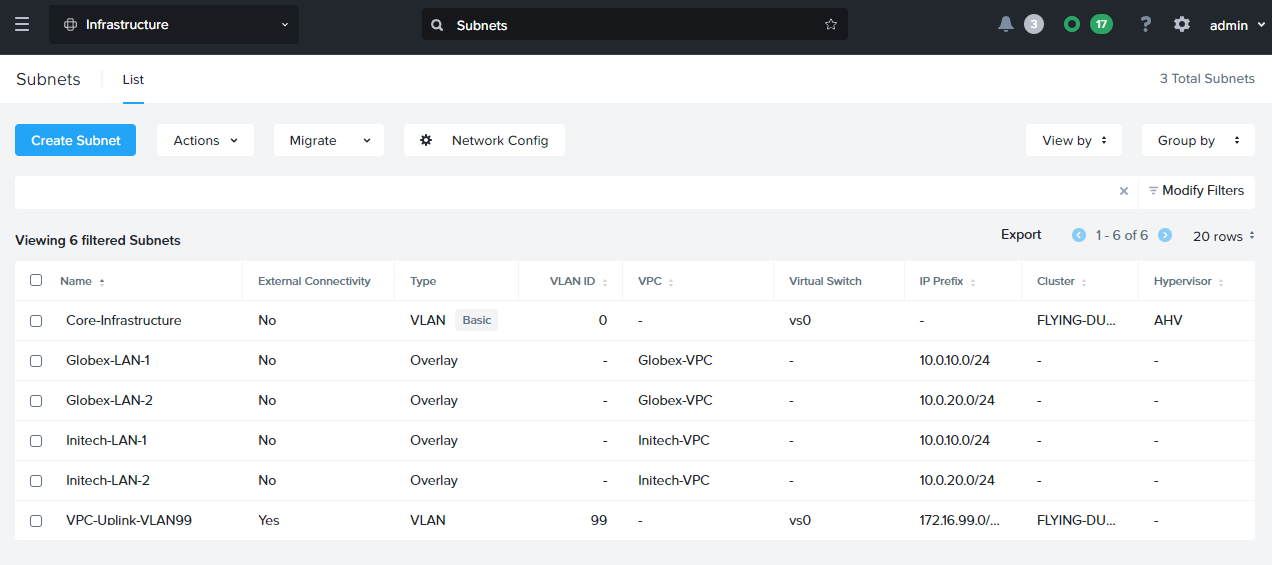
As you can see, we have just six subnets in total:
- One VLAN for Core Infrastructure - Used by Prism Central and the cluster for management
- One shared VLAN for uplink to the edge firewall gateway from the VPCs (VLAN99)
- Two Overlay LANs for use inside the Globex VPC
- Two Overlay LANs for use inside the Initech VPC
Nice and simple!
VM Build Out
So we are ready to deploy some client VMs in to our VPCs.
As we configured IP pools for our client VPC overlay networks, we can use the built in Nutanix DHCP server to control the IP addressing of our VMs connected to our VPC subnets.
Let’s attach a VM into the Globex-LAN-1 subnet, select Assign Static IP and give it an IP of 10.0.10.5:
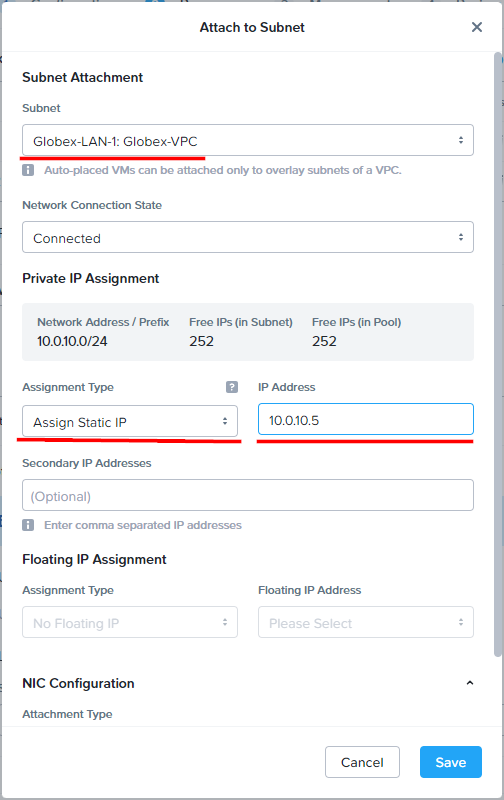
Yes, that’s correct VMware fans, with Nutanix we can configure and manage our VM IP addressing directly from virtualisation management layer; Prism Central in this instance.
No more ‘faffing’ with IP settings at the operating system level inside our VMs.
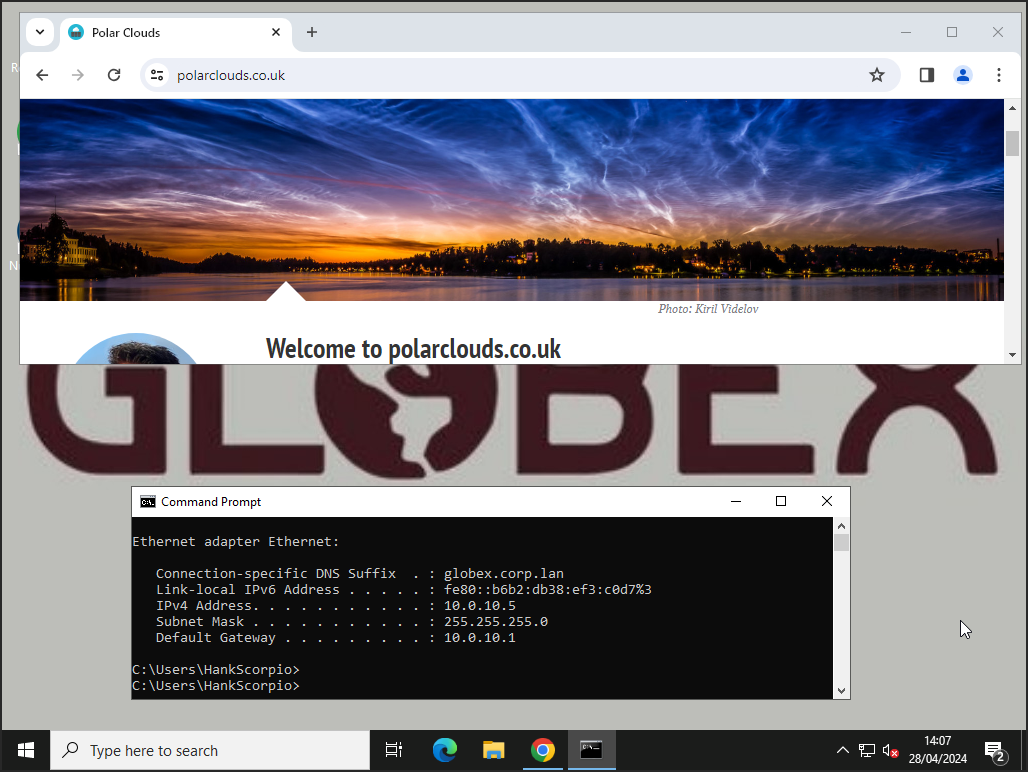
Logging onto the VM deployed in the Globex VPC and double checking it’s IP configuration, all looks good:
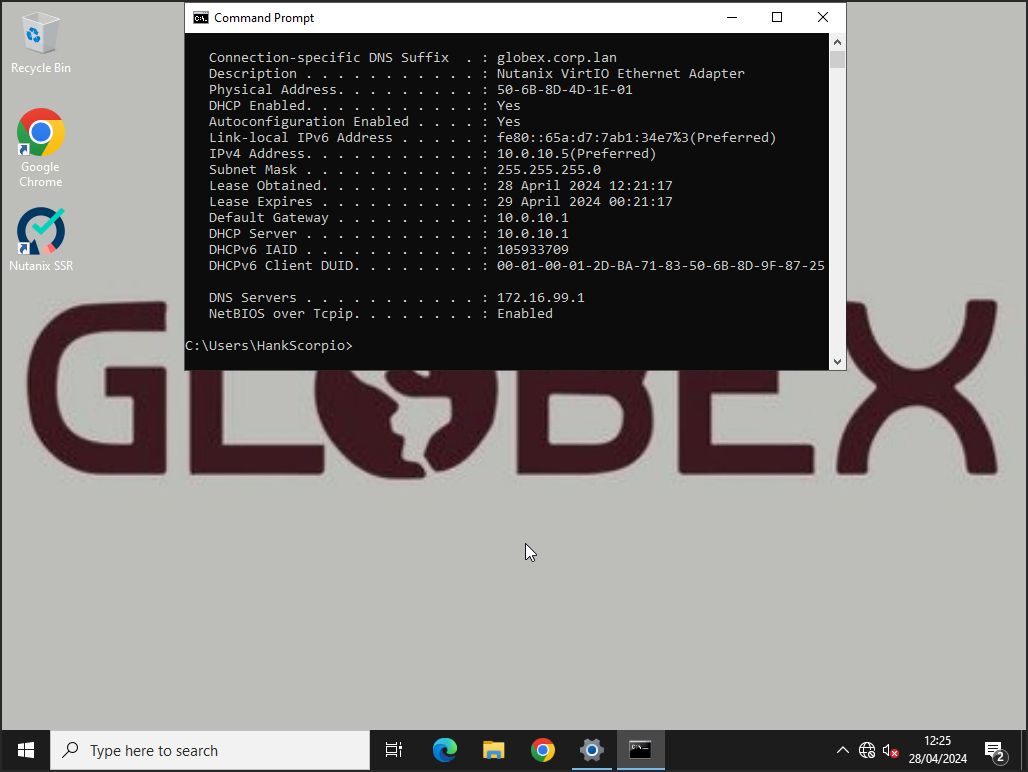
DNS is working as expected too:
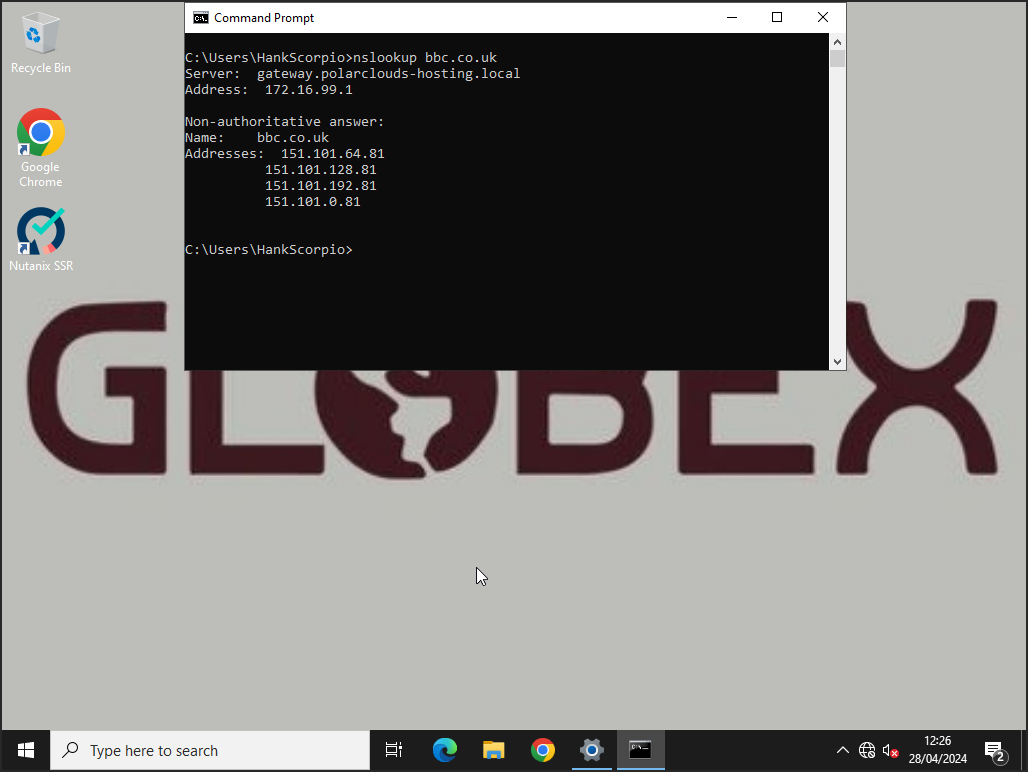
Nice.
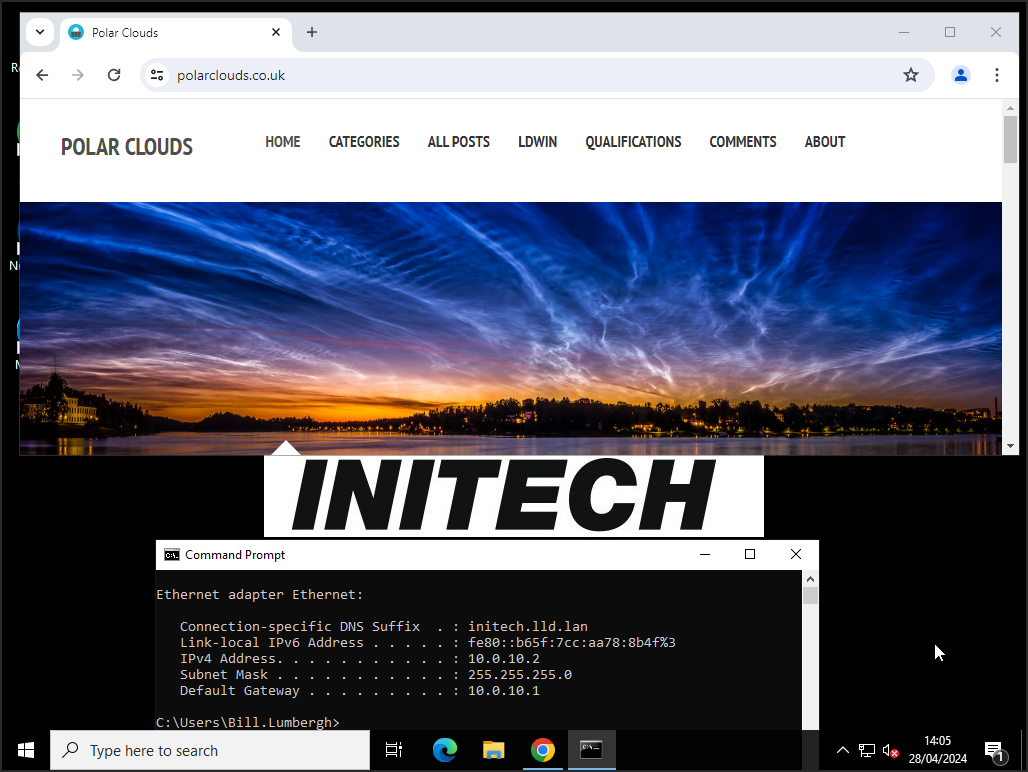
Let’s see how Initech are getting on:
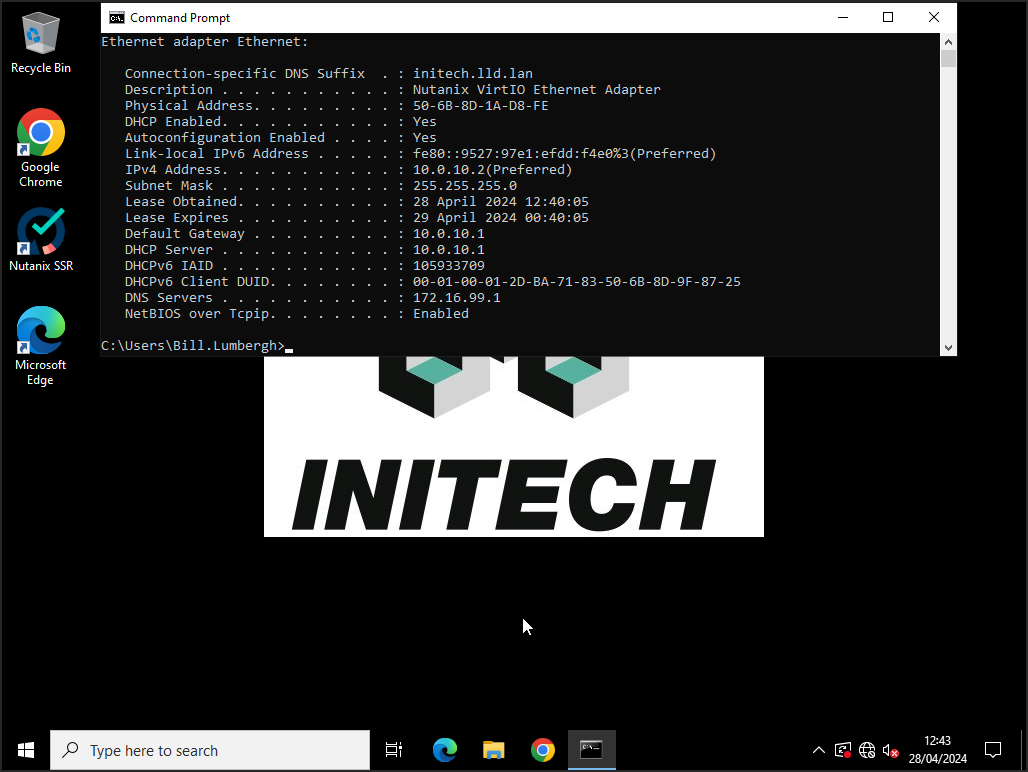
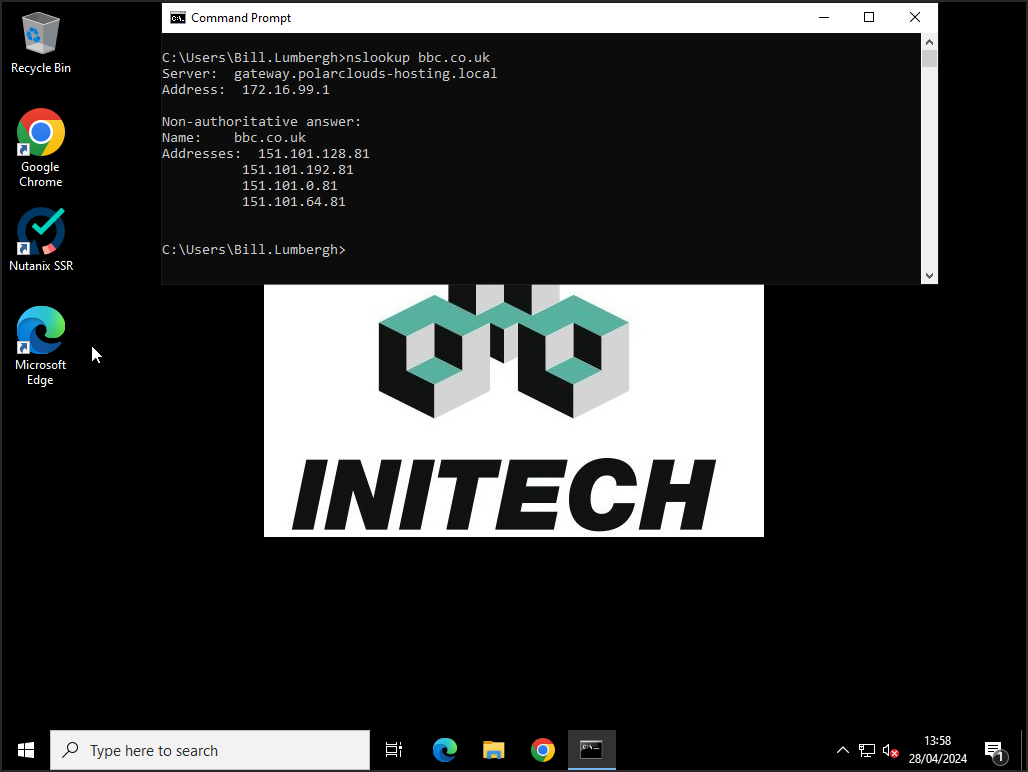
Yep, all good. DNS too:
Internet Access From VPCs
Both tenants can reach the internet without issue:
Looking good.
End of Part 1
That’ll do for the first part of this series.
As seen, above all the object of this post was to create two simple Virtual Private Clouds, one each for our clients Globex and Initech. Again, yes there are more complex, more secure and more disaster tolerant ways of achieving the same thing, however this series is all about simplicity.
After VM build out in the VPCs, even though both clients are using the same IP schema, both can access the internet via the PolarClouds hosting edge firewall gateway without issue.
Next time in part 2, we’ll look at ingress to VMs inside the VPCs for clients to manage their VMs, plus access for web hosting from the VPCs.
Finally, who knew that Hank Scorpio and Bill Lumbergh were such avid readers if this here PolarClouds blog?

Looks like Bill is wanting to make use of his VPC as soon as possible…
Part 2 is now available: Virtual Private Cloud Basics with Nutanix Flow - Part 2.
-Chris