


 Last time we looked at creating two Virtual Private Clouds (VPCs) for both The Globex Corporation and Initech LLD. Click the company links to learn more about each company.
Due to various constraints, neither company requires a “Rolls-Royce” cloud hosting solution. They both require a simple solution based on Nutanix products.
Therefore the following design was settled upon and implemented:
In this post we shall continue from where part 1 left off.
If you missed part 1, or need a refresher, you can find it here: Virtual Private Cloud Basics with Nutanix Flow - Part 1.
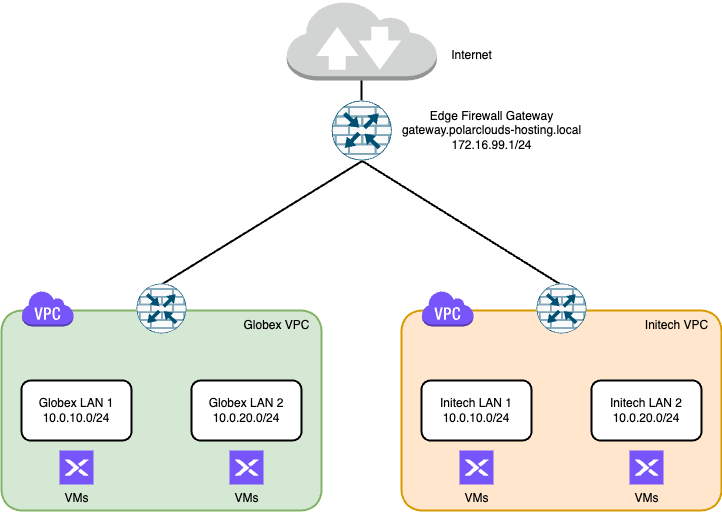
Overview
Client Access To VPCs
OK, as we covered in part 1, the tenant VMs in both VPCs can access the internet without issue. But what happens if either Globex or Initech want to access their tenant VMs via the internet?
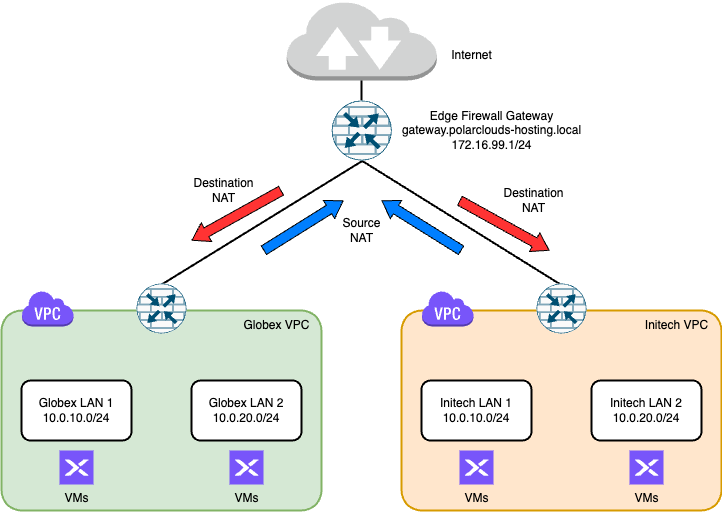
SNAT
So far, each client has been able to access the wider network and the internet from their tenant VMs thanks to their VPC routers performing Network Address Translation (NAT) for the outgoing traffic. Think of your broadband router at home. It translates outgoing traffic from the devices connected to it via WiFi and so on allowing them all to share the one internet connection. The same is happening here.
Confusingly (perhaps) this type of NAT is called Source Network Translation or SNAT for short and is represented in blue in the diagram below:
We can confirm this by double checking the configuration of one of the tenant VPCs. Let’s look at Initech’s VPC:
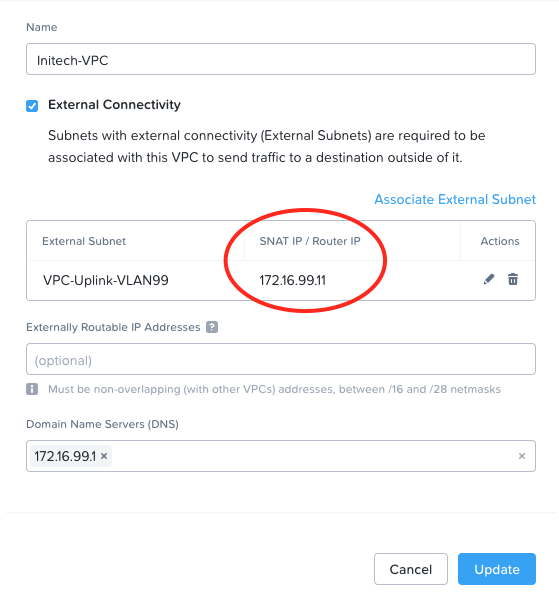
All internet bound traffic coming from tenant VMs in the Initech VPC is being translated (or SNAT’ed) to 172.16.99.11. From there it heads up out the Edge Firewall Gateway to the internet as normal.
DNAT
So that’s outbound traffic taken care of. What happens when we want inbound traffic?
Well, the red arrows in the diagram above have given the game away; we need to implement Destination Network Address Translation or DNAT.
If we can assign a tenant VM an IP address in the 172.16.99.x range, inbound traffic heading in through the Edge Firewall Gateway will be able to access the VM.
Again as simplicity rules in this solution, to allow client access each tenant will make use of their own dedicated Windows jump server, located within their respective VPC. Yes, we could do something more secure like granting client VPN access direct to their respective VPCs, but (again) let’s keep it simple to start with.
Floating IPs
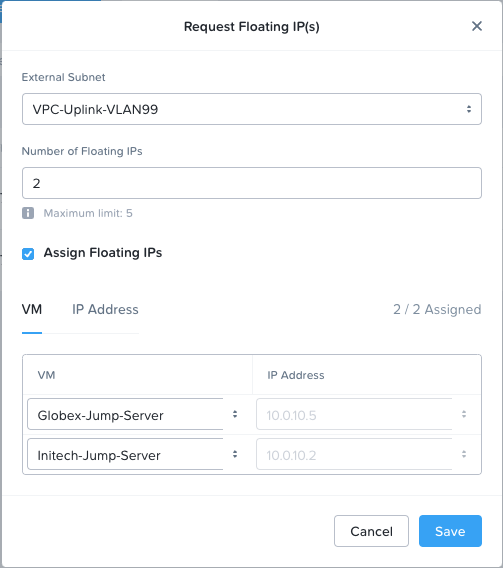
So lets grant each tenant Windows jump server a floating IP address in the VPC uplink subnet. Each client will then be able to VPN to PolarClouds Hosting and open a Windows Remote Desktop (RDP) session to their respective Windows jump server. For brevity of this series, we will leave client VPN connectivity to the Edge firewall gateway to another post. All we are interested in here is how clients access their tenant VMs after they have connectivity to the Edge firewall gateway.
Let’s check for client jump servers present in the VPCs:

One jump server each. That’s just what we wanted. Let’s assign the floating IPs.
From the Prism Central dashboard, expand Networking and Security, select Floating IPs and click Request Floating IP.
Next we’ll select our VPC-Uplink-VLAN99 (the 172.16.99.x subnet), 2 floating IPs and we’ll assign them to our Jump server VMs:
Save when done and let’s see:

OK, so:
- The Globex jump server has been assigned 172.6.99.2
- The Initech jump server has been assigned 172.16.99.13
Perfect.
VPC Segmentation
Here is where the simplicity of the design is going to potentially bite us.
As things stand right now, given that we are using a shared subnet for VPC connectivity (the 172.16.99.x subnet), there is nothing stopping users of tenant VMs in one VPC connecting to the floating IP address of the Windows jump server in the other tenant’s VPC.
For example, Globex users could connect to their jump server at 172.16.99.2 in the normal way, start an remote desktop session and connect to 172.16.99.13 - Initech’s jump server. Not good.
Let’s fix that. For this we will use Flow Network Security (FNS).
From the Prism Central dashboard, expand Networking and Security, select Security Policies and click Enable.
Select Enable Microsegmentation and click Save:
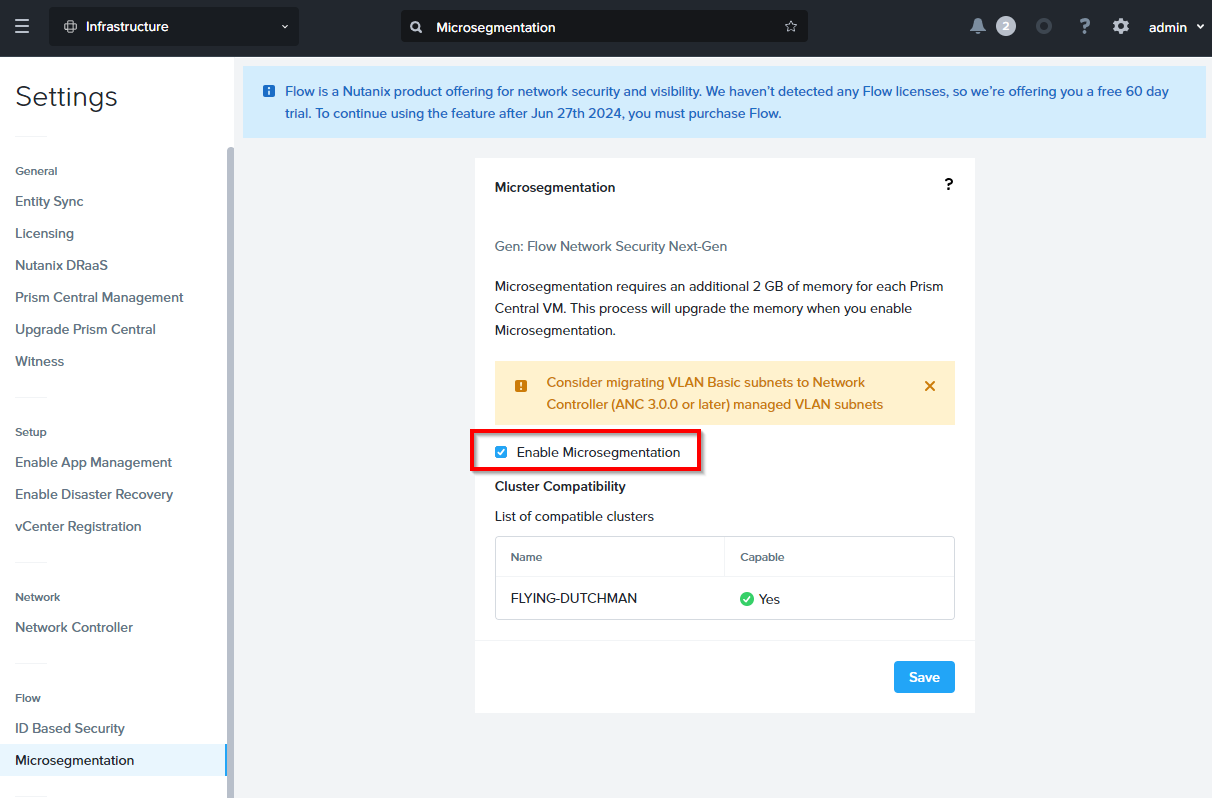
As can be seen, FNS is available free for 60 days.
Categories
In order to apply specific firewall rules to specific VMs or groups of VMs, we can use categories. From the Prism Central dashboard, expand Administration, choose Categories and select New Category.
For the uninitiated, categories can seem very slightly strange at first. Categories consist of two items; name and value. These can be described as follows:
- Category Name = Types of attributes, for example ‘Department’
- Category Value = Instances of attributes, for example ‘HR’ or ‘Finance’
‘HR’ and ‘Finance’ could be described as child attributes belonging to the parent attribute ‘Department’. These categories would be referred to as follows:
- Department:HR
- Department:Finance
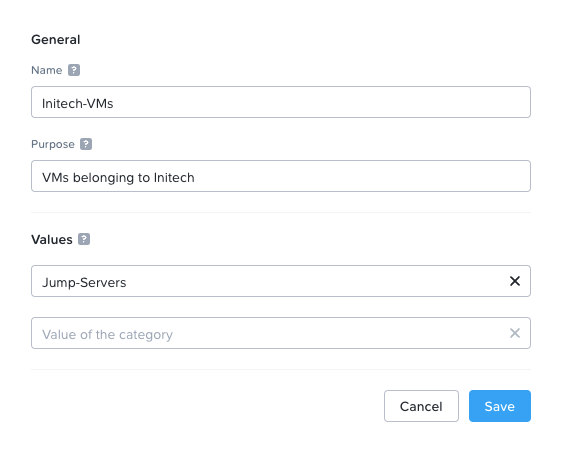
With the above in mind, I’ll create the following Categories:
- Globex-VMs:Jump-Servers
- Initech-VMs:Jump-Servers
Building out the Initech category:
Next, we will assign the client jump server VMs to their respective categories.
From the Prism Central dashboard, expand ACompute and Storage, choose VMs, locate the VM to be assigned a category, right click the VM name and select Manage Categories. Use the search box to locate the correct category. For example:
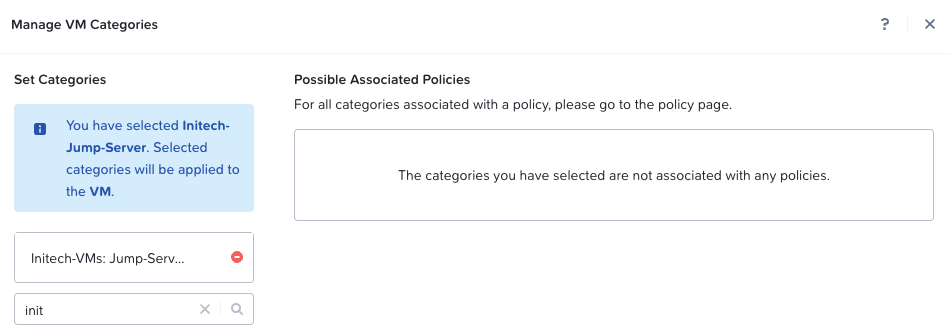
Click Save when done and repeat for the Globex jump server VM, remembering to assign it to the Globex-VMs:Jump-Servers category instead.
Flow Network Security Policies
Whilst I could write a whole post on the FNS security policy model, I’m going to refer you to the relevant section in the FNS documentation instead.
Suffice to say, we are going to create one Application Security Policy for each of our categories containing our jump server VMs. So two policies configured almost exactly the same.
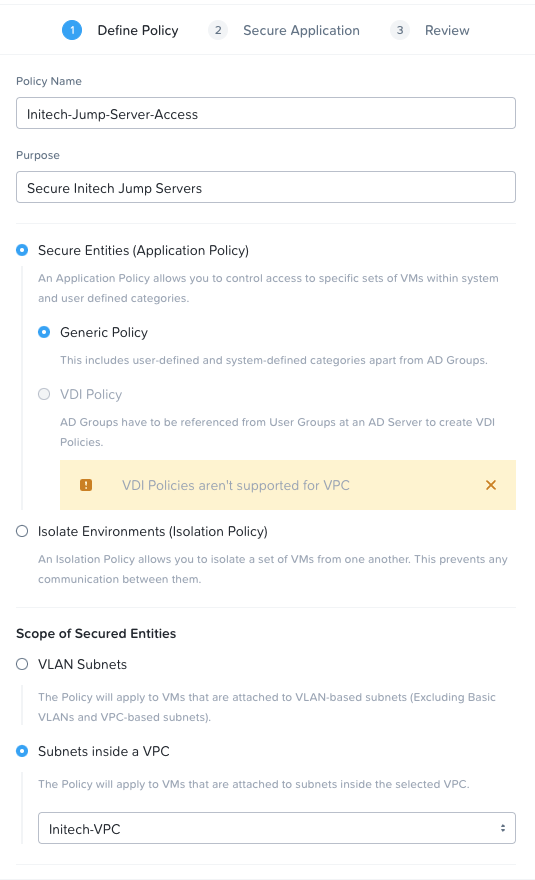
To do this, from the Prism Central dashboard, expand Networking and Security, select Security Policies and click Create Security Policy. Complete the following configuration in step 1:
- Policy Name = Initech-Jump-Server-Access
- Purpose = Secure Initech Jump Servers
- Secure Entities (Application Policy) = Selected, Generic Policy
- Scope of Secured Entities = Subnets inside a VPC, Initech-VPC
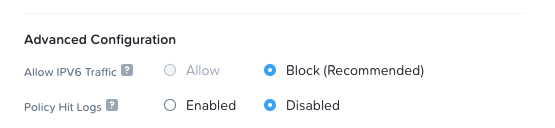
- Allow IPV6 Traffic = Blocked
- Policy Hit Logs = Disabled
Click Next to continue.
In step 2, we define allowed inbound traffic to our secured entities and allowed outbound traffic from our secured entities.
As Initech will be using an inbound VPN connection terminating at the hosting gateway, we know that their incoming VPN range is 10.20.1.0/24. We will use this as our source Subnet/IP. We will only allow RDP traffic (TCP and UDP Port 3389).
Our Secured Entity will be our Initech-VMs:Jump-Servers category.
Initially we will allow outbound traffic to All Destinations, which when built into the configuration resembles the following:
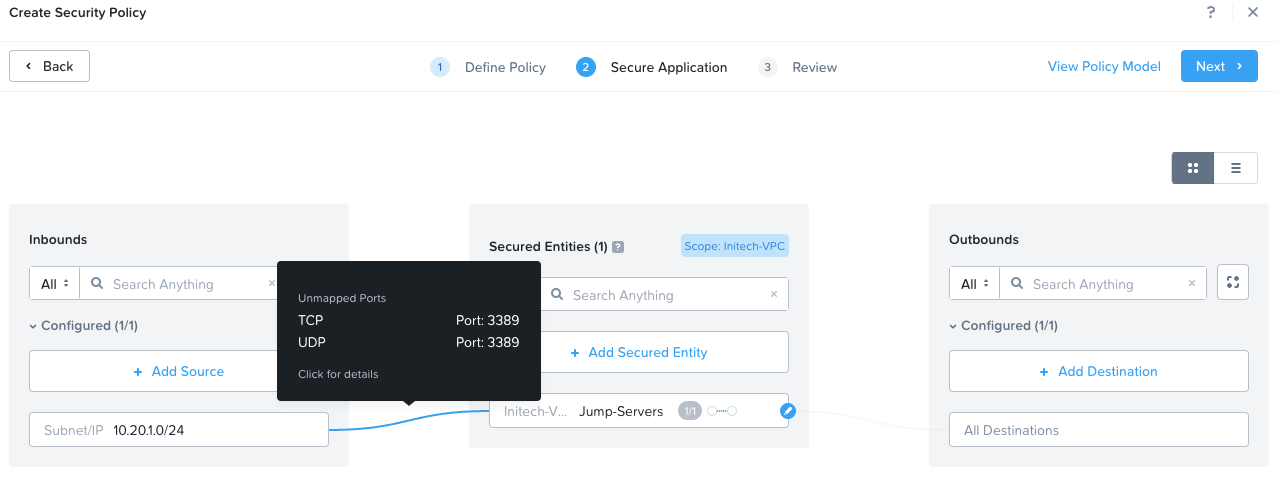

Click Next to continue.
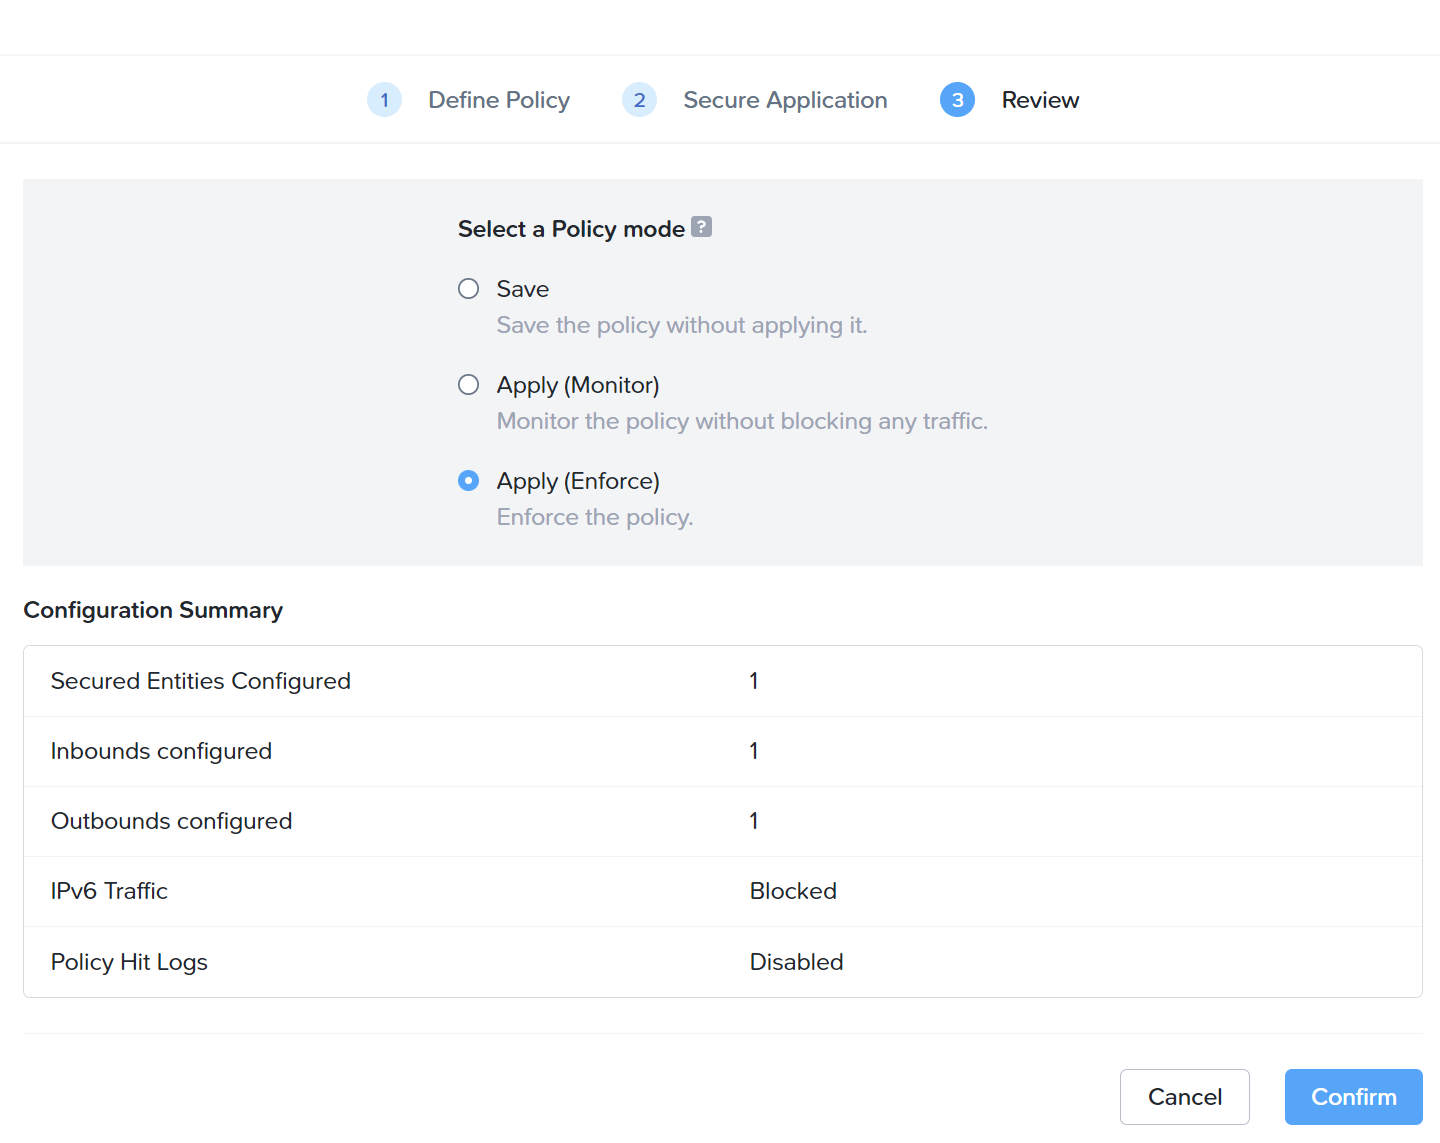
Set the policy to Apply (Enforce) and click Confirm to complete.
How about a video showing the end to end process? Why of course! (this video has no audio):
Simple.
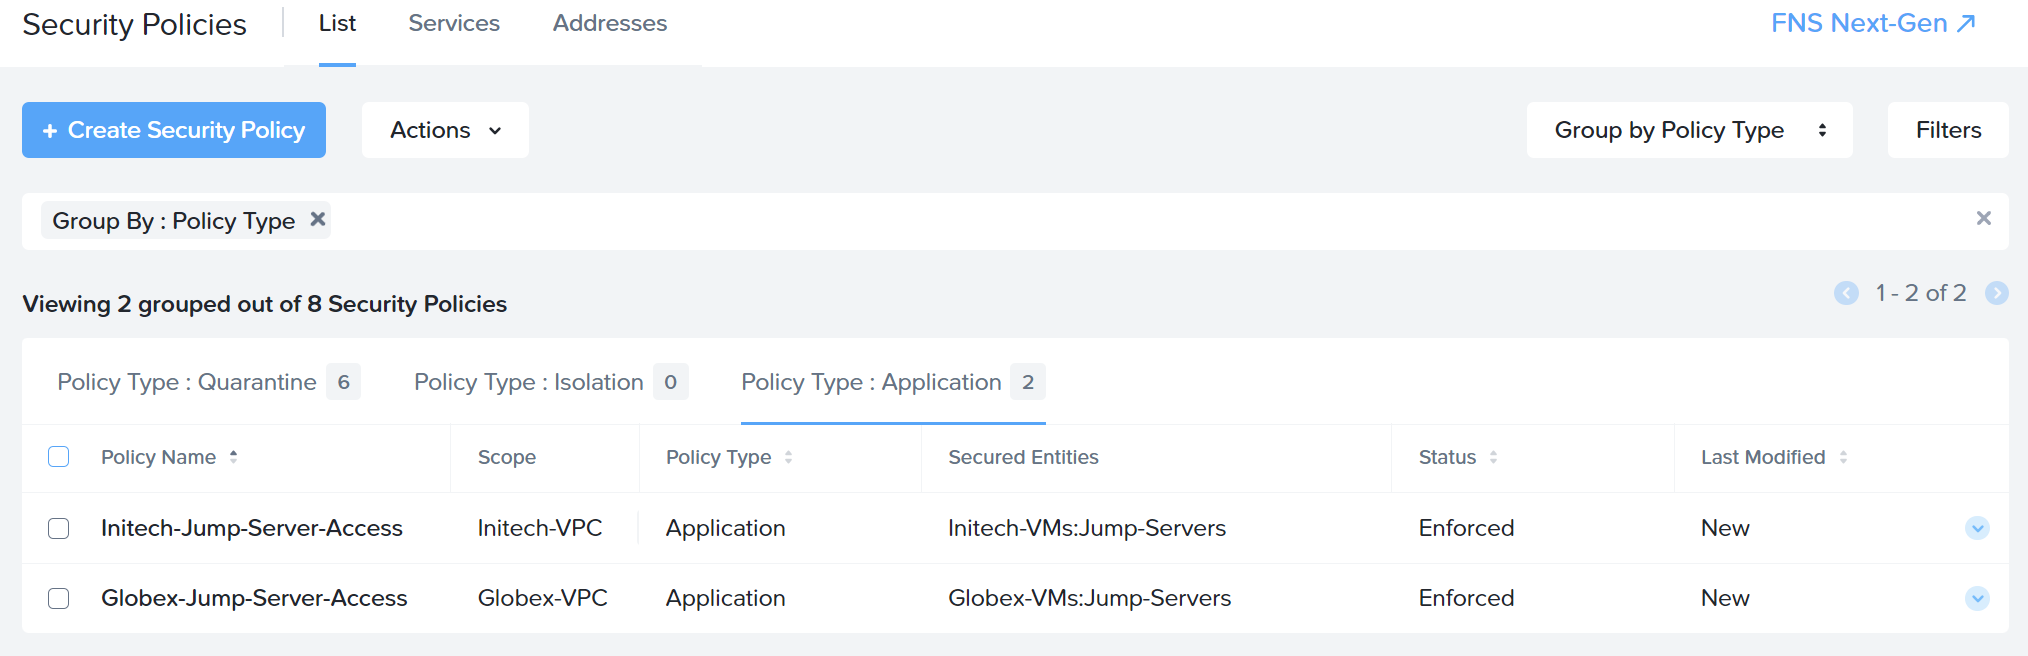
After creating the equivalent policy for Globex, remembering that Globex’s incoming VPN range is 10.30.1.0/24 and that we wish to secure the category Globex-VMs:Jump-Servers, the final jump server security policy list resembles the following:
Let’s test:
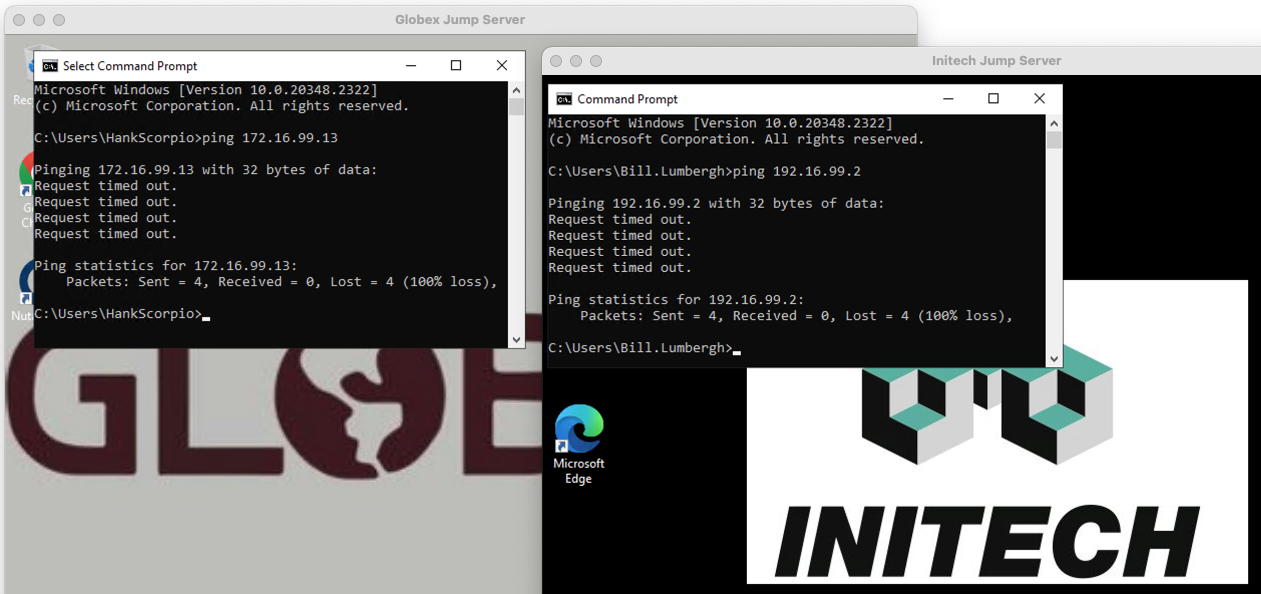
Yep, neither tenant can access the other via the 172.16.99.x subnet. Crisis averted.
Web Hosting
Perhaps unsurprisingly both tenants would like to host websites from the respective VPCs. To achieve this both tenants have deployed their own web servers into their VPCs. Let’s check:
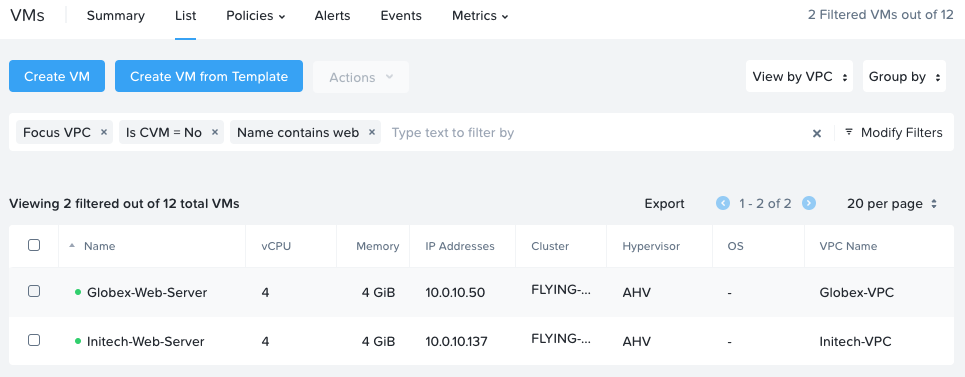
Two web servers, one per tenant:
- The Globex web server has a VPC IP address of 10.0.10.50
- The Initech web server has a VPC IP address of 10.0.10.137
Perfect. As both tenants want their web servers externally accessible, this time to the whole internet, these VMs will also require (you guessed it) floating IPs addresses.
After assigning:
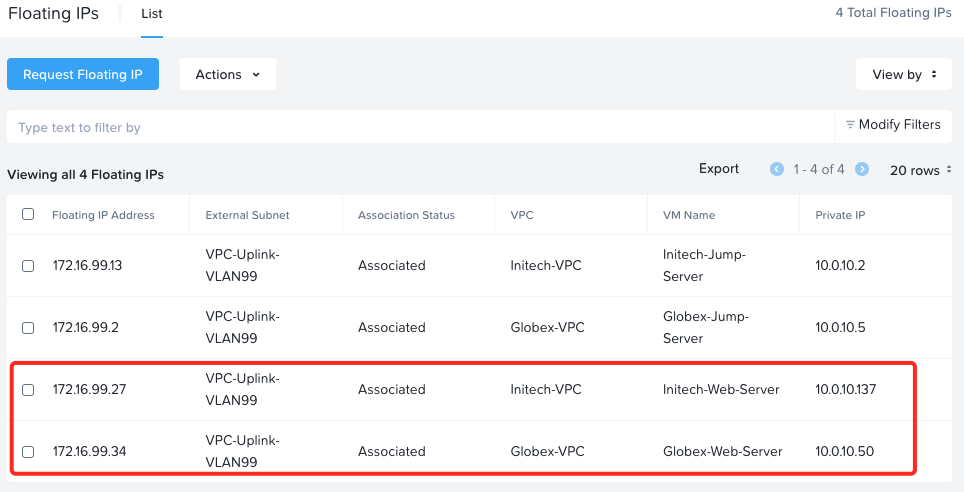
- The Initech web server has a DNAT / floating IP of 172.16.99.27
- The Globex web server has a DNAT / floating IP of 172.16.99.34
Next, let’s assign both web servers to categories so that we can apply some security policies (firewall rules) to them. First we need to add the Web-Servers category value to the Globex-VMs category name:
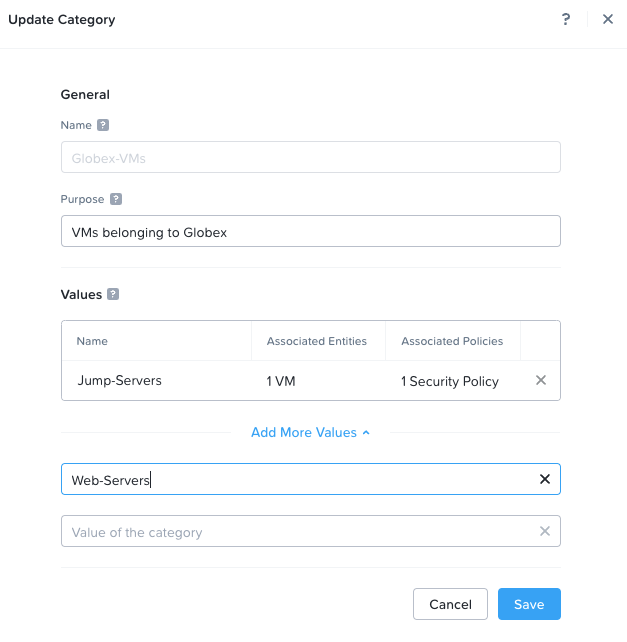
Repeat for Initech. Don’t forget to assign the web servers to their categories, as we did above with the jump servers to their categories.
Back in Security Polices, we shall create another application security policy, this time using the slightly more traditional policy interface.
Inbound rules, allowing access from the Initech jump server on RDP ports (TCP port 3389 and UDP port 3389) and web access from all on TCP port 80:
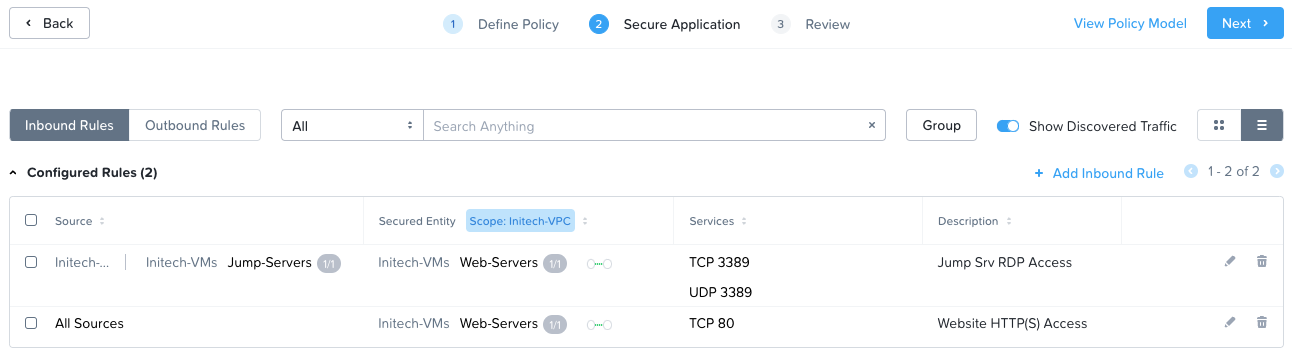
Outbound rules:

Save and enforce the rules as shown previously.
Moment of truth… Testing web access from a Mac connected to the network between the Firewall gateway router and the internet:
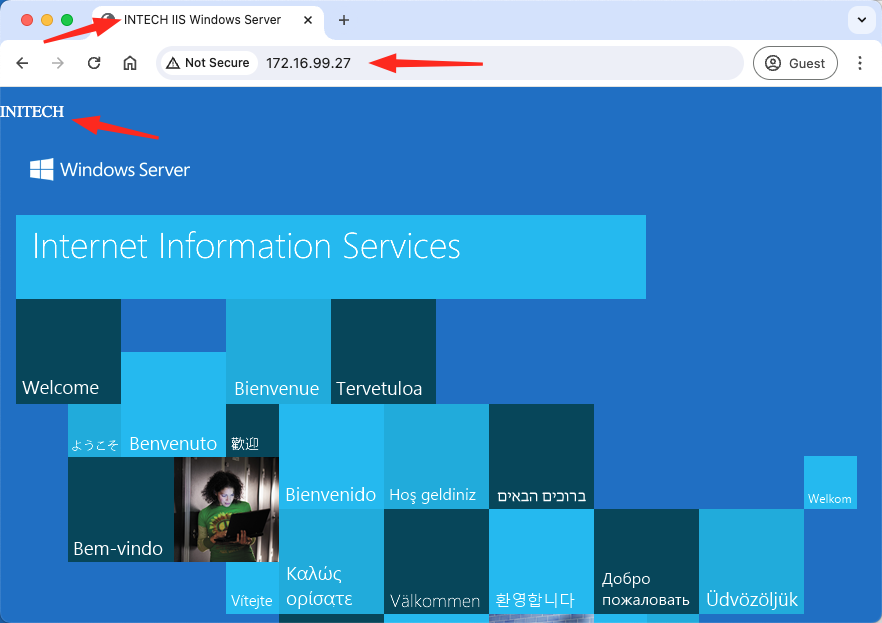
BOOM! Working nicely!
After implementing the policy for the Globex Web Server, and testing:
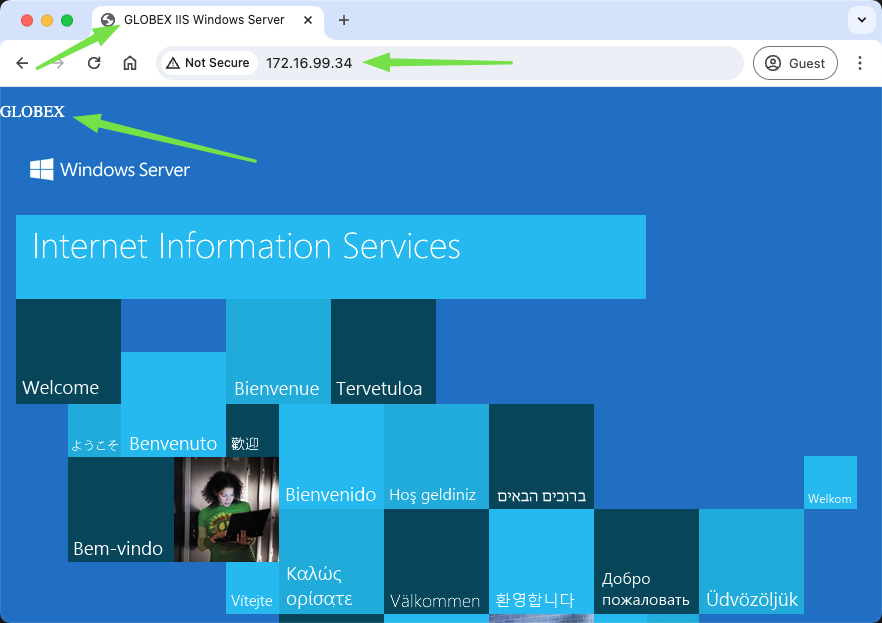
DOUBLE BOOM! Globex website is available to the internet too.
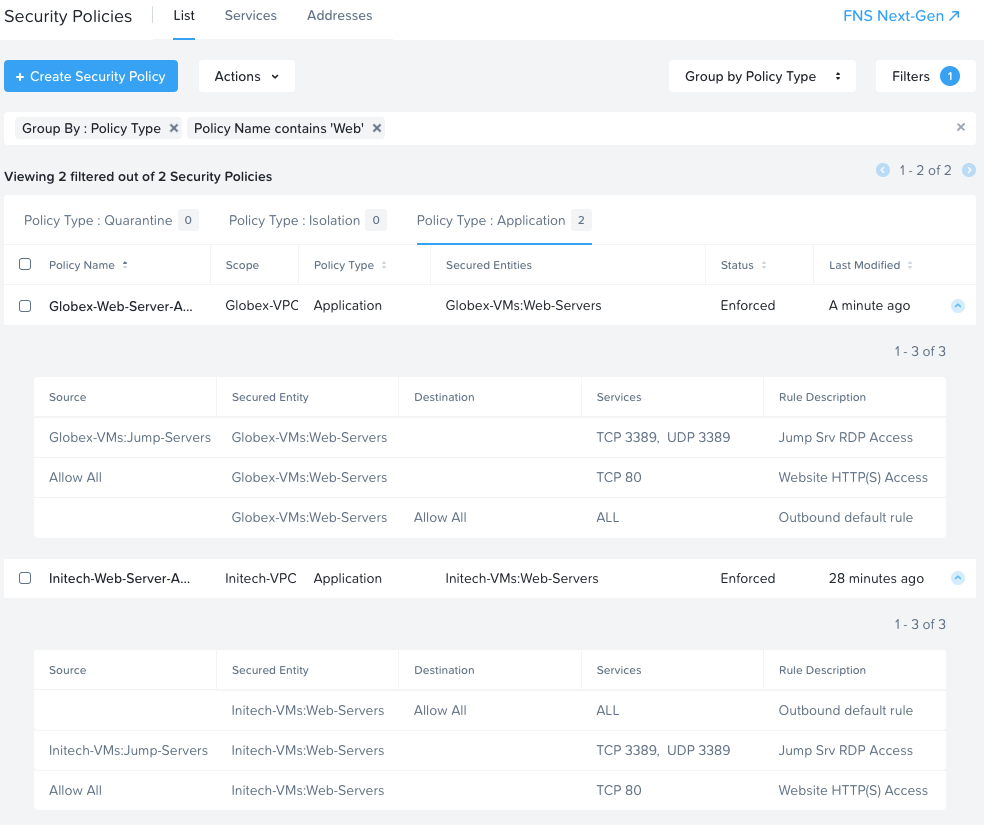
For completeness, here is a screenshot of both completed web server access policies:
Conclusion and Wrap Up
Congratulations, you made it to the end of the series!
So what did we achieve here?
Well, over the course of this and the previous post we designed, implemented, secured and tested Virtual Private Clouds for our two fictional clients the Globex Corp and Initech LLC.
Given the goals set out in at the beginning of part 1 - a simple solution based on Nutanix products - we 100% delivered.
Sure, we almost came unstuck when it came to client traffic segregation with incoming traffic and the use of a single VLAN for VPC connectivity to the gateway, but with some simple security polices that crisis was averted.
All that remains is to check back with one of our clients:

Yep, I think he’s happy!
This post was part 2 of a 2 series. Here is part 1: Let’s Start Simple. That would be Great!
-Chris