


 With the demise of the free edition of VMware ESXi as per VMware KB2107518, what better time to give the free Nutanix Community Edition a test drive instead?
When Community Edition was being developed, certain choices were made to ensure Community Edition (CE) compatibility with the widest range of hardware possible, one of which was the virtualisation of the storage controller - also known as a Host Bus Adapter (HBA) - by the hypervisor, in CE’s case Nutanix AHV.
The downside of this compatibility choice is CE’s storage I/O is not as performant as the enterprise versions of Nutanix AOS. This post attempts to address that difference and (when using the correct hardware) reconfigure CE to match the storage performance its enterprise sibling.
Overview
Quick Refresher
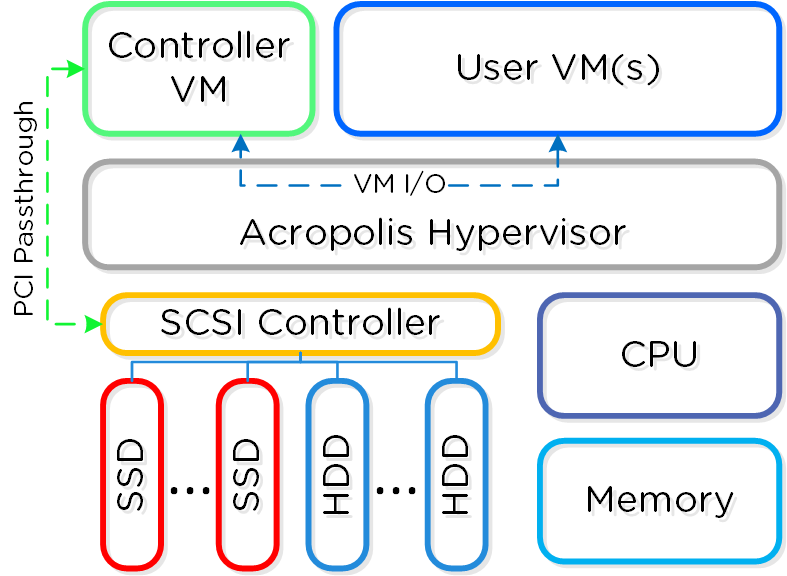
As discussed in a previous post, Nutanix AOS employs a Control VM (CVM) to manage the operation of a cluster. Every node (aka host in VMware parlance) in a Nutanix cluster houses and runs a CVM.
Along with cluster management, configuration and other duties, the CVM directly manages the local storage contained in the node that it is running on. In the enterprise version of AOS it is able to do this via PCI passthrough of the storage controller to the CVM:
Find out more at the Nutanix Bible Book of Basics.
Hardware Requirements
OK, so how do we go about this? First off, we need to ensure that our CE node is using different storage controllers for its hypervisor boot and its user VM storage.
Hypervisor Boot Storage
This can be any type of storage. As discussed in the Recommended Community Edition Hardware documentation:
One 32 GB capacity device per node. It can be an external (such as USB flash drive) or internal device (such as SATA DOM, M.2 SSD or SATA SSD/HDD).
Nutanix has successfully tested and used external USB drives and internal devices such as a SATA DOM with AHV. Drives with high I/O speed and reliability are recommended. Note: Nutanix recommends to use USB 3.0 drives or higher to avoid hypervisor imaging timed out issues.
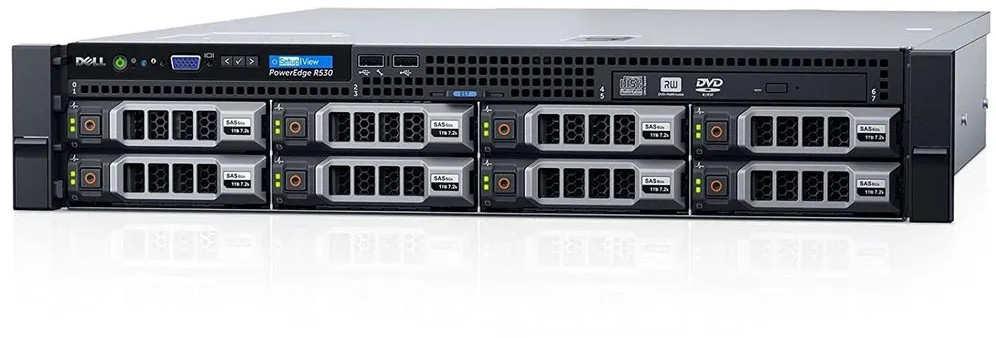
In my case, I’m using a Dell PowerEdge R530:
With an adapter fitted in the DVD ROM slot which in turn contains a SATA SSD:

For my hypervisor boot; the server boots from a 120GB SSD drive fitted into to the adapter.
User VM Storage
My Dell R530 was supplied with a PERC H730 HBA adapter. This adapter manages the drives fitted into the eight drive trays in the front of the R530:
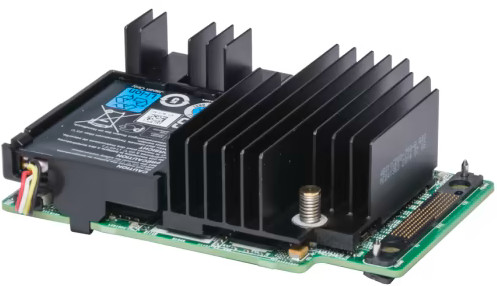
I have configured this adapter to HBA mode as shown in this Dell Enterprise YouTube video.
Community Edition Installation
I’ve covered CE installation previously, so I won’t cover it again here, suffice to say double check that the drive you select for your hypervisor boot [H] is not a drive connected to the HBA you wish to passthrough to the CVM. In my case I selected my 120GB SATA fitted to my DVD ROM adapter.
HBA Passthrough Configuration - Information Gathering
With all of the above preamble out of the way, hardware correctly configured, CE installed and updated, lets get to it!
VT-d Extensions
Firstly we need to ensure that our server BIOS and CE install are ready to pass PCI devices through to our CVM. Luckily for us this can be checked and confirmed with two commands.
After opening an SSH session to the AHV hypervisor, elevate to root and run the following command:
[root@AHV ~]# dmesg | grep 'Virtualization Technology'Running the command on my server, I can see that VT-d is enabled (if VT-d was not enabled, no text would be returned):

Finally, let’s confirm that the Nutanix kernel has VT-d enabled :
[root@AHV ~]# grep intel_iommu /boot/grub2/grub.cfgYep, as part of the default AHV hypervisor boot parameters intel_iommu=on is enabled:

Finding the HBA to Passthrough
Next we need to locate the HBA that we plan to pass though to our CVM. I happen to know that the Dell PERC H730 is hased on an LSI chipset and in so being is identified in Linux as a MegaRAID card. The HBA you plan to pass though to your CVM might be different. If it is, simply omit the grep MegaRAID from the following command:
[root@AHV ~]# lspci -vv | grep MegaRAID
The numbers at the beginning of the above represent the PCI bus ID of the HBA. From the screenshot you can see that my HBA is at PCI ID 01:00.0. Plumbing the PCI ID into virsh to obtain more information on the HBA:
[root@AHV ~]# virsh nodedev-dumpxml pci_0000_01_00_0
Yep, virsh is listing that ID as the MegaRAID card. Make a note of the <address domain='0x0000' bus='0x01' slot='0x00' function='0x0'/> information returned (yours may be different) as we will need this later.
HBA Passthrough Configuration - Making Changes
Shutdown VMs
First off we need to shutdown all the VMs running on our node, including the CVM.
Once all other VMs are shut down, open an SSH session to the CVM and issue the following command to cleanly shutdown and power off the CVM:
nutanix@CVM:~$ cvm_shutdown -PDetach HBA from AHV
Next, we need to tell AHV to relinquish use of the HBA. This is done via an SSH session to the AHV hypervisor:
[root@AHV ~]# virsh nodedev-detach pci_0000_01_00_0If the above command is successful, the hypervisor will return nothing. No errors or confirmation.
Attach HBA to CVM
As a get out of jail card, should things go wrong or if we want to go back to the original configuration at a later date, let’s find and backup our CVM configuration first (replace the X’s with the details of your CVM):
[root@AHV ~]# virsh list --all
[root@AHV ~]# virsh dumpxml NTNX-XXXXXX-CVM > /root/NTNX-XXXXXX-CVM-ORIG.xml
Next, let’s edit the CVM VM configuration (again, replace the X’s with the details of your CVM):
[root@AHV ~]# virsh edit NTNX-XXXXXX-CVMThe VM configuration editor is based on vi, so for those unfamiliar with vi - Basic vi Commands.
In the VM configuration, we need to delete all references to the disks connected to the HBA we will passthrough. I my case, I have three Samsung SSDs connected to my Dell PERC H730, I need to completely delete these three sections from the CVM config:
 <disk type='block' device='disk'>
      <driver name='qemu' type='raw' cache='none' io='native'/>
      <source dev='/dev/disk/by-id/ata-SAMSUNG_MZ7LH1T9HMLT-00005_XXXXXXXXXXXXXX'/>
      <backingStore/>
      <target dev='sda' bus='scsi'/>
      <serial>SXXXXXXXXXXXXXX</serial>
      <wwn>XXXXXXXXXXXXXX</wwn>
      <vendor>ATA</vendor>
      <product>SAMSUNG MZ7LH1T9</product>
      <address type='drive' controller='0' bus='0' target='0' unit='0'/>
    </disk>
    <disk type='block' device='disk'>
      <driver name='qemu' type='raw' cache='none' io='native'/>
      <source dev='/dev/disk/by-id/ata-SAMSUNG_MZ7LH1T9HMLT-00005_XXXXXXXXXXXXXX'/>
      <backingStore/>
      <target dev='sdb' bus='scsi'/>
      <serial>XXXXXXXXXXXXXX</serial>
      <wwn>XXXXXXXXXXXXXX</wwn>
      <vendor>ATA</vendor>
      <product>SAMSUNG MZ7LH1T9</product>
      <address type='drive' controller='0' bus='0' target='0' unit='1'/>
    </disk>
    <disk type='block' device='disk'>
      <driver name='qemu' type='raw' cache='none' io='native'/>
      <source dev='/dev/disk/by-id/ata-SAMSUNG_MZ7LH1T9HMLT-00005_XXXXXXXXXXXXXX'/>
      <backingStore/>
      <target dev='sdc' bus='scsi'/>
      <serial>XXXXXXXXXXXXXX</serial>
      <wwn>XXXXXXXXXXXXXX</wwn>
      <vendor>ATA</vendor>
      <product>SAMSUNG MZ7LH1T9</product>
      <address type='drive' controller='0' bus='0' target='0' unit='2'/>
    </disk>
Next, remove the virtual SCSI adapter from the CVM configuration too. I deleted the following section:
    <controller type='scsi' index='0' model='virtio-scsi'>
      <address type='pci' domain='0x0000' bus='0x00' slot='0x06' function='0x0'/>
    </controller>
Finally, add the details of the HBA into CVM config. A good place to add this is where we deleted the above controller section.
The <address domain='0x0000' bus='0x01' slot='0x00' function='0x0'/> information was obtained when we ran the virsh nodedev-dumpxml pci_0000_01_00_0 command previously.
The config I added to my CVM resembled the following:
<hostdev mode='subsystem' type='pci' managed='yes'>
<source> <address domain='0x0000' bus='0x01' slot='0x00' function='0x0'/>
</source>
</hostdev>
With all changes complete, save the config and exit the VM editor.
Fire in the Hole!
Start the CVM
With all changes done, there is nothing else left to do than to do the do. Let’s start the CVM (again, replace the X’s with the details of your CVM):
[root@AHV ~]# virsh start NTNX-XXXXXX-CVMYou should receive the comforting confirmation the the CVM started OK.

If you do run into issues and need to restore yor CVM from the backup we took earlier, use the following commands (again, replace the X’s with the details of your CVM):
[root@AHV ~]# virsh undefine NTNX-XXXXXX-CVM
[root@AHV ~]# virsh define --file  /root/NTNX-XXXXXX-CVM-ORIG.xml
After the CVM has booted and with a bit of luck you should be able to ping your CVM after a couple of minutes.
Checking CVM HBAs
Right, we’ve updated our CVM config and our CVM boots. So far, so good. Let’s check to see if it is using our HBA. Open a SSH session to the CVM and check it’s PCI devices using lspci:
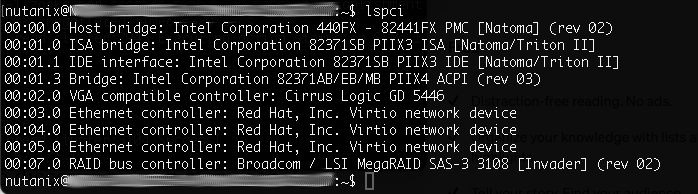
As a belt and braces move, lets see what disks our CVM can see via the passed through HBA using the list_disks command in the CVM:
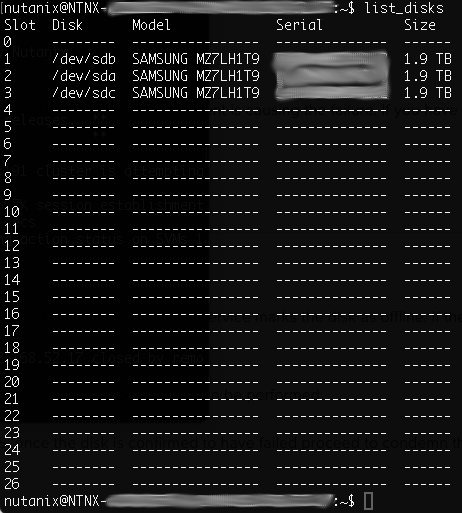
 NICE!
NICE!
Set CVM to Auto Start
Finally, finally, to ensure that the CVM auto starts next time we start the node, back in the SSH session to the hypervisor, run the following command (again, replace the X’s with the details of your CVM):
[root@AHV ~]# virsh autostart NTNX-XXXXXX-CVMConclusion, Wrap Up and Further Reading
With that done, we now have a Community Edition installation with storage performance equivalent to that of an enterprise installation. Nice.
In this post we took advantage of the fact that Nutanix AOS runs Linux Kernel Virtual Machine (KVM) under the covers as it’s virtualisation engine. From there we used some generic KVM knowledge to find pass our HBA through to the VM that manages all the storage in our Nutanix node; the CVM.
Some further reading:
- A LinuxQuestions Thread that proved invaluable when trying this for the first time and ultimately putting this post together
- Nutanix KB 7154: CVM might not boot after hardware replacement due to PCI re-numbering on AHV discusses editing the CVM config with respect to HBA passthrough
- Nutanix KB 1113: HDD, SSD, and HBA troubleshooting
A Quick Word on Hardware Compatibility and Support
Nutanix hardware compatibility is detailed in Supported Hardware Platforms and Public Clouds. The whole ethos behind CE is that support comes from the community as per the CE documentation.
Is this level of modification supported? No, but I’m happy to run my CE install with a config that matches that seen in Nutanix enterprise deployments and enjoy the performance boost.
Want to see the numbers behind the boost? Take a look at my post Testing Nutanix Community Edition HBA Passthrough.
Until next time…
-Chris