


 Last time we looked at addressing the storage performance difference between Nutanix Community Edition (CE) and it’s enterprise sibling.
We were able to make changes to our Community Edition lab environment to successfully use PCI Passthrough to pass our node’s storage controller, also known as a Host Bus Adapter (HBA), through to our node’s CVM.
If you have not had a chance to read through that post yet, what’s stopping you? It is available here and is a great read! ![]() This post builds upon that post and puts some numbers around the performance increase achieved by implementing the changes described.
This post builds upon that post and puts some numbers around the performance increase achieved by implementing the changes described.
Overview
Introducing Nutanix X-Ray
X-Ray is a freely available automated testing framework and benchmarking application for enterprise-grade datacenters. The X-Ray application is a downloadable virtual machine (VM) with a user interface and documentation. After installing X-Ray, you can test and analyze several systems and report comparable information.
X-Ray provides test scenarios for hyperconverged platforms that demonstrate variations in areas such as performance, data integrity, and availability. X-Ray supports clusters of virtually any size. X-Ray runs one test scenario per target at a time.
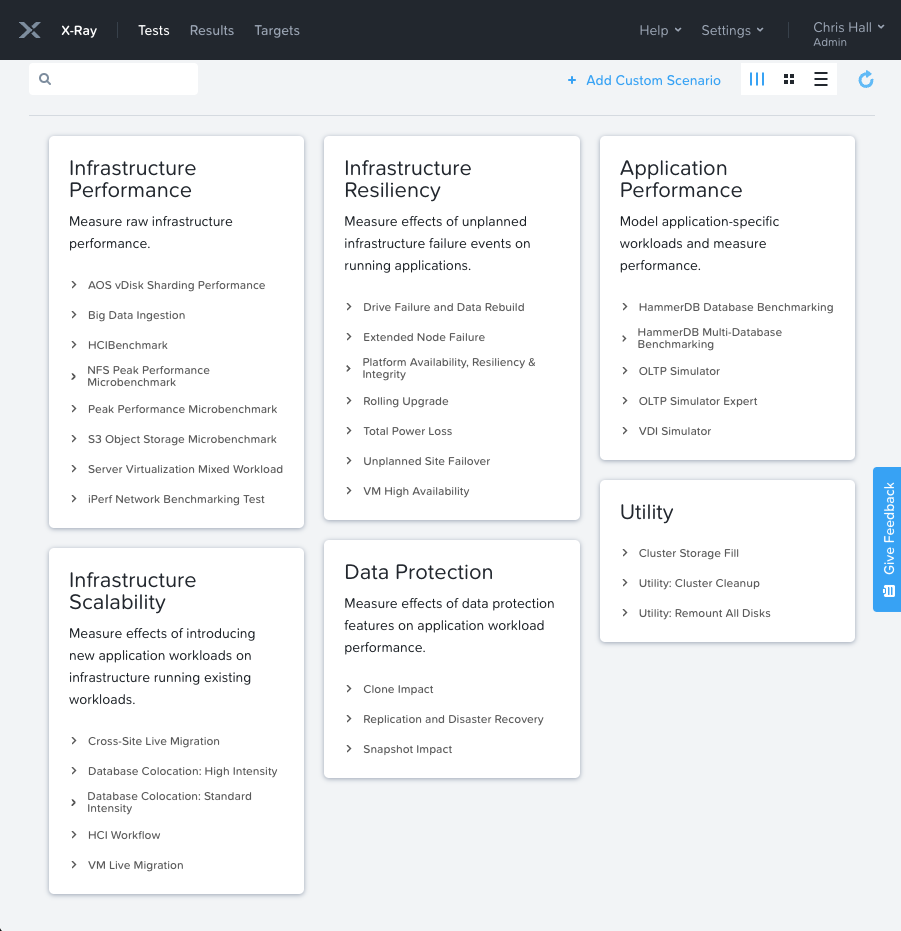
Let’s take a look at the array of tests X-Ray can perform for us:
Find out more about testing with X-Ray here: Nutanix X-Ray.
Testing Preamble
To try and keep everything as fair as possible, I’ll be doing the following.
Order of Testing
As my CE node is already using HBA passthrough, I’ll be doing my performance testing a bit backwards - that is I’ll be performance testing with HBA passthrough first after which I’ll be going back to my CVM backup taken prior to any changes as described here. After which I’ll rerun my selected X-Ray test.
Test Environment Handling
As the X-Ray management VM should not be deployed on the environment under test, I’ll be deploying it to my ESXi host and testing my Nutanix node from there.
Prior to testing, I’ll shutdown all user VMs on my CE server, after which I will reboot my CVM and allow it to start the cluster as normal.
After 11 minutes of CVM uptime (one better than ten minutes!), I’ll start the X-Ray test and allow it to complete normally.
X-Ray Test Selection
As I’m testing a one node cluster, I’m not interested in using X-Ray to test resiliency, scalability, data protection or utility. I’m purely interested in storage performance. To this end, I selected X-Ray’s Peak Performance Microbenchmark.
Details of the X-Ray Peak Performance Microbenchmark test are as follows. From the X-Ray test description:
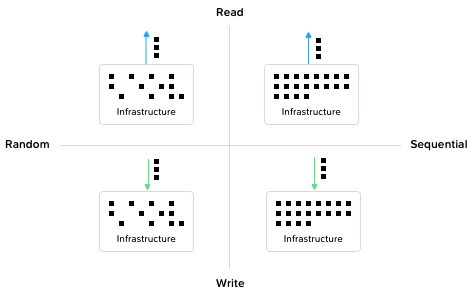
This test runs the four data workload types (random reads, sequential reads, random writes, and sequential writes) and shows their peak burst performances.
Each of these workloads runs in sequence for 1 minute with 1-minute intervals between. For random reads and writes, higher IOPS indicates better performance; for sequential reads and writes, more bytes per second indicate better performance.
How X-Ray runs the test
Note: This test scales with the number of nodes.Test Requirements
- vCPU: 4 vCPU per node.
- RAM: 4 GB per node.
- Cluster storage: 116 GB per node.
- IP addresses: one per node.
Setup
- Deploy one workload VM per host.
- Fill virtual disks with random data.
- Run random read workload warmup for 5 minutes.
Measurement
- Run random read workload for 1 minute on all VMs.
- Wait 1 minute.
- Run sequential read workload for 1 minute on all VMs.
- Wait 1 minute.
- Run random write workload for 1 minute on all VMs.
- Wait 1 minute.
- Run sequential write workload for 1 minute on all VMs.
This looks like the perfect test for this exercise. I shall use this test in it’s default form with zero customisation.
Usual Disclaimers Apply
What follows are results from two consecutive test runs executed on the same morning with the previously applied configuration changes reversed in between tests. More on that below. AHV was not rebooted in between tests.
Your mileage may vary, usual disclaimer applies. With that out of the way, lets get to it.
The Results: With HBA Passthrough
The results of testing with the HBA passed through to CVM are as follows:
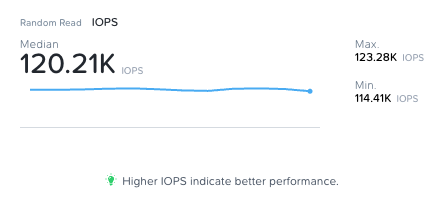
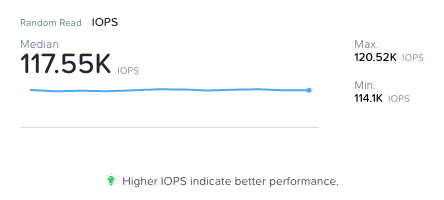
Random Read (IOPS) - With HBA Passthrough
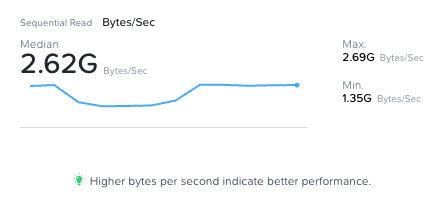
Sequential Read (Bytes/Sec) - With HBA Passthrough
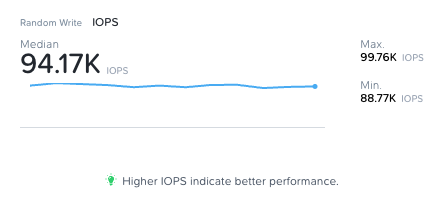
Random Write (IOPS) - With HBA Passthrough
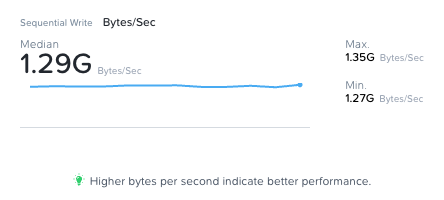
Sequential Write (Bytes/Sec) - With HBA Passthrough
The Results: Without HBA Passthrough
This required a little backwards configuration to set up for testing:
1. After shutting CVM down, delete CVM with HBA passthrough configured:
[root@AHV ~]# virsh undefine NTNX-XXXXXX-CVM

2. Restore CVM from backup taken before HBA passthrough changes made:
[root@AHV ~]# virsh define --file  /root/NTNX-XXXXXX-CVM-ORIG.xml

3. Reattach AHV to the HBA:
[root@AHV ~]# virsh nodedev-reattach pci_0000_01_00_0

4. Start CVM as normal:
[root@AHV ~]# virsh start NTNX-XXXXXX-CVM
After allowing the CVM to boot, let’s check it’s PCI devices via lspci:
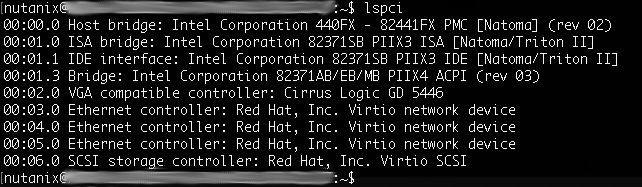
Yep, the CVM is now using the Virtio SCSI HBA rather than our passed though LSI MegaRAID HBA. Let’s test!
Random Read (IOPS) - Without HBA Passthrough
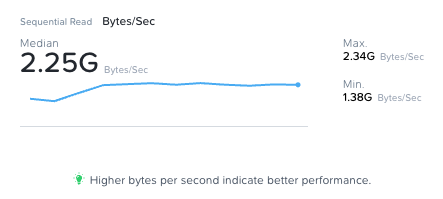
Sequential Read (Bytes/Sec) - Without HBA Passthrough
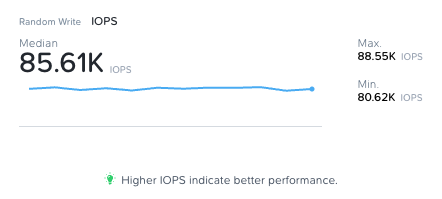
Random Write (IOPS) - Without HBA Passthrough
Sequential Write (Bytes/Sec) - Without HBA Passthrough

The Results: Comparison and Analysis
Let’s dig into the results.
Median
| Test | Without HBA PCI Passthrough (Median) | With HBA PCI Passthrough (Median) | % Gain or Loss | Winner |
|---|---|---|---|---|
| Random Read (IOPS) | 117.55K | 120.21K | +2.26% | With HBA Passthrough |
| Sequential Read (Bytes/Sec) | 2.25G | 2.62G | +16.44% | With HBA Passthrough |
| Random Write (IOPS) | 85.61K | 94.17K | +9.99% | With HBA Passthrough |
| Sequential Write (Bytes/Sec) | 1.29G | 1.29G | 0% | Equal |
Well there we have it. Gains across the board with equal performance in one result. Nice!
Sure, gains are to be expected because by using HBA passthrough we are simplifying the I/O path to our storage. What is interesting is to see the level of change that the simplification affords us.
Since we have them too, lets compare the maximum and minimum results too.
Maximums
| Test | Without HBA PCI Passthrough (Maximums) | With HBA PCI Passthrough (Maximums) | % Gain or Loss | Winner |
|---|---|---|---|---|
| Random Read (IOPS) | 120.52K | 123.28K | +2.29% | With HBA Passthrough |
| Sequential Read (Bytes/Sec) | 2.34G | 2.69G | +14.96% | With HBA Passthrough |
| Random Write (IOPS) | 88.55K | 99.76K | +3.43% | With HBA Passthrough |
| Sequential Write (Bytes/Sec) | 1.31G | 1.35G | +3.05% | With HBA Passthrough |
Comparing the maximum results seen on each test, our results roughly match the orders of magnitude seen in the median results.
Minimums
| Test | Without HBA PCI Passthrough (Minimums) | With HBA PCI Passthrough (Minimums) | % Gain or Loss | Winner |
|---|---|---|---|---|
| Random Read (IOPS) | 114.1K | 114.41K | +0.27% | With HBA Passthrough |
| Sequential Read (Bytes/Sec) | 1.38G | 1.35G | -2.17% | Without HBA Passthrough |
| Random Write (IOPS) | 80.62K | 88.77K | +10.11% | With HBA Passthrough |
| Sequential Write (Bytes/Sec) | 1.19G | 1.27G | +6.72% | With HBA Passthrough |
Interestingly we see our first win for Without HBA Passthrough; minimum sequential read without HBA passthrough is 2.17% faster.
Conclusion and Wrap Up
After implementing the HBA passthrough changes it is nice to have some figures to match the perceived performance gains. It’s not a placebo!

Looking to the future, the even better news is that as it stands today, when CE is deployed on systems using NVMe drives, the CE installer will pass the NVMe controller(s) through to the CVM natively - no need for the modifications discussed in this and the previous posts. Thanks to Matt Brown for your assistance confirming this! ![]()
Finally, this all might be academic one day. Fingers crossed Jon! ![]()
-Chris