


 Consider this scenario: You are a small company with a small budget to match. Until now you have been running quite happily with VMware’s free ESXi server offering. Besides you only have a handful of VMs that run perfectly well on your free ESXi server. You enjoy not being beholden to a software subscription licence agreement.
Or perhaps you are a large company with several test and development environments that also make use of the free ESXi offering from VMware. As these are test and development, there is zero financial appetite or need to formally licence these environments. Besides, if anything catastrophic happens you can rebuild, no harm no foul.
Then along comes Broadcom and BAM! End Of General Availability of the Free vSphere Hypervisor KB2107518.

Short of setting up a free key exchange for free old ESXi licence keys - what’s stopping Broadcom from removing free ESXi functionality at their earliest convenience - i.e. with the next ESXi patch releases…?
It’s time to look further afield for a new free hypervisor.
Overview
First, Some More Words about VMware Licensing
Whilst this post describes migrating VMs from the free version of ESXi to Nutanix Community Edition, we need to talk about VMware licensing.
Unfortunately out of the box, the free version of ESXi does not provide licensing provision for the required vSphere Storage APIs required to allow Nutanix Move to incrementally capture the source VM. Therefore in order to follow the method outlined in this post, you will either need to obtain some temporary ESXi license keys or use a search engine to find out how to reset your ESXi license configuration to reenable the free 60 day evaluation ESXi license to continue.
However you do enable vSphere Storage APIs on your free ESXi instance is between you and VMware Broadcom. I don’t want or need to know. ![]()
![]()
![]()
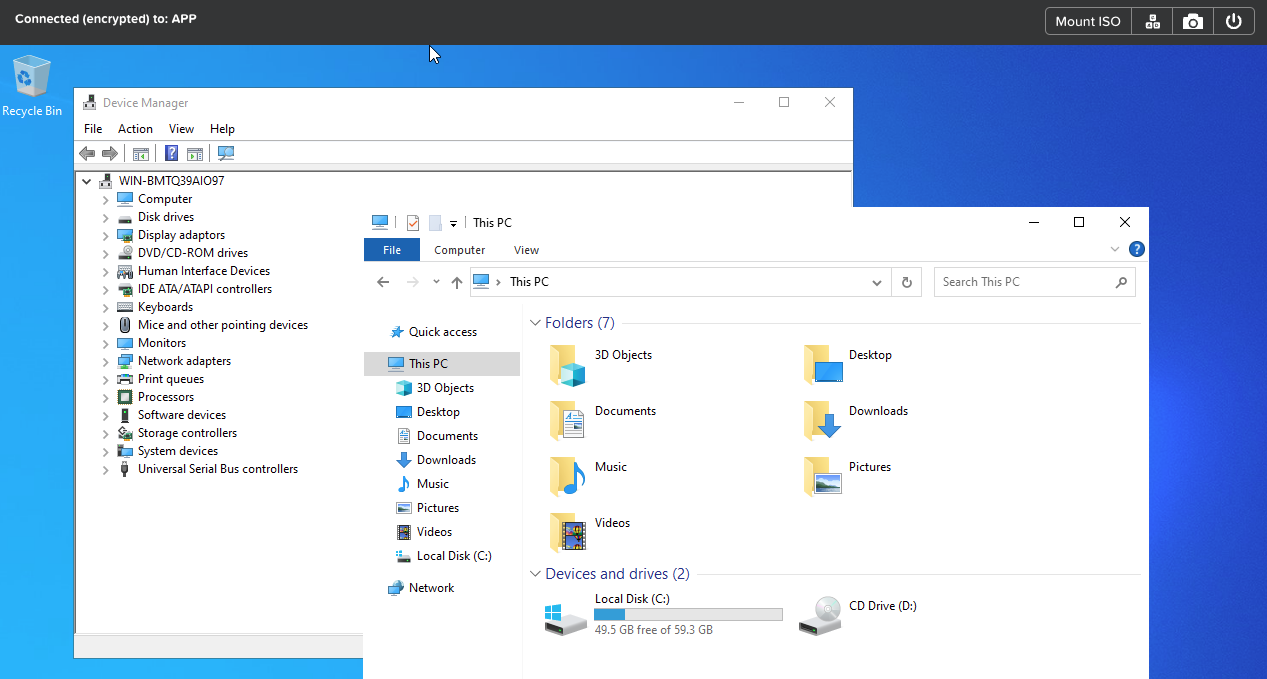
To confirm you are all set, logon to your ESXi server, select Host > Manage > Licensing. If Storage APIs is listed as a licensed feature, you are good to go.
Anyway, on with the post.
How about Nutanix Community Edition?
Nutanix Community Edition (CE) is a free version of Nutanix AOS, which powers the Nutanix Enterprise Cloud Platform. The Community Edition of AOS is designed for people interested in test driving AOS main features on their own test hardware and infrastructure. As stated in the license agreement, Community Edition is intended for internal business operations and non-production use only.
Perfect.
Community Edition Installation
I won’t cover CE installation here, as I have covered it here previously. You can obtain your free copy of CE from here: Download Community Edition (free account required).
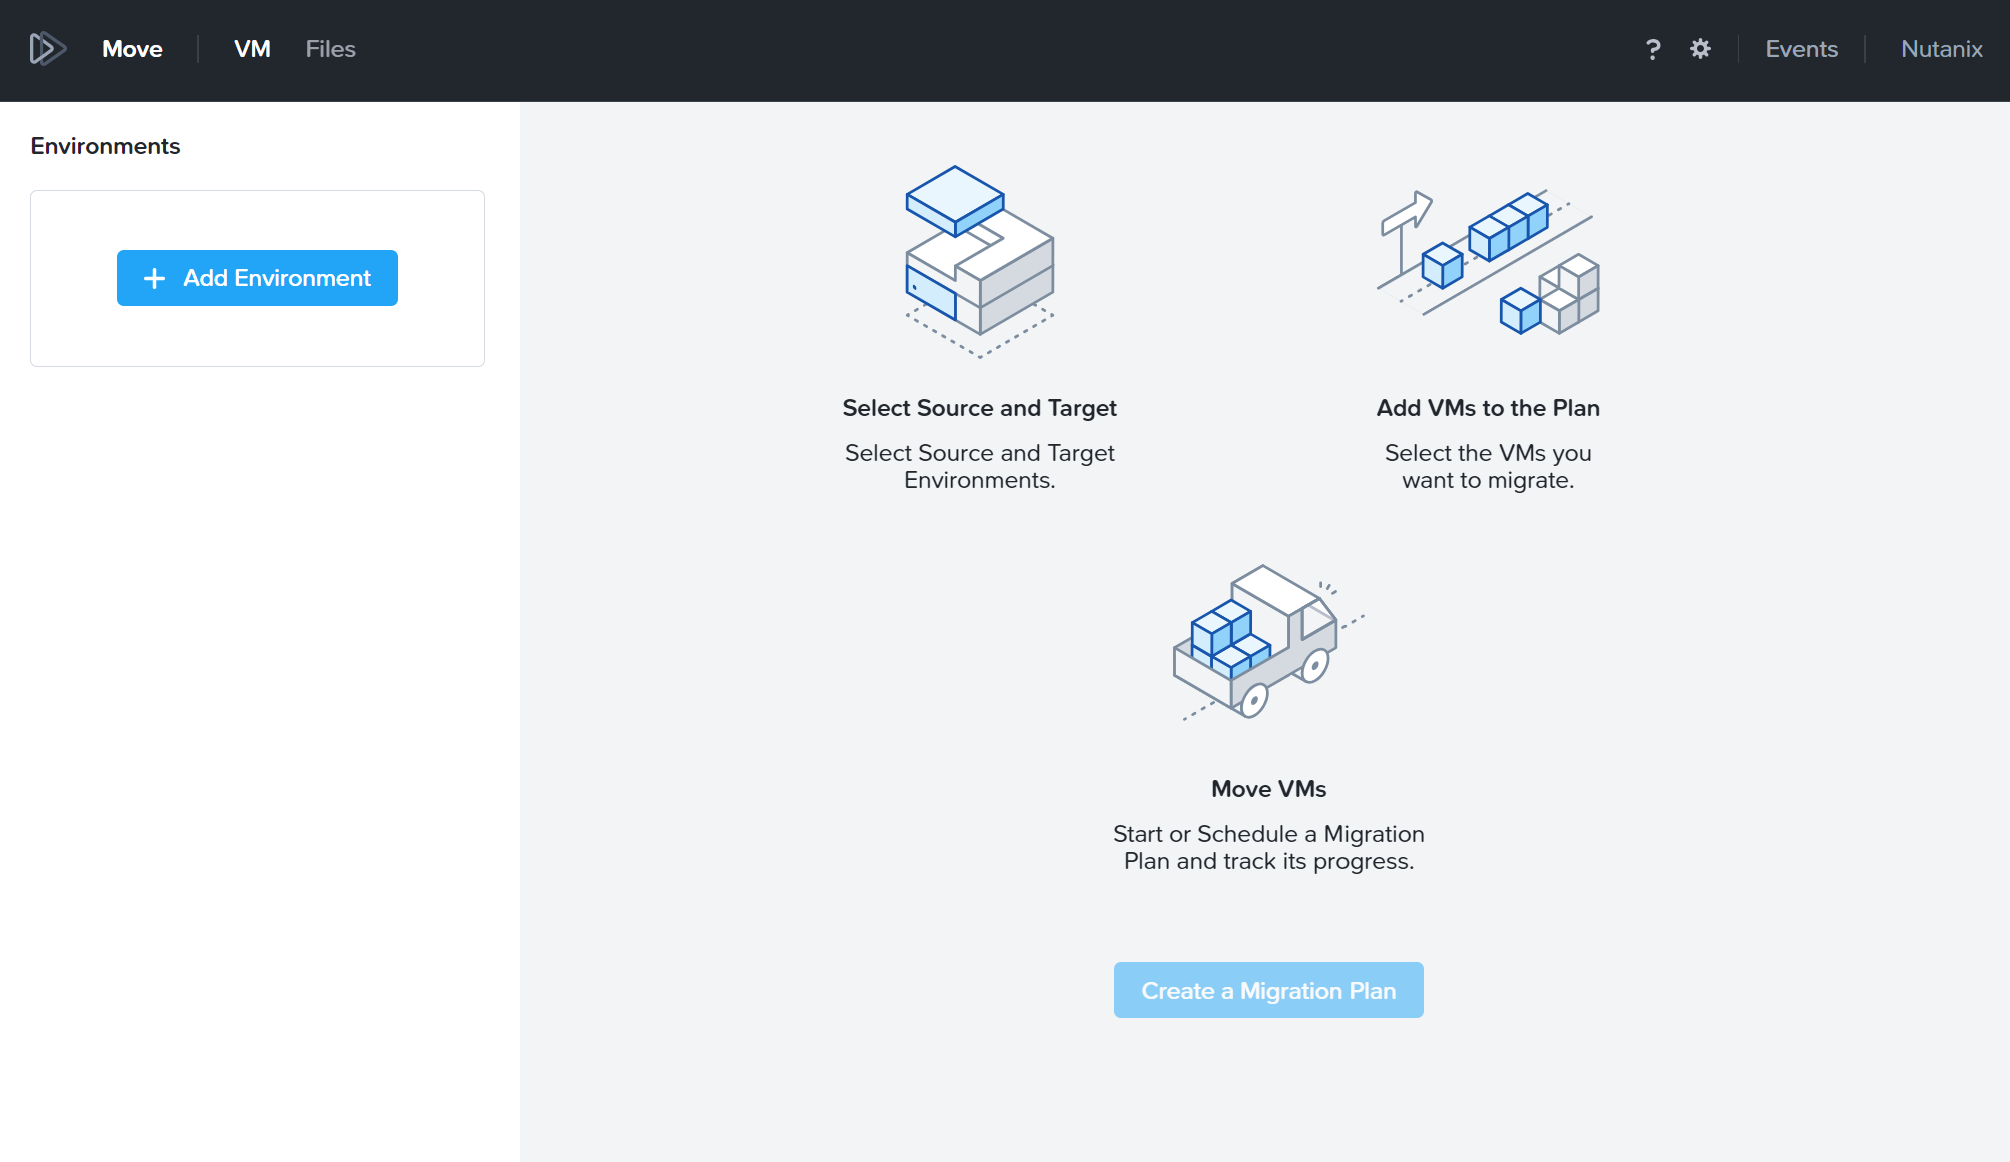
Introducing Nutanix Move
Keeping with the Nutanix naming standard of calling a piece of software after it’s core functionality, Move is used to ..er.. move VMs between environments:
…But we are getting ahead of ourselves.
Move supports VM migration from the following sources to targets:
- VMware ESXi (legacy infrastructure or Nutanix) to AHV
- VMware ESXi (legacy infrastructure or Nutanix) to VMware ESXi on Nutanix
- VMware ESXi to Nutanix Cloud Clusters (NC2) on AWS
- VMware ESXi to NC2 on Microsoft Azure
- Microsoft Hyper-V to AHV
- Microsoft Hyper-V to VMware ESXi on Nutanix
- Microsoft Hyper-V to NC2 on AWS
- AWS EC2 to AHV
- AWS EC2 to VMware ESXi on Nutanix
- AWS EC2 to NC2 on AWS
- Microsoft Azure Cloud to AHV
- Microsoft Azure Cloud to VMware ESXi on Nutanix
- Microsoft Azure Cloud to NC2 on Azure
- Nutanix AHV to Nutanix AHV
- Nutanix AHV to AWS EC2
- Nutanix AHV to Microsoft Azure Cloud
- Nutanix AHV to NC2 on AWS/Azure
- NC2 on AWS/Azure to Nutanix AHV
- NC2 on Azure to NC2 on Azure
Oh and by the way, Nutanix Move now migrates between 22,000 and 26,000 VMs to AHV per quarter, so you are among friends! What’s more Move is free.
Installing and Configuring Move
Following the Move deployment documentation the recommendation is to install Move on to the target environment. So in our case that is our Nutanix CE installation.
Download the installer from the Nutanix Portal. Use the same free account you used when installing CE to access the Move downloads. As mentioned, Move is free to download and use.
[Update] Portal Fun
It has been brought to my attention that accessing downloads from the Nutanix Portal is sometimes tricky for Community Edition only users. After some further testing, the following process should allow you access to the downloads area of the Nutanix portal:
- Create a Community Edition account as normal at https://www.nutanix.com/products/community-edition/register
- Verify email address via link sent in email
- Navigate and login (with credentials set above) to https://my.nutanix.com/
- Scroll down to, launch and register with Nutanix University - again using credentials set above
- Launch https://portal.nutanix.com directly (as in enter this address into your browser)
You’ll know you’ve got it correct when portal.nutanix stops redirecting you to my.nutanix. Finally, with stable access to portal.nutanix, click the hamburger menu (top left) to access downloads.
As you can gleam from the above, it seems that downloads are only available to those that also have University accounts. Thanks to Brandon at virtualizationhowto.com for reaching out on this. Cheers Brandon!
Upload Move Disk Image
Log into Prism Element running on your CE cluster (https: // your-cluster : 9440). Click the settings cog in the top right hand corner of the Prism Element UI, select Image Configuration from the menu on the left.
Select Upload Image.
Complete the wizard, selecting image type of disk and finally selecting the move qcow image previously downloaded:
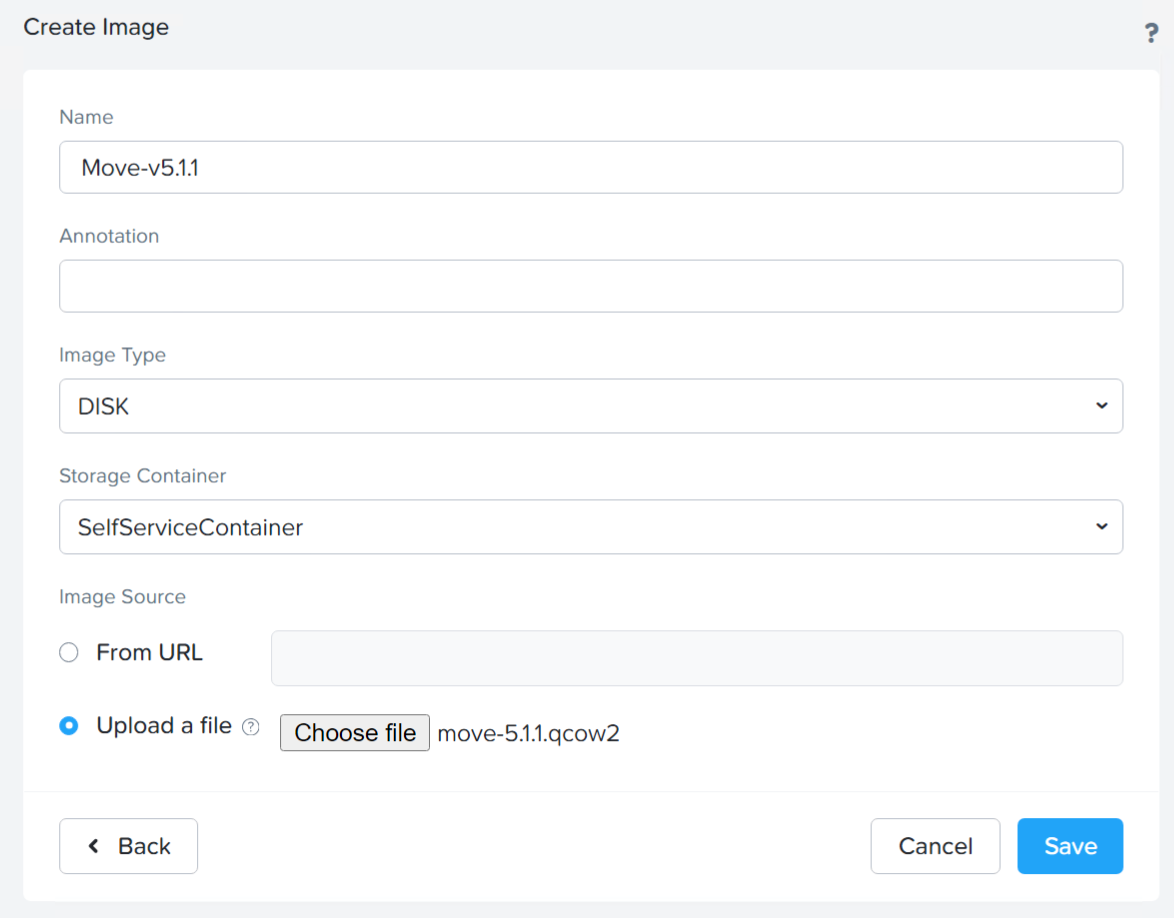
Confirm the image type is set to Disk and select Save to upload the Move VM disk image.
Deploy Move VM
Next, we need to deploy our Move VM.
Again from the Prism Element UI, click the CE logo  and select Home > VM > + Create VM (+ Create VM is located in top right hand corner of the VM UI).
- Name: Move
- Timezone: UTC (which matches my timezone)
- vCPUs: 2
- Number Of Cores Per vCPU: 2
- Memory: 8 GiB
- Boot Configuration: Legacy BIOS
- Disks: (See below)
- Network Adapters: One NIC on my management LAN
The above specs match the minimum requirements for Move. You may size your VM differently as required.
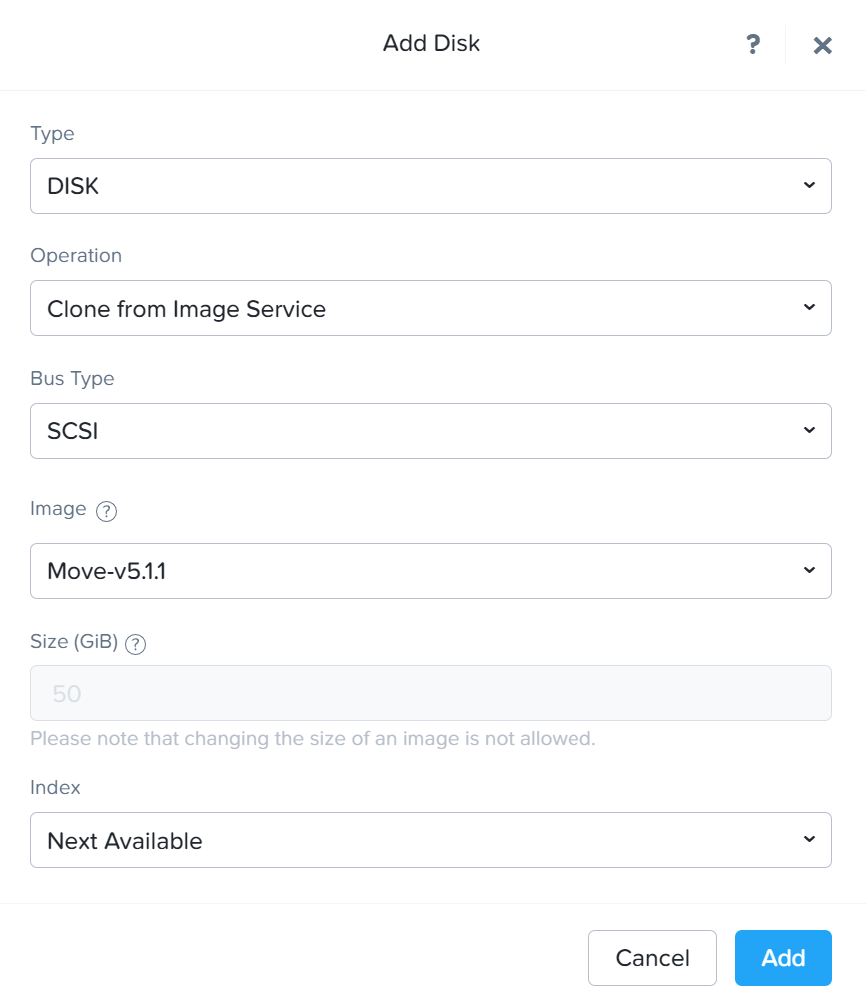
Add one disk and configure it to clone from previously uploaded Move image:
Once the VM has been created, right click it and select Power On.
Move Configuration
Once the Move VM has booted up and is available on the network, access it via a web browser.
Should you need to manually assign an IP address to the move VM, use the configure-static-ip script detailed in Assigning a Static IP Address to Move section of the Move User Guide.
Additionally, given that my source ESXi host is in my lab and my CE target is not, I’ll need to add a static route to my Move VM to allow it to get to my lab.
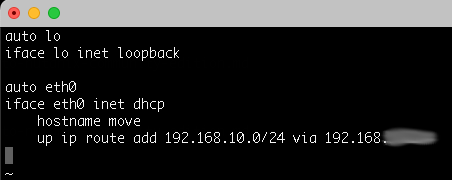
The process is simple enough. We need to open an SSH connection to our move VM, login with default credentials and reset the password. After that we need to edit the file /etc/network/interfaces (sudo vi) and add our static route in the format:
up ip route add DESTINATION-NET/CIDR via GATEWAYWhich in my case looks like this:
Reboot the Move VM to apply the static route. Once the Move VM has booted access the Move IP address/hostname via a web browser.
After accepting the licence and customer experience agreements, set a new password. Login in with your newly set password you will be presented with the Move dashboard:
As you can see, the Move interface is clutter free and simple enough to navigate.
Move Environments
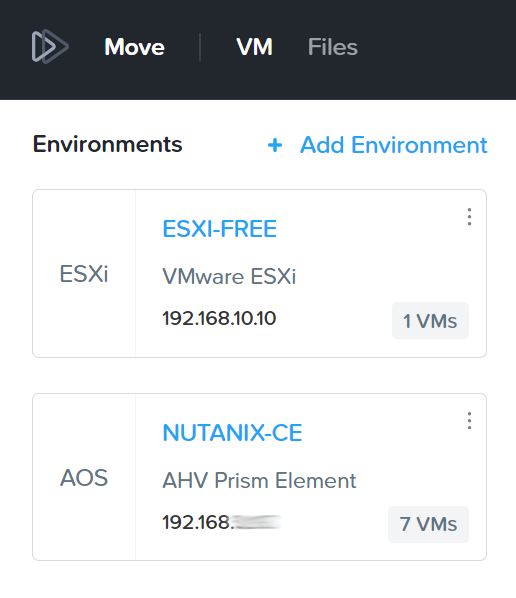
Right, let’s setup my source VMware ESXi environment within Move.
From the Move interface, select + Add Environment. Select the environment type and complete the details. For my ESXi host, the details are as follows:
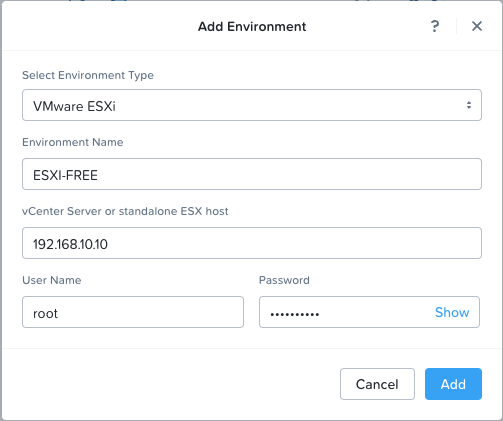
Click Add to complete. Next we will add our Nutanix CE Environment:
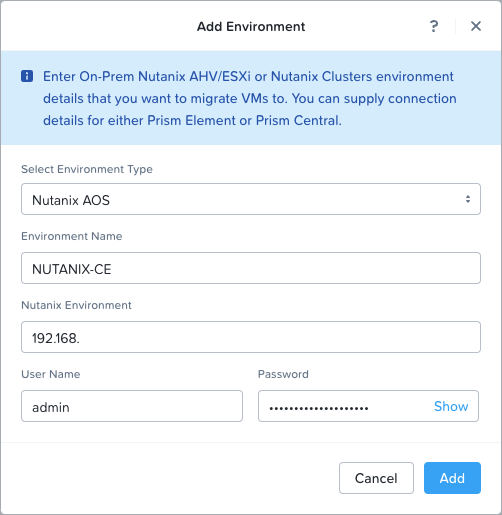
Use the Virtual IP for the Nutanix Cluster set as discussed here. Again click Add to complete.
Migration Plan
With both source and target environments configured in Move, let’s create a migration plan.
I’ll name my Plan ESXi Free to Nutanix CE and after completing the details:
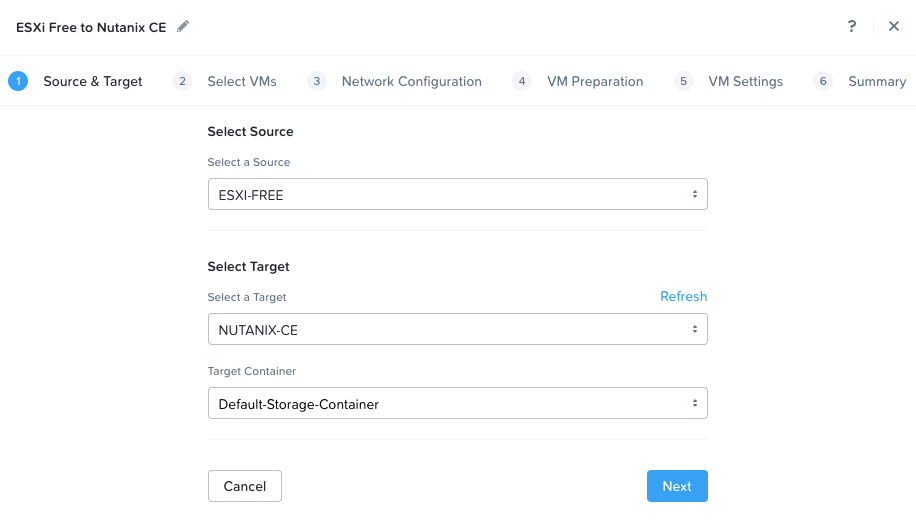
Click Next to continue. Next I’ll select my VM to migrate by clicking the + next to the VM. Added VMs are listed on the right:
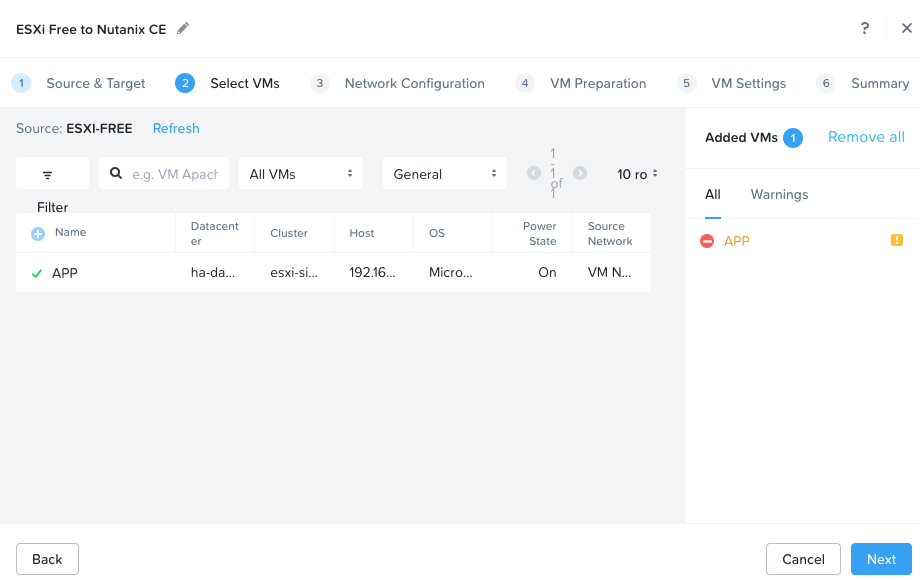
Let’s investigate the [!] note:
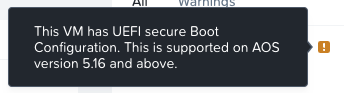
My CE installation is running AOS 6.5.5.5 (latest LTS version of AOS as of time of writing), so I’m all good. Again click Next to continue.
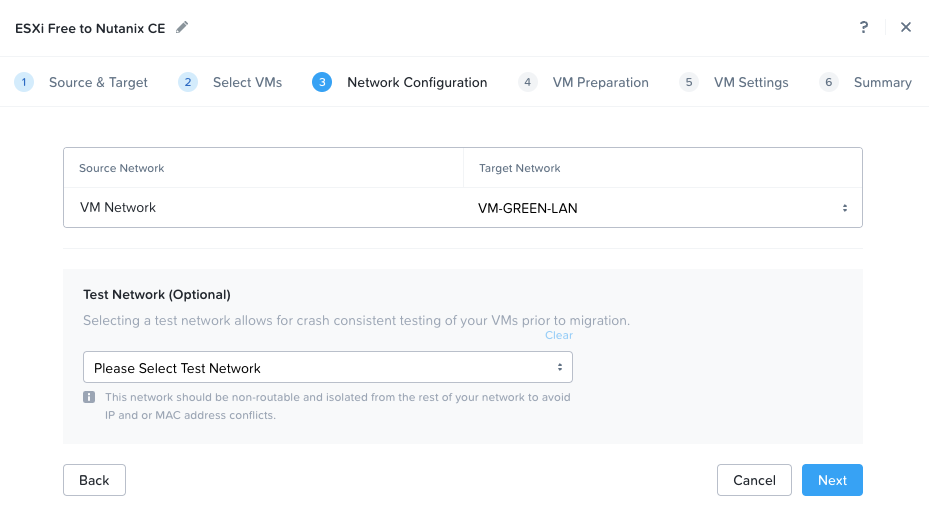
I’ll select my target network, VM-GREEN-LAN in my case. I’m not going to use a test network. Again click Next to continue.
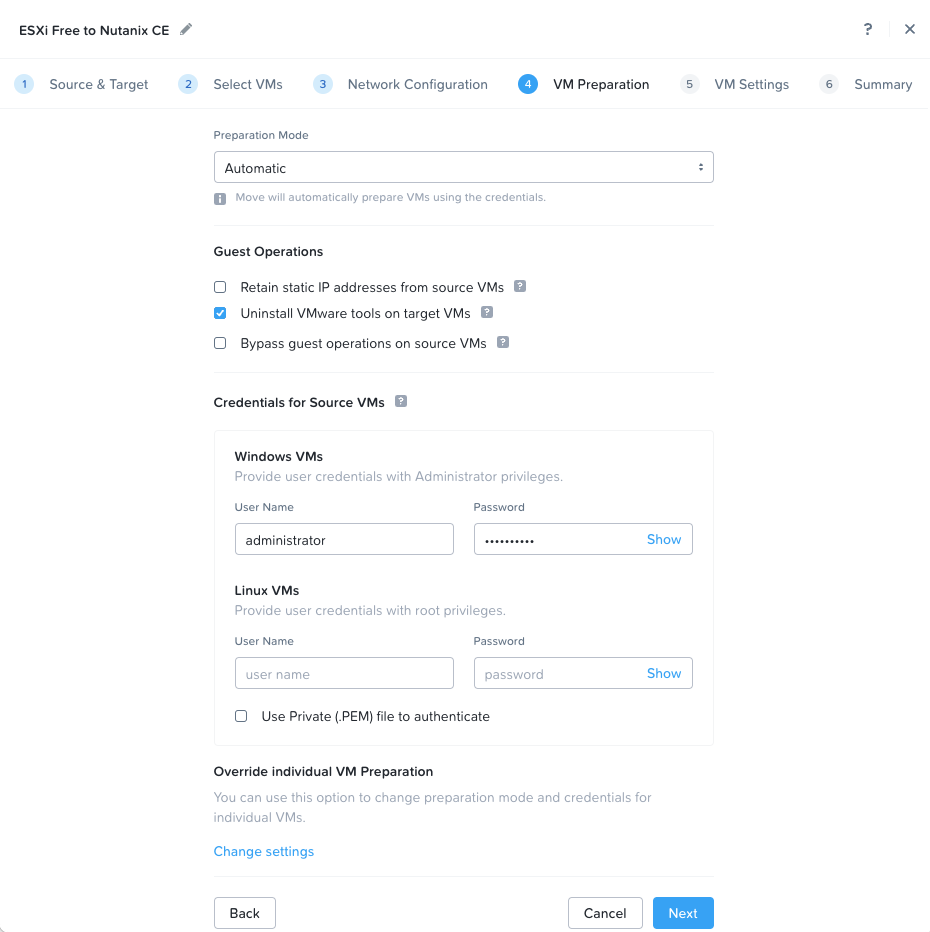
I’ve unticked Retain static IP addresses from source VMs as I’m moving my VM onto a network with DHCP enabled. I’ve also supplied the credentials of my VM to Move so that it can uninstall VMtools from and inject the required VirtIO drivers into my VM as part of the migration.
Again click Next to continue.
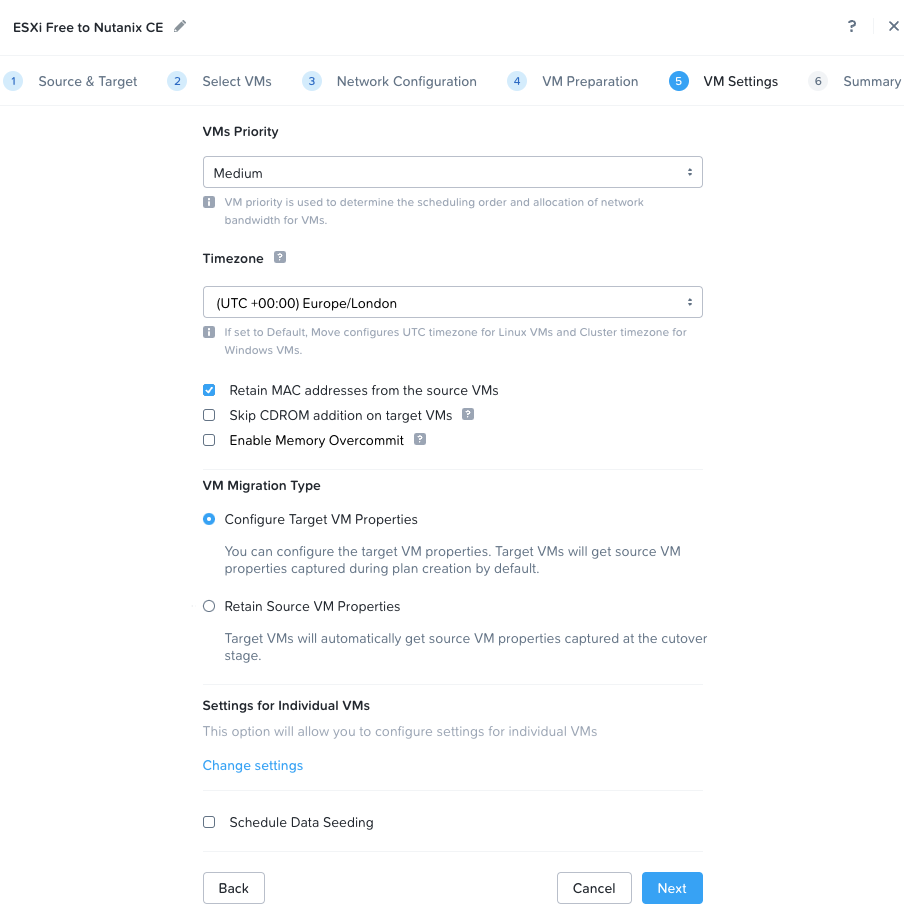
I’ve set my timezone and I’ll retain my VM’s MAC address. Again click Next to continue.
Move will now validate selected settings and provided credentials.
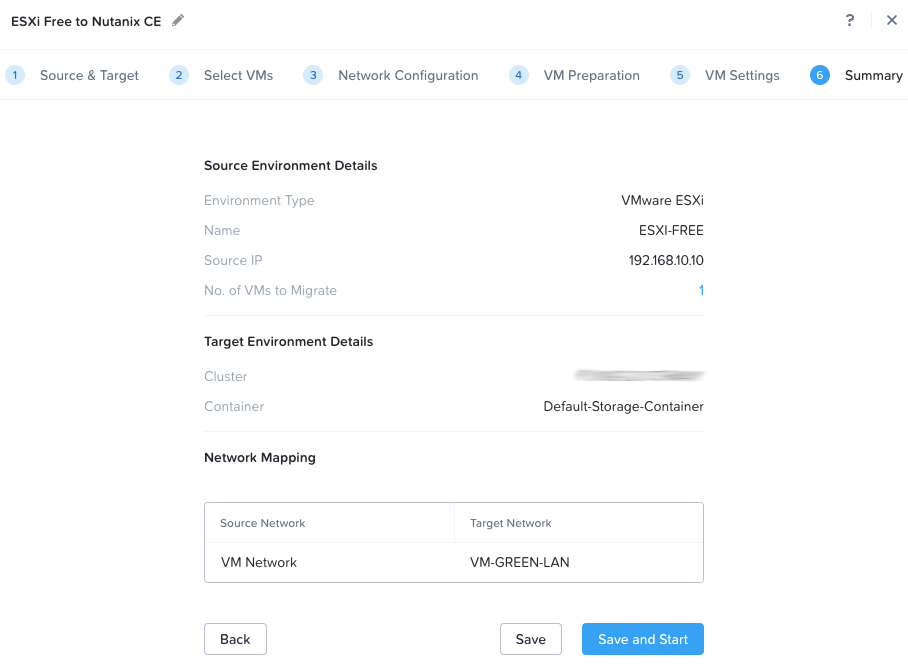
Click Save and Start.
Data Replication
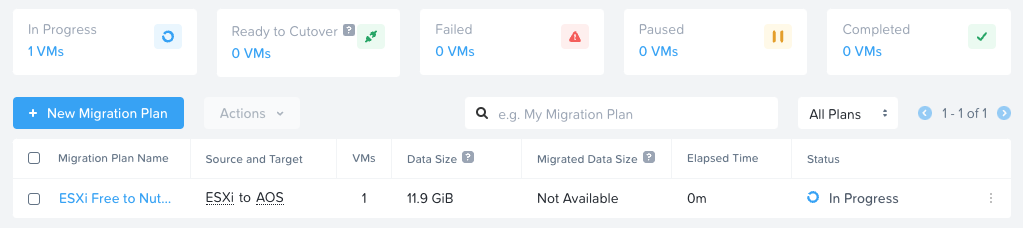
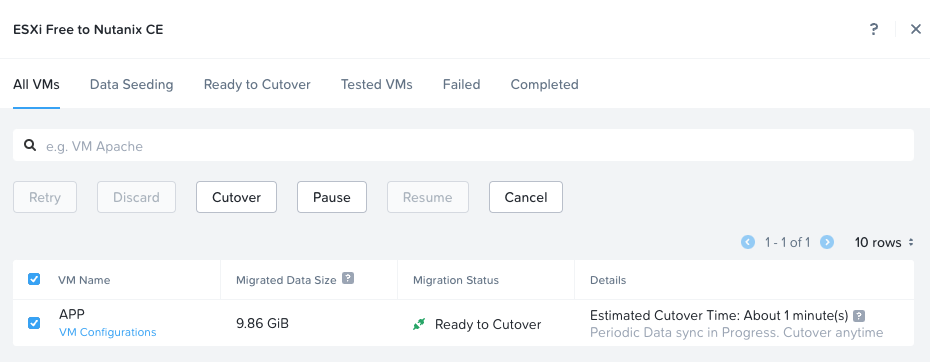
With the above completed, we can see that Move has started replicating our ESXi VM(s) to our CE instance:
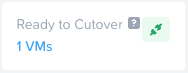
Once seeding has completed, the ready to Cutover count will increase to match the count of VMs configured in the migration plan:
In this state, changes to the source VM will be replicated to the target VM every 10 minutes. If you wish to change this interval, from the move interface select the cog on the Move task bar and select Appliance Settings > Snapshot Configuration:

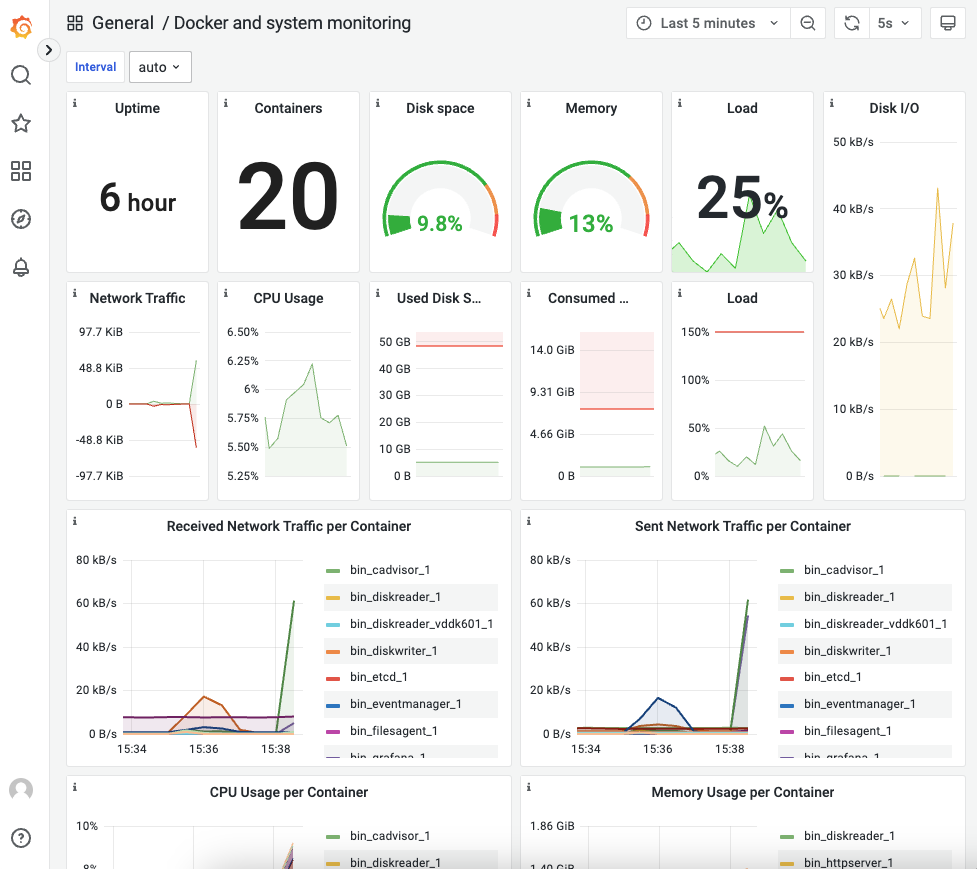
For bonus points, from the move interface select the cog on the Move task bar and select View Metrics:
Making the Move
So let’s cutover our VM from our Free ESXi installation into our Community Edition environment.
From the Move dashboard, click on the In Progress status dialogue of the currently running plan. Then select the VM to cutover:
Select Cutover.
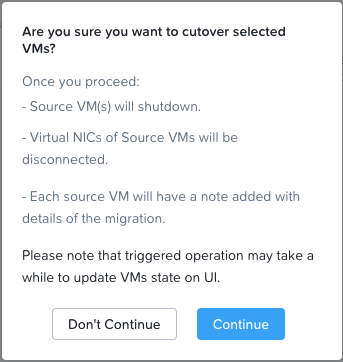
Select Continue and allow time for the cutover to complete Once Move has complete the migration:
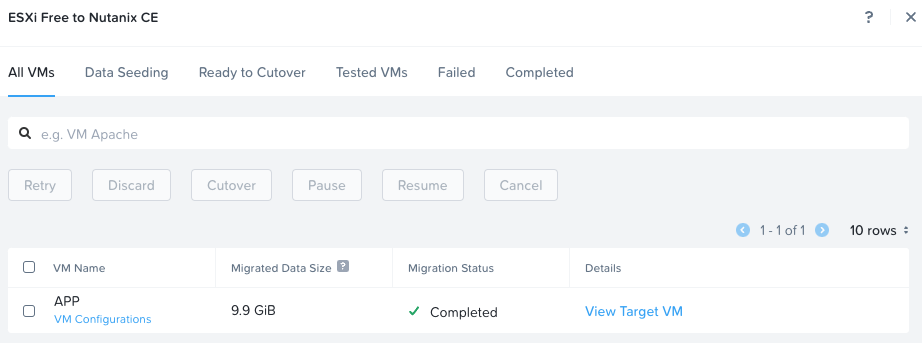
Let’s log into our migrated VM. Looks good:
Conclusion and Wrap Up
So there we have it. A free and simple way to migrate VMs from ESXi to CE.
Of course, this guide also works should you be migrating VMs from vSphere to any Nutanix version - CE or Enterprise.
To confirm if your guest VM is supported for migration by Move, take a look at the following documentation links:
- Move Supported Guest Operating Systems
- Move Supported Operating Systems for UEFI Enabled VMs
- Move Support for UEFI with Secure Boot Enabled VMs
- Move Supported AOS, ESXi, and Hyper-V Versions
Moving doesn’t need to be stressful. Enjoy.
-Chris