


 Photo: pi-hole.net
Quick primer:
Photo: pi-hole.net
Quick primer:
- DNS: Domain Name System: The system by which domain names such as polarclouds.co.uk are converted to Internet Protocol (IP) addresses such as 104.31.82.123
- HTTPS: Hypertext Transfer Protocol Secure: Used for secure communication over a computer network, such as the Internet
- Pi: Raspberry Pi (shortened to Pi in this instance): A low cost, credit-card sized computer: See this PolarClouds post from 2011! Now available in it’s fourth iteration
- Hole: An empty space in an object, usually with an opening to the object’s surface, or an opening that goes completely through an object. Source.
UPDATE: See Why I was For, Against, then For Browser DNS over HTTPS
Overview
Objectives
It’s no secret, I’m not a fan of adverts. Over the years I’ve posted about my disdain for adverts several times. I think this sums up my feelings nicely:

Luckily for us there exists a free product that can extend this advert free joy to EVERY DEVICE ON YOUR NETWORK (computers, phones, tablets, you name it).
Also, let’s block other internet borne garbage such as ransomware, crypo-miners, internet tracking, malware and the like.
Finally, let’s also move to a secure DNS service whilst we are at it. Besides, DNS over HTTPS is coming whether ISPs and governments like it or not. Firefox is slowly enabling DNS over HTTPS so we can to!
Pi-hole
What is a (the) Pi-hole? From the documentation:
The Pi-hole® is a DNS sinkhole that protects your devices from unwanted content, without installing any client-side software.
- Easy-to-install: our versatile installer walks you through the process, and takes less than ten minutes
- Resolute: content is blocked in non-browser locations, such as ad-laden mobile apps and smart TVs
- Responsive: seamlessly speeds up the feel of everyday browsing by caching DNS queries
- Lightweight: runs smoothly with minimal hardware and software requirements
- Robust: a command line interface that is quality assured for interoperability
- Insightful: a beautiful responsive Web Interface dashboard to view and control your Pi-hole
- Versatile: can optionally function as a DHCP server, ensuring all your devices are protected automatically
- Scalable: capable of handling hundreds of millions of queries when installed on server-grade hardware
- Modern: blocks ads over both IPv4 and IPv6
- Free: open source software which helps ensure you are the sole person in control of your privacy
Raspberry Pi Setup
Most home users run Pi-hole on Raspberry Pi hardware on top of a standard Raspian operating system install. For details on setting up Raspian see Installing operating system images documentation.
Non-Raspberry Pi Setup
As you can gather from the Pi-hole section above, Pi-hole does not have to be run on Raspberry Pi hardware. I have mine running in a VMware virtual machine running Debian Server (non-GUI) as it’s base O/S. You could, for example install Debian and Pi-hole on any old x86 hardware you have laying about. To set Debian up for yourself, follow this excellent howtoforge guide.
For the purposes of this post, I’m going to setup Pi-Hole under Debian Buster in a VMware VM. Regular readers will know that I use a SpongeBob SquarePants naming scheme in my lab. This VM shall follow that convention and will have the hostname mable. ![]()
DNS Over HTTPS - Cloudflared Argo Tunnel
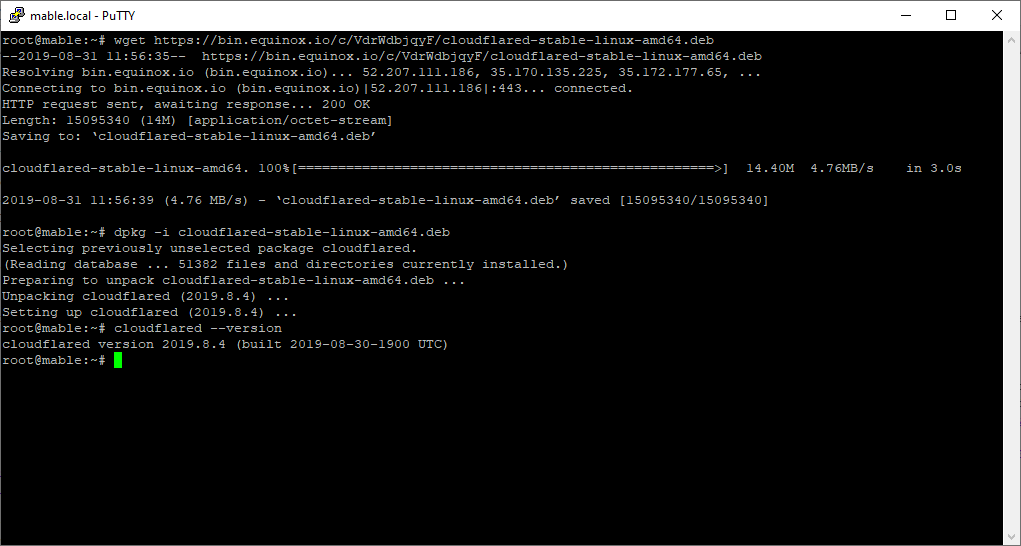
Let’s get DNS over HTTPS running. To do this we are going to use Cloudflare’s Argo Tunnel. We will use port 54 as our local endpoint of the Argo tunnel. To install then:
wget https://bin.equinox.io/c/VdrWdbjqyF/cloudflared-stable-linux-amd64.deb
dpkg -i cloudflared-stable-linux-amd64.deb
cloudflared --version
Next, let’s test. As the cloudflared daemon doesn’t return to the command prompt once running, we need to test using screen:
sudo apt-get install screen
screen
sudo cloudflared proxy-dns --port 54 --upstream https://1.1.1.1/.well-known/dns-query --upstream https://1.0.0.1/.well-known/dns-query
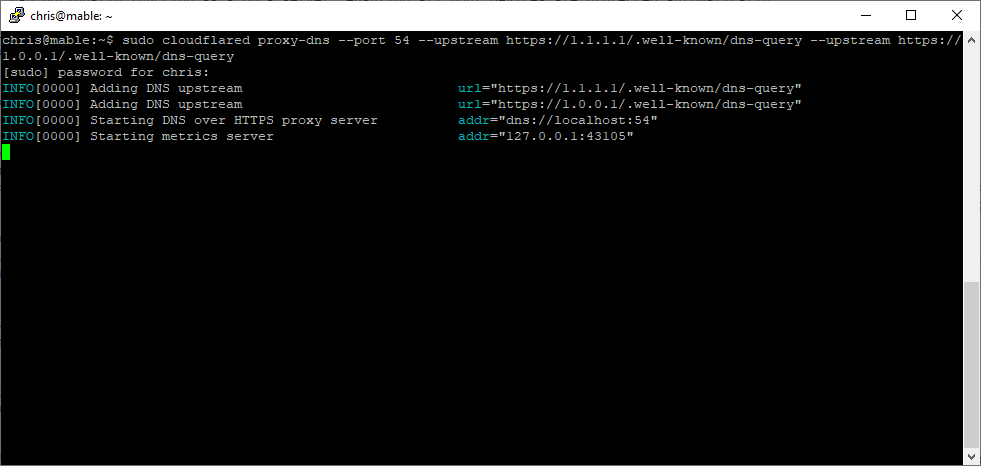
This will start a cloudflared daemon listening at port 54 for DNS requests which will then be forwarded over HTTPS to Cloudflare’s 1.1.1.1 DNS service.
Hit Ctrl+A+D to leave the daemon and session running. Next step is to install Pi-hole and test.
Installing Pi-hole
Installing Pi-hole involves just the one command. (Alternative installation methods are available):
curl -sSL https://install.pi-hole.net | sudo bash
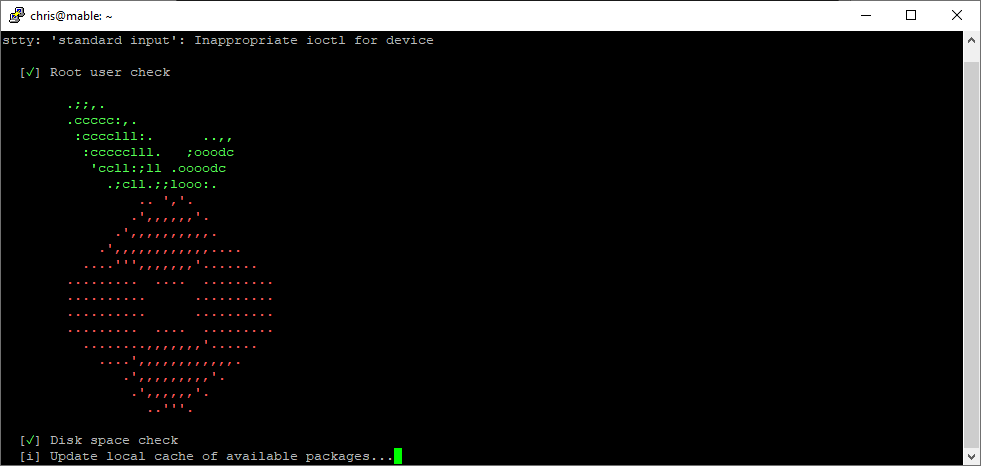
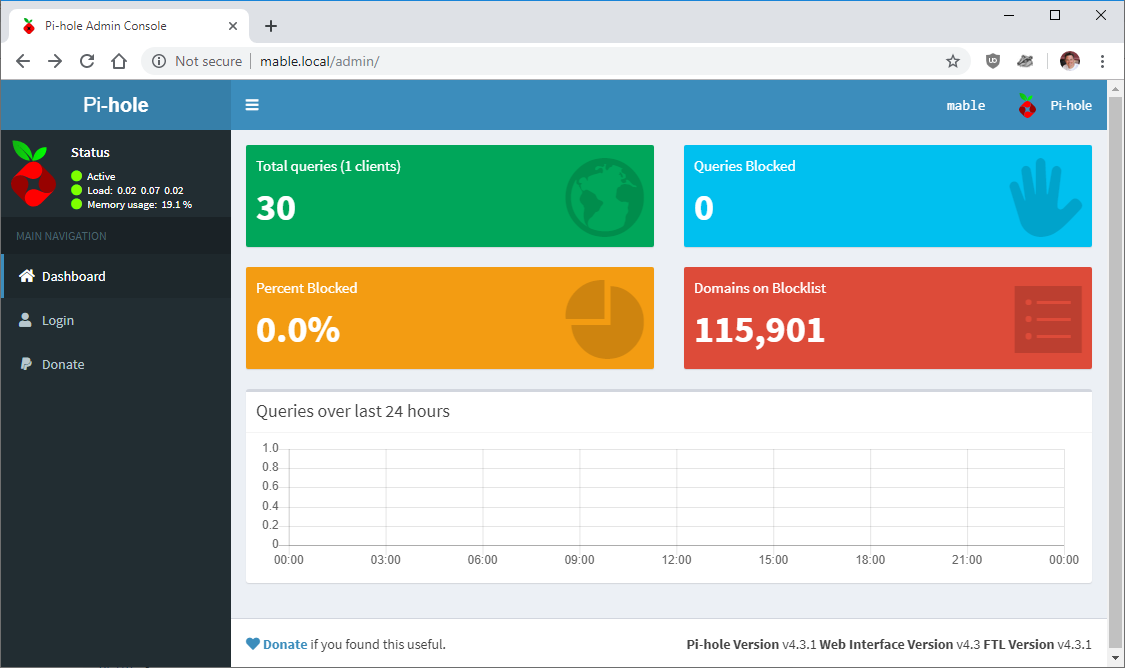
Follow the setup process and complete any prompts along the way. It doesn’t matter what default DNS we use at this point as we will be changing it to use the Argo Tunnel anyway. Make a note of the web interface URL and password. Once installed, confirm you can browse to the Pi-hole and login OK:
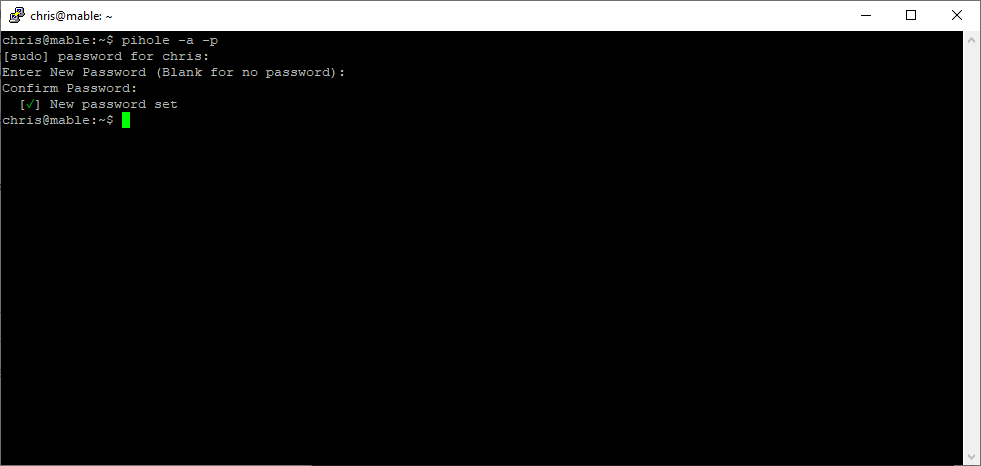
To change Pi-hole’s web admin password:
pihole -a -p
Configuring Pi-hole to use Cloudflared Argo Tunnel
Back at the command line, let’s setup Pi-hole to use the Argo Tunnel via the cloudflared daemon started earlier. Enter the following:
echo 'server=127.0.0.1#54' | sudo tee /etc/dnsmasq.d/02-pihole.conf
Final step is to comment out (place a ‘#’ in front of) the two entries PIHOLE_DNS_1= and PIHOLE_DNS_2= in /etc/pihole/setupVars.conf:
sudo nano /etc/pihole/setupVars.conf
The above will configure pi-hole to use the cloudflared daemon listening at port 54 as its upstream DNS server. Save and restart pi hole with the command pihole restartdns
Quick Test
Configure a machine to use your newly configured Pi-hole machine as it’s DNS server. Then browse to dnsleaktest.com and run the extended test. If all working correctly you should see Cloudflare listed as your ISP in the results:
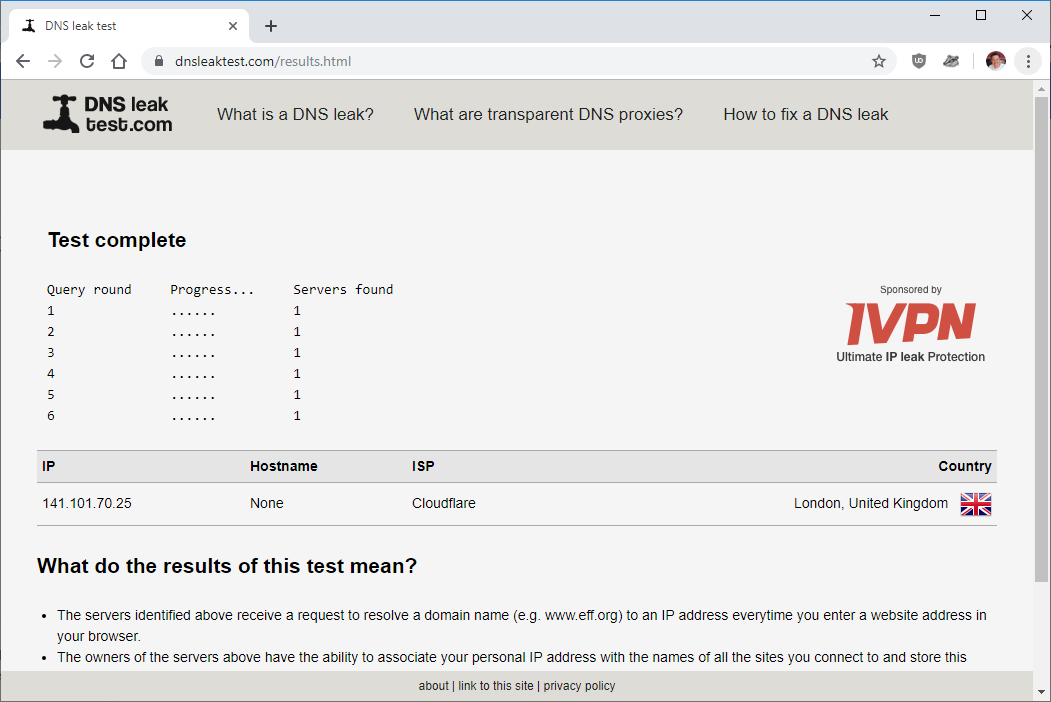
You may have more than one DNS server listed, that’s perfectly OK as long as they all list Cloudflare as your ISP ![]()
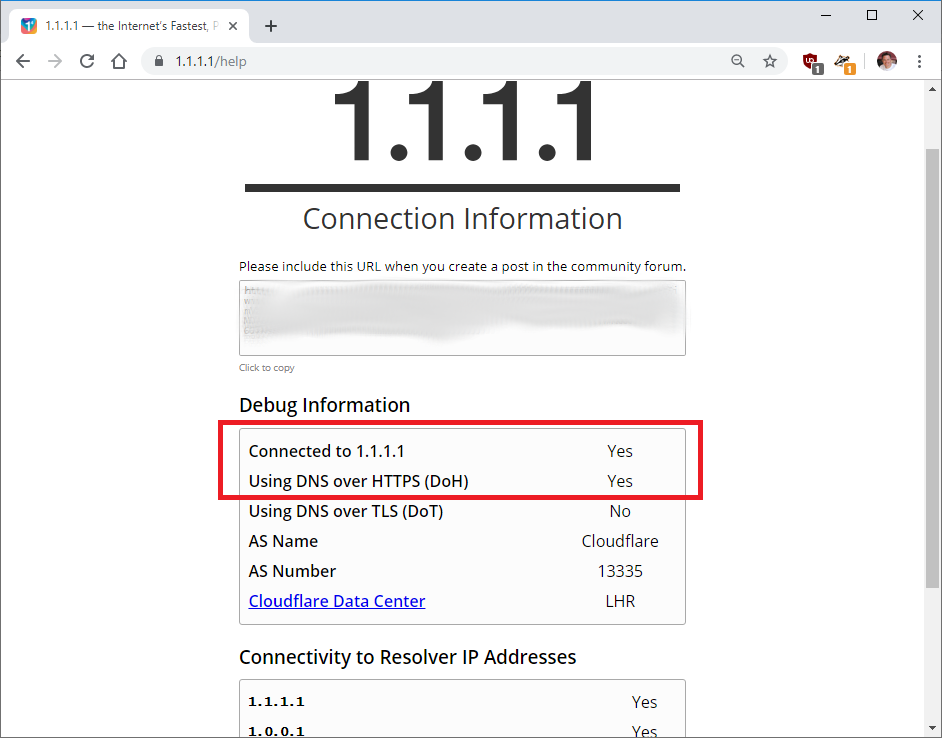
To confirm DNS over HTTPS functionality, browse to https://1.1.1.1/help. The return should match below. Check that Using DNS over HTTPS (DoH) returns Yes:
Run Cloudflared Argo Tunnel as a Service
Final piece is to configure Cloudflare to always run on startup. Edit the service unit file:
sudo nano /etc/systemd/system/dnsproxy.service
Paste in the following:
[Unit]
Description=CloudFlare DNS over HTTPS Proxy
Wants=network-online.target
After=network.target network-online.target

[Service]
ExecStart=/usr/local/bin/cloudflared proxy-dns --port 54 --upstream https://1.1.1.1/.well-known/dns-query --upstream https://1.0.0.1/.well-known/dns-query
Restart=always

[Install]
WantedBy=multi-user.target
Configure the service to auto start:
sudo systemctl enable dnsproxy.service
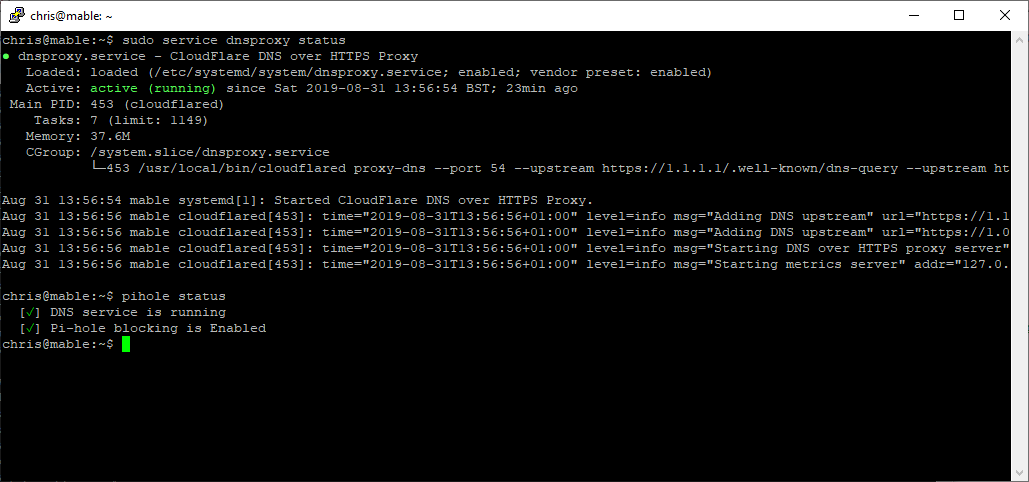
Reboot your pi-hole machine and confirm the newly created dnsproxy service starts and runs OK. Pi-hole too:
sudo service dnsproxy status
pihole status
Blocklists
Now we cone to the fun part; blocking unwanted adverts and other unwanted stuff! ![]()
There are plenty of sources of blocklists that can be used with Pi-hole. Here are some of my favourite sources:
- firebog.net - Excellent source of blocklists curated by Wally3k
- Block List Project - Good source of blocklists free for non-commercial use
- StevenBlack hosts - Consolidated blocklists
- Pi-hole discourse thread - The best blocking lists for the Pi-Hole + Alternative DNS servers 2019
Whitelists
The more you block, the more whitelists come into play. Whitelists allow connectivity to domains even when they are listed in the blocklists. Again, sources of whitelists are available on the internet:
- firebog.net - Whitelists are towards the bottom of Wally3k’s lists page
- anudeepND whitelist - Source of commonly whitelisted domains plus automated whitelist update tool
- Pi-hole discourse thread - Whitelist discussion with plenty of suggestions
Configuring Other Devices to use Pi-hole
This will vary from network to network depending on how devices attached to those networks obtain their network settings. Typically this will require a change on your internet router. Simply edit the local network DHCP settings that are pushed to network clients and enter the IP address of your pi-hole machine so that all clients use the pi-hole as their DNS server instead.
Pfsense has this setting in Services - DHCP Server - LAN:

Conclusion
In this post we looked at setting up domain based blocking with the objective of keeping most types of internet bourne garbage (adverts, ransomware, crypo-miners, internet tracking, malware, etc) off of all devices connected to our network. We achieved this by implementing Pi-hole and leveraging freely available blocklists.
As a bonus, we also enabled DNS over HTTPS to enhance privacy too.
Until next time, happy and safe web-surfing! ![]()
-Chris