


 When travelling with work, one of the preferred hotels we have the option to stay in is a nice quiet comfortable family run hotel with great service and a great restaurant menu. What’s even better is that all of their rooms have comfortable beds and decent WiFi coverage. Unfortunately it’s on the subject of WiFi that I have an issue:
The hotel’s WiFi is open and unencrypted.
Don’t get me wrong, I’m 100% positive that this isn’t the only hotel in the world with open and unencrypted WiFi. Looking at it from the perspective of the hotel management, such things as encryption, passwords, communication of passwords (today’s password is XYZ1234!!), dealing with guests unable to connect to the provided WiFi are added pain points that hotel staff can do without. Hotel management don’t need that additional burden. Just run the WiFi open and the above issues are resolved.
Why is open and unencrypted WiFi an issue? In fact what are the issues with public WiFi in general, both encrypted and unencrypted? The headline issues are:
- Snooping and sniffing - Tools exist that allow others to eavesdrop on WiFi connections. Doubly easy if the WiFi is unencrypted.
- Distribution of malware - How do you know that someone connected to the WiFi isn’t already infected, just waiting to pass the infection on?
- Man-in-the-middle attacks - Again, tools exist to allow someone else on the WiFi to proxy your traffic through their device.
- Password and username vulnerabilities - Yep, because very website in the world ever is 100% secure, have i been pwned?
As I’m sure you’ll have guessed by now, the answer is a VPN - a Virtual Private Network.
If you’ve been living user a rock for the last X years, or just want to know more, have a read of Wikipedia to find out more about VPNs.
What better platform to configure a VPN server on than pfSense? ![]() Lets dig in.
Lets dig in.
Overview
Objectives
For this setup I want the following:
- Secure - Goes without saying
- Two factor authentication - To achieve this, each user must hold a specific certificate as well as supplying the correct username and password
- Route ALL client traffic via VPN - No client traffic must leak onto the public network
pfSense Install
I wont cover that here. It’s simple enough and is already documented in the Netgate Docs
Certificates
As we are using certificates as one of the factors of our two factor authentication, each user must present their individual certificate at connection. The certificate must match that held by the OpenVPN server and have been generated via the same Certificate Authority (CA). From there username and password credentials are authenticated over a TLS link.
See the OpenVPN Authentication process documentation for the full breakdown of the OpenVPN authentication process.
Luckily for us, pfSense ships with a built in CA which can be used to handle all our certificate requirements. Bonus!
CA Certificate
Log into pfSense and select System / Certificate Manager / CAs and click Add.
Complete the following:
- Descriptive name - Something like “pfSense CA”
- Method - Create an internal Certificate Authority
- Key length (bits) - at least 2048
- Digest Algorithm - at least sha256
- Lifetime (days) - 3650 (10 years) is fine
- Common Name - Something generic like “internal-ca” is fine
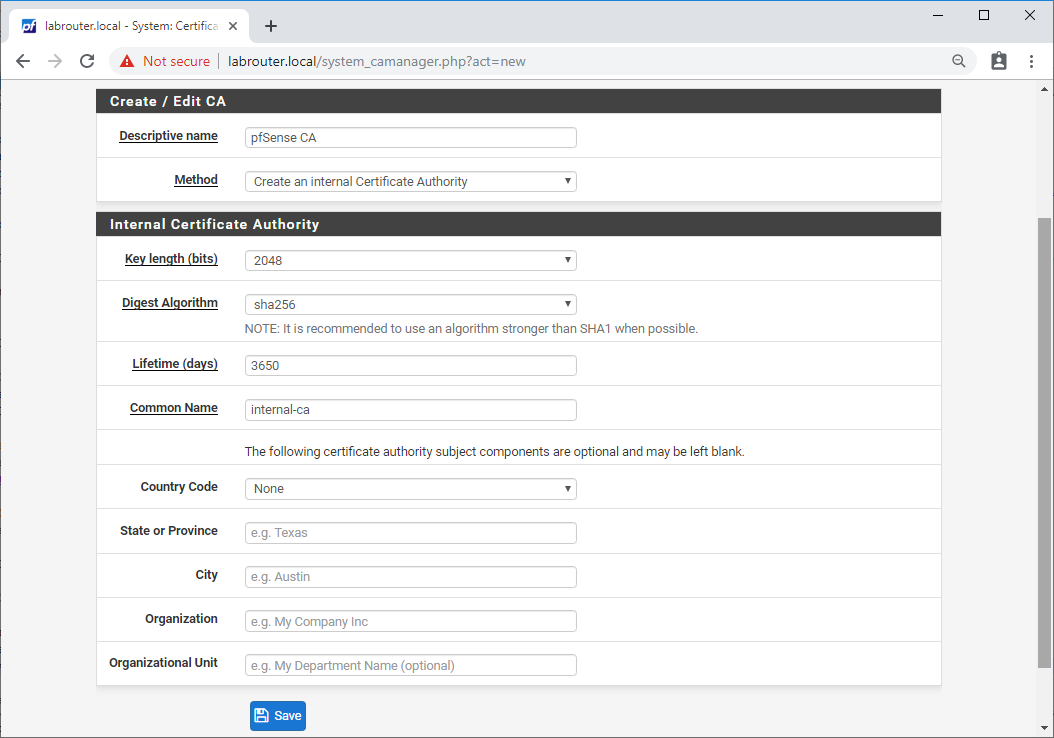 Click Save.
Server Certificate
Select System / Certificate Manager / Certificates and click Add/Sign.
Complete the following:
- Method - Create an Internal Certificate
- Descriptive name - Something like “VPN Server Certificate”
- Certificate authority - CA name set previously
- Key length (bits) - at least 2048
- Digest Algorithm - at least sha256
- Lifetime (days) - 3650 (10 years) is fine
- Common Name - Something generic like “vpn-server” is fine
- Certificate Type - Server Certificate
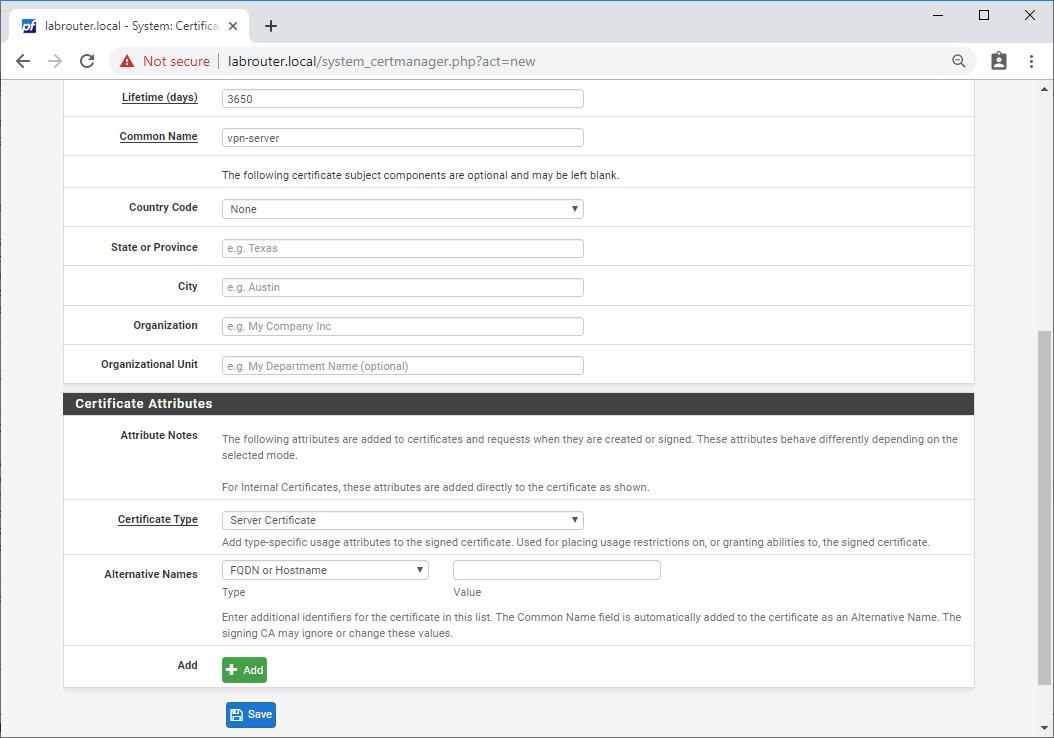 Click Save.
User Certificates
Complete this step for each user accessing the VPN server.
Select System / Certificate Manager / Certificates and click Add/Sign.
Complete the following:
- Method - Create an Internal Certificate
- Descriptive name - Something like “VPN Access - Chris”
- Certificate authority - CA name set previously
- Key length (bits) - at least 2048
- Digest Algorithm - at least sha256
- Lifetime (days) - 3650 (10 years) is fine
- Common Name - Must match username (created later) - eg “Chris”
- Certificate Type - User Certificate
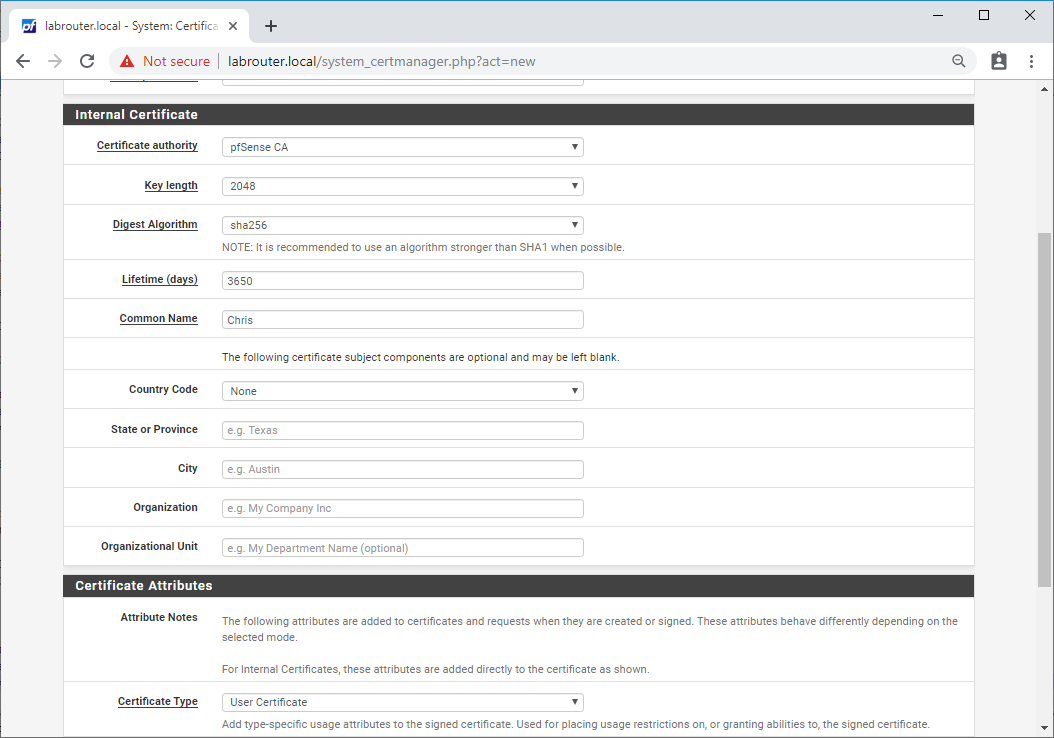 Click Save.
User Accounts
Complete this step for each user accessing the VPN server.
Select System / User Manager / Users and click Add.
Complete the following:
- Username - Must match Common Name (created earlier) - eg “Chris”
- Password - Obvious. NOTE - This will become the user’s VPN password
- Full name - Whatever you want!
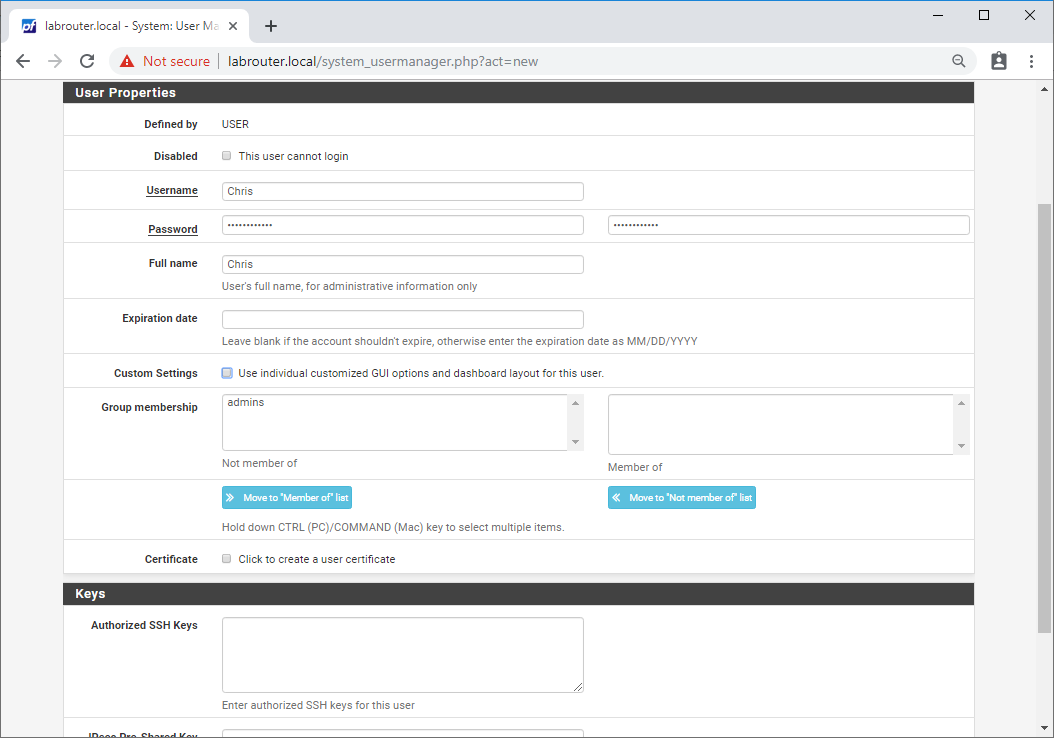 Click Save.
Tie User Certificate to User Account
Complete this step for each user accessing the VPN server.
Select System / User Manager / Users and click the pencil icon next to the user to modify. Under User Certificates, select Add.
- Method - Choose an Existing Certificate
- Existing Certificates - Select user’s certificate created earlier
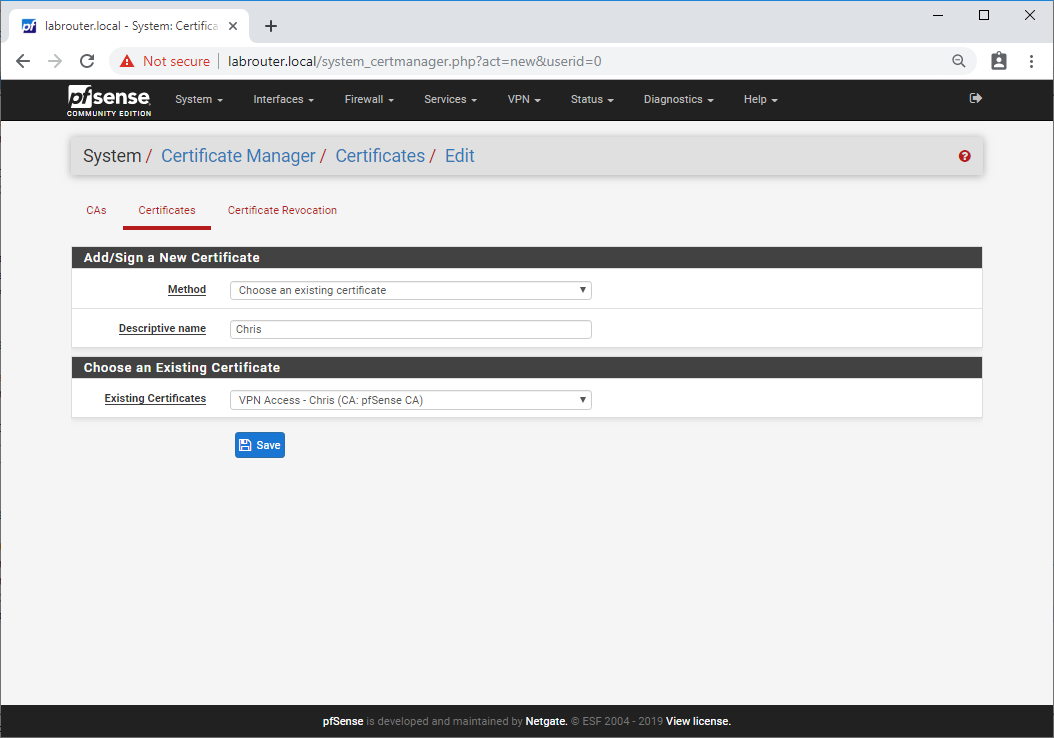 Click Save.
OpenVPN Server Configuration
Finally, the VPN server configuration itself!
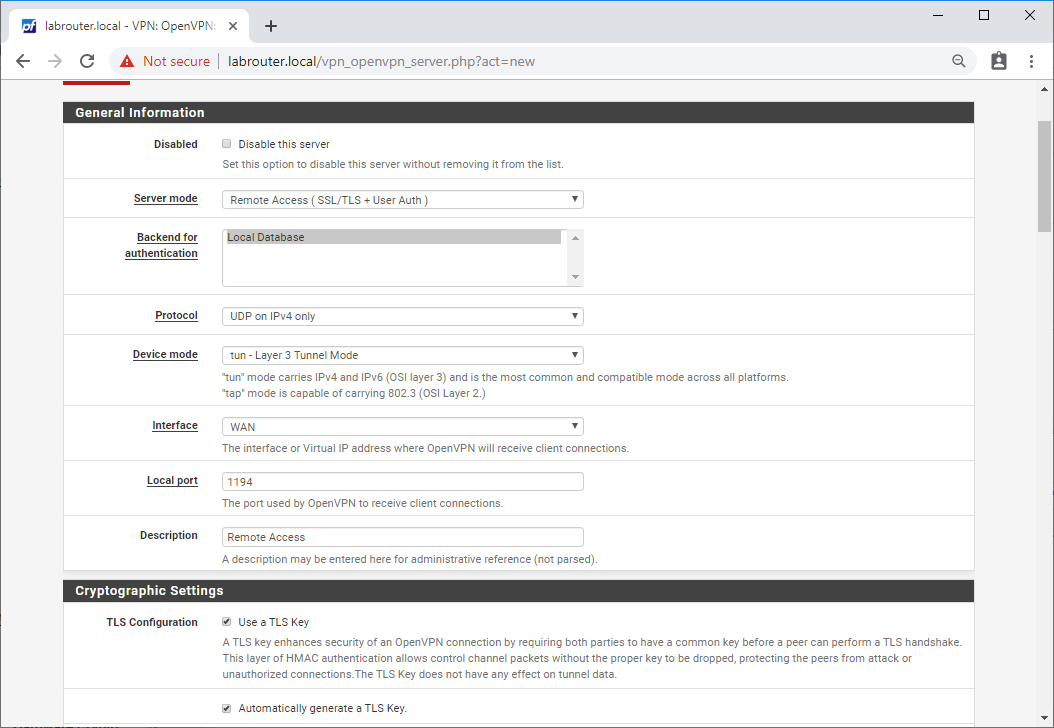
Select VPN / OpenVPN / Servers and click Add.
Quick point of note, these settings work for me. They will work for you too. However if you do have issues or would like to learn more, check out the Netgate Docs.
Complete the following:
- Server mode - Remote Access (SSL/TLS + User Auth)
- Backend for - Local Database
- Protocol - UDP on IPv4 only
- Device mode - tun - Layer 3 Tunnel Mode
- Interface - WAN
- Local port - 1194 (can be whatever you like!)
- Description - Remote Access (can be whatever you like!)
- TLS Configuration - Use TLS Key ticked
- Automatically generate a TLS Key - Ticked
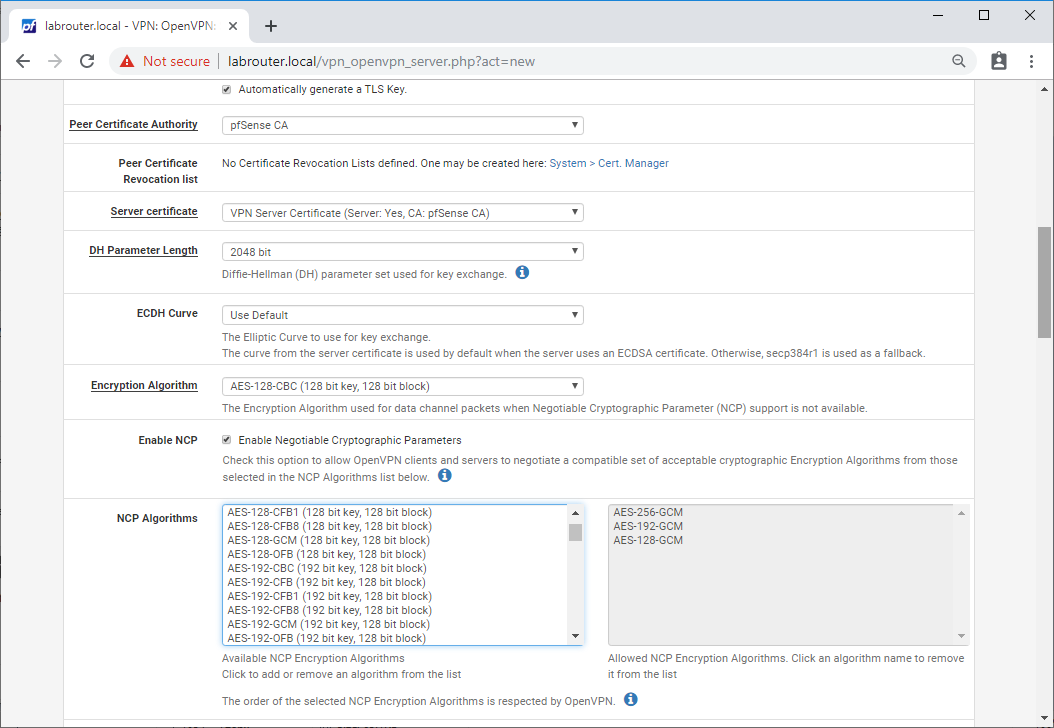
- Peer Certificate Authority - CA name set previously
- Server certificate - Server certificate created earlier
- DH Parameter Length - 2048 bit
- ECDH Curve - Use Default
- Encryption Algorithm - AES-256-CBC (256 bit key, 128 bit block)
- Enable NCP - Ticked
- NCP Algorithms - Allowed NCP Encryption Algorithms - AES-256-GCM, AES-192-GCM, AES-128-GCM
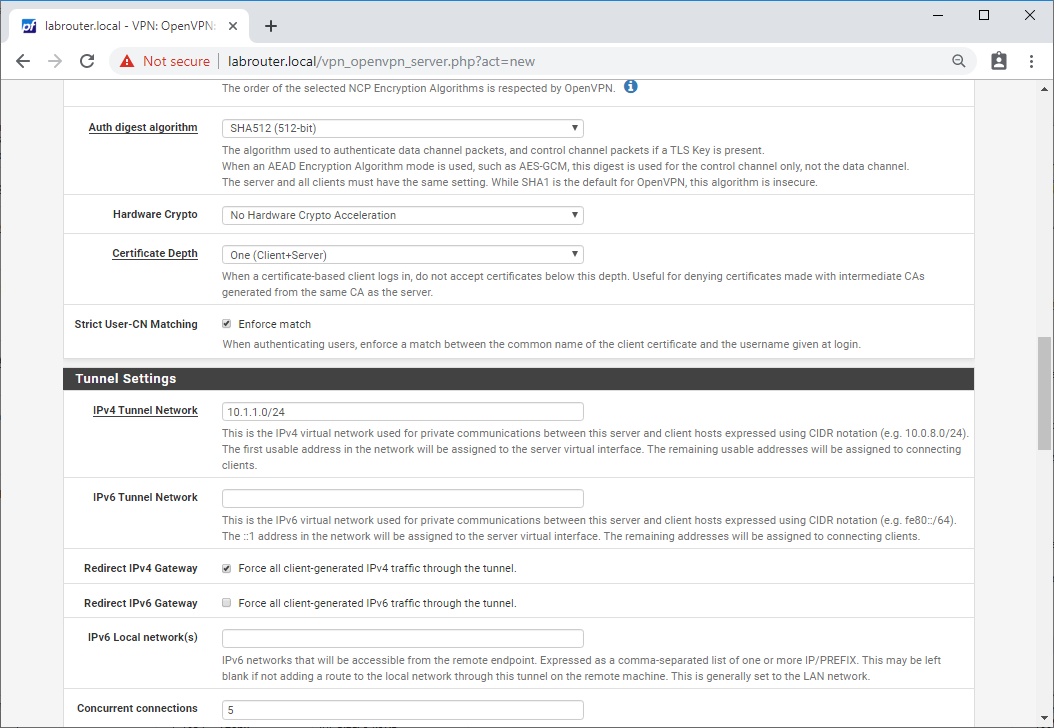
- Auth digest algorithm - SHA512 (512-bit)
- Hardware Crypto - Enable if available
- Certificate Depth - One (Client+Server)
- Strict User-CN Matching - Ticked (Enforce match)
- IPv4 Tunnel Network - 10.1.1.0/24 (an IP range not used elsewhere within pfSense(
- IPv6 Tunnel Network - (blank)
- Redirect IPv4 Gateway - Ticked (Force all client-generated IPv4 traffic through the tunnel.)
- Redirect IPv6 Gateway - Unticked
- IPv6 Local network(s) - (blank)
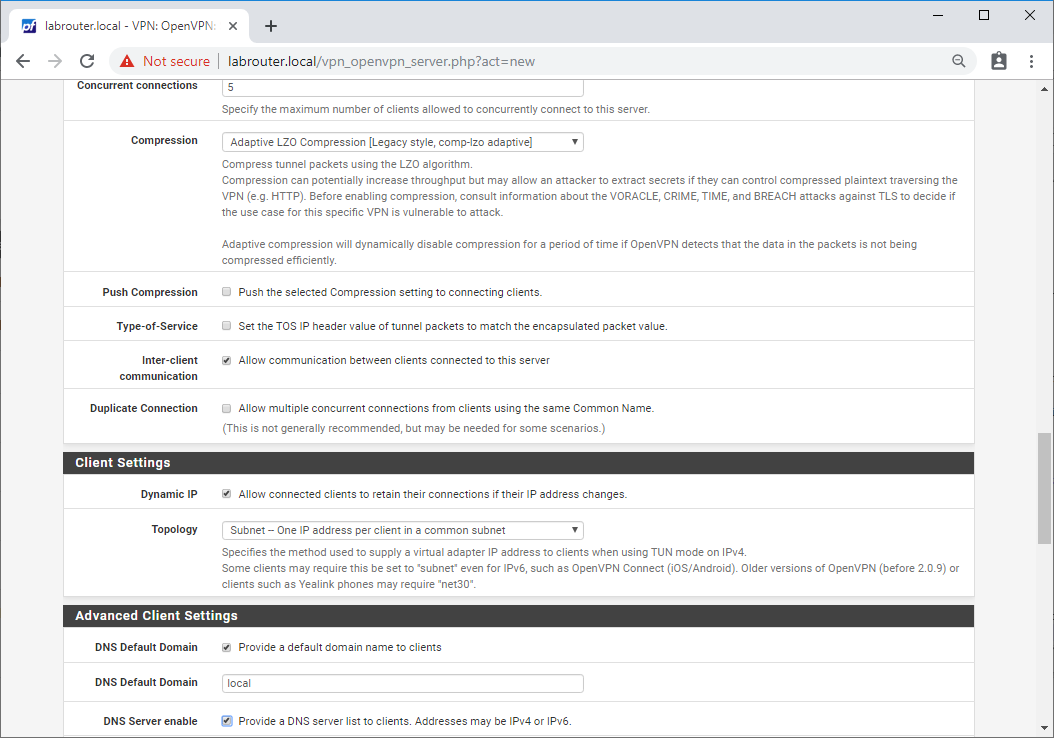
- Concurrent connections - 5
- Compression - Adaptive LZO Compression [Legacy style, comp-lzo adaptive]
- Push Compression - Unticked
- Type-of-Service - Unticked
- Inter-client communication - Ticked
- Duplicate Connection - Unticked
- Dynamic IP - Ticked
- Topology - Subnet – One IP address per client in common subnet
- DNS Default Domain - Ticked
- DNS Default Domain - Match DNS settings configured in pfSense (eg local)
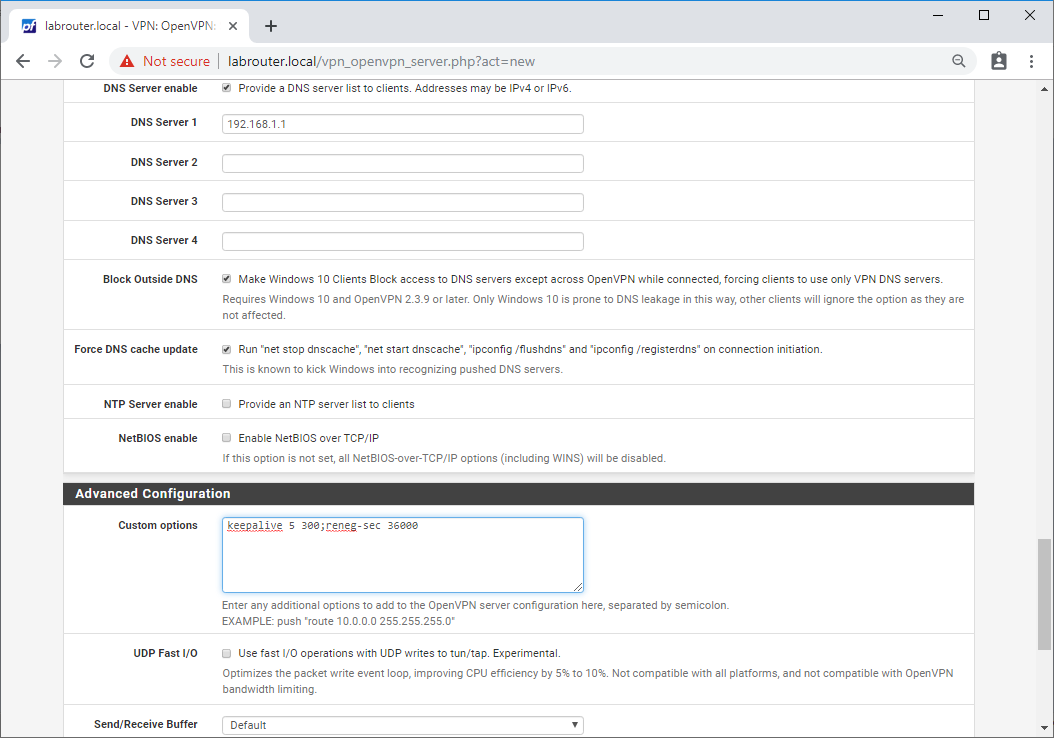
- DNS Server enable - Ticked
- DNS Server 1 - IP address of your internal DNS server (eg 192.168.1.1)
- DNS Server 2 to 4 - Blank
- Block Outside DNS - Ticked
- Force DNS cache update - Ticked
- NTP Server enable - Unticked
- NetBIOS enable - Unticked
- Custom options - keepalive 5 300;reneg-sec 36000 (send keep-alive packet every 5 seconds for 5 minutes, Renegotiate data channel key after 36000 seconds)
- UDP Fast I/O - Unticked
- Send/Receive Buffer - Default
- Gateway creation - Both
- Verbosity level - Default
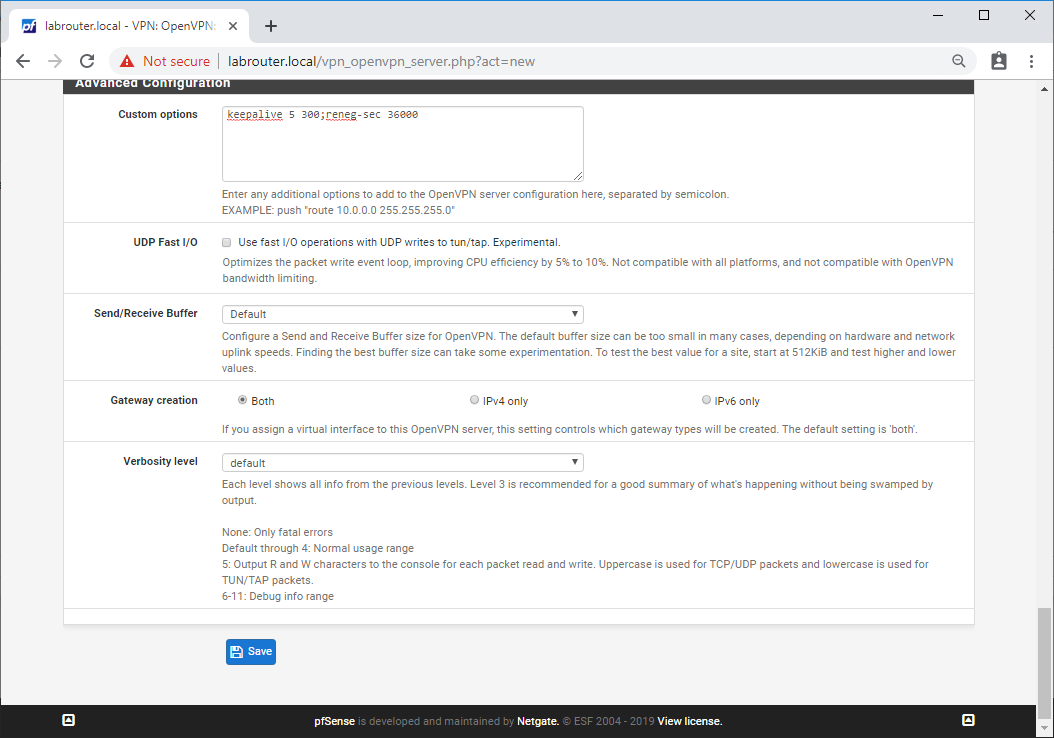 Click Save.
Open Firewall
Final step is to allow connections to the VPN server via the pfSense firewall.
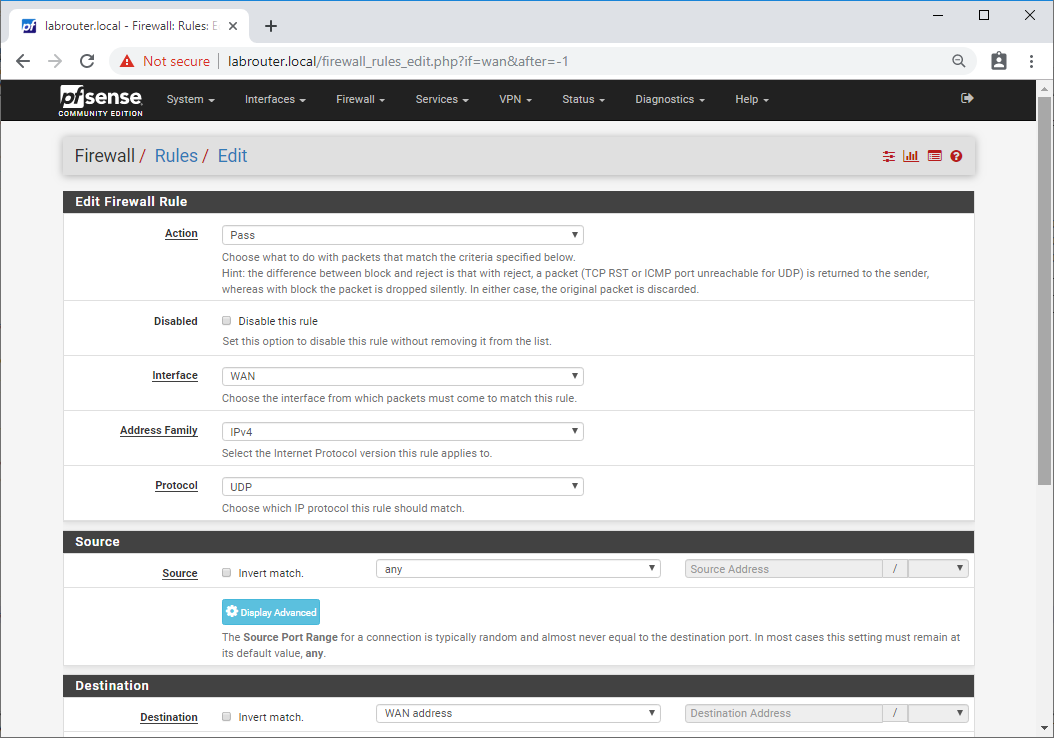
Select Firewall / Rules / WAN and click Add.
Complete the following:
- Action - Pass
- Disabled - Unticked
- Interface - WAN
- Address Family - IPv4
- Protocol - UDP
- Source - any
- Destination - WAN Address
- Destination Port Range - (other) 1194 (other) 1194
- Log - Unticked
- Description - Open VPN Access
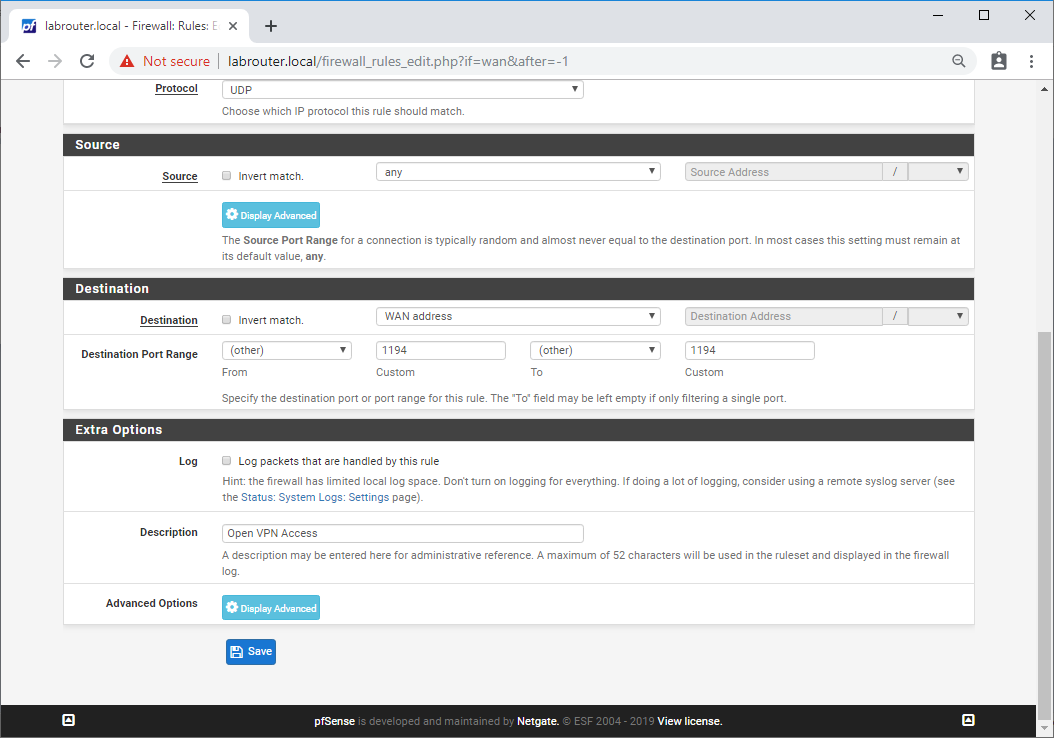 Click Save and Apply Changes
Conclusion
Phew! ![]() That’ll finish it for the pfSense OpenVPN server configuration.
That’ll finish it for the pfSense OpenVPN server configuration.
In this article we looked at why a VPN is a good idea and what could happen if you don’t run a VPN. From there we looked at configuring an OpenVPN server on pfSense. Not only that, we secured our OpenVPN server with two factor authentication using both certificates and passwords.
Next time, we will look at client configuration and testing
Until then, keep it secure! ![]()
-Chris