


 Just over five years ago (yep… time flies!)
I posted a simple method to boot and install a VMware ESXi server from a Microsoft Windows Deployment Services (WDS) Server.
Back then I was using Windows Server 2012 to boot ESXi 5.5. Check out that post here.
Prompted by a recent comment from Tariq on that post:
The procedure works fine when BIOS set to Legacy mode. But, it is not working when set to UEFI mode.
Got me thinking. Let’s update that post.
Not only will we go for UEFI booting, lets use WDS from Windows Server 2019 and ESXi 7.0 too. What follows is a whistle stop process to go from zero to booting ESXi via UEFI from WDS.
Overview
What, Why, When?
What?
- UEFI: Unified Extensible Firmware Interface: Replaces the legacy Basic Input/Output System (BIOS) firmware interface originally present in all IBM PC-compatible PCs/Servers. Learn more about UEFI here.
- WDS: Windows Deployment Services is a server technology from Microsoft for network-based installation of Windows operating systems - although we are going to leverage our WDS server for ESXi. Learn more about WDS here
- ESXi: A bare-metal hypervisor that is capable of running Virtual Machines. Learn more about ESXi here
Why?
ESXi is shipped by VMware in the form of an ISO disk image file. To install ESXi, the administrator either has to create a USB device (stick, hard disk, etc) from the image or burn the image onto a CD-ROM or finally use some other third party method (HP iLO, Dell iDRAC, IBM RSA) to boot the ESXi installer in order to install ESXi.
Instead of all that, how about just extracting the ESXi ISO file to a folder, updating two files and booting the server to have ESXi installed over the network? Much quicker and simpler!
When?
Typically and to get the most of of the VMware portfolio of products, ESXi is not installed on just one server per datacentre or solution. Clustered ESXi deployments can number from two to thirty two ESXi hosts per cluster, per solution.
Imagine having to deploy thirty two ESXi hosts from a handful of boot CD’s or USB sticks…
What’s more, using VMware Workstation / VMware Workstation Player, you could install your WDS server into a VM and use that VM to boot and deploy ESXi.
Install WDS and DHCP Services
First off, grab a copy of Windows Server 2019. If you don’t already have a copy, you can download a 180 day trial from here.
I’m not going to cover deploying Windows Server, it’s simple enough and there are plenty of other sites that cover that (for example). Once installed, make a note of the IP address you assign to the WDS server. You’ll need that later. For example, I gave my WDS server an IP address of 192.168.123.2. Yours maybe different.
Once you Windows server has been installed, open Server Manager and select Add Roles and Features. From there click Next two or three times (depending on your server configuration and tick the following roles to be installed. Click Add Features when prompted to add role features:
- DHCP Server
- Windows Deployment Services
As shown below:

Click Next four times, ensure both Deployment Server and Transport Server are selected, click Next again and finally click Install.
Once complete, click on the orange triangle and select Complete DHCP Configuration:
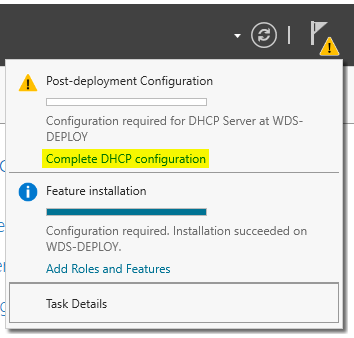
Click Commit and Close to complete the DHCP server post install configuration.
Lets go ahead and reboot the server at this point.
Configure WDS and DHCP Services
Now that we have DHCP and WDS installed, it’s time to configure both of them.
DHCP Service
Click Start, Windows Administrative Tools, DHCP, right click IPv4 and select New Scope.
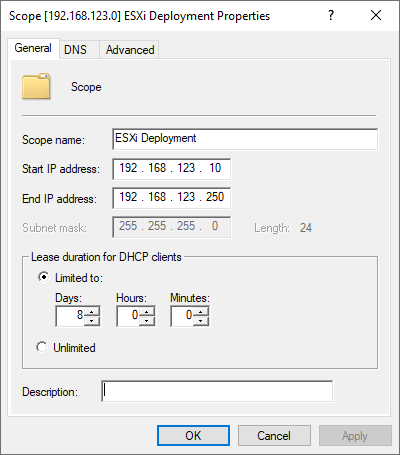
Name the scope (I called mine ESXi Deployment), click Next and define your DHCP scope. Remember to use IP addresses in the same range as your WDS server (As above, I chose to give my WDS server an IP address of 192.168.123.2, so I’ll use 192.168.123.10 as my start IP address and 192.168.123.250 as my end IP address - again, yours maybe different).
Click Next, set any scope exclusions (if required), Next, set the DHCP lease duration (again, if required), click Next, click Yes I want to configure these options now and Next. Set your gateway IP (I’m using 192.168.123.1), click Add and Next.
Configure your DNS settings if required (I’m not using any DNS in my deployment as the ESXi installer has no need for DNS, so I left everything blank) and clicked Next.
I cant remember when anyone last used WINS, so click Next.
Finally, click Yes I want to activate this scope now, Next and Finish
My completed DHCP scope looked like this:
WDS Service
Click Start, Windows Administrative Tools, Windows Deployment Services. Open up Servers right click your server and select Configure Server.
Click Next, Standalone Server, set path to C:\RemoteInstall, click Next and Yes to continue if you receive a warning.
Ensure that only Do not listen on DHCP and DHCPv6 ports is ticked. If needed, untick Configure DHCP options for Proxy DHCP and click Next
Ensure that Do not respond to any client computers is selected, click Next and Finish. Ignore the error regarding unable to start WDS services in a timely fashion should you receive it.
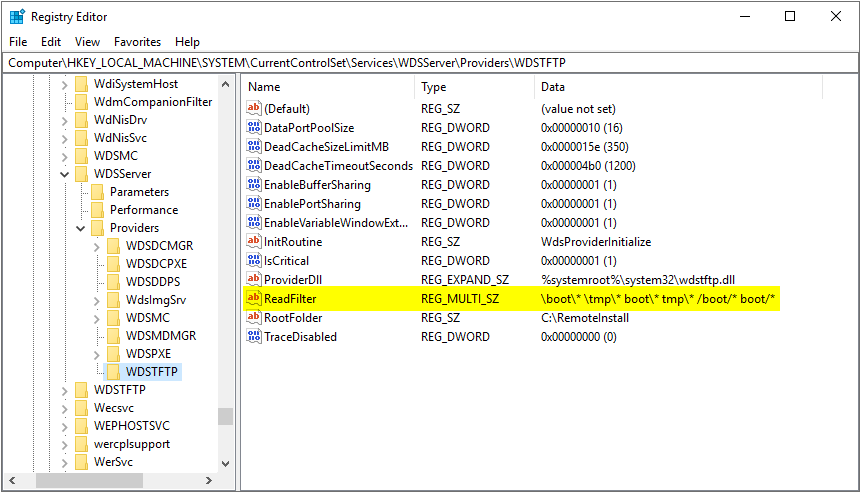
Next we need to add two entries into the registry to allow WDS to support deploying ESXi.
Open regedit and navigate to the following key:
HKEY_LOCAL_MACHINE\SYSTEM\CurrentControlSet\Services\WDSServer\Providers\WDSTFTPDouble click ReadFilter and add the following to the bottom of the list and click OK:
/boot/*
boot/*
If you receive an error regarding empty strings, just click OK. Your saved entry should look like this:
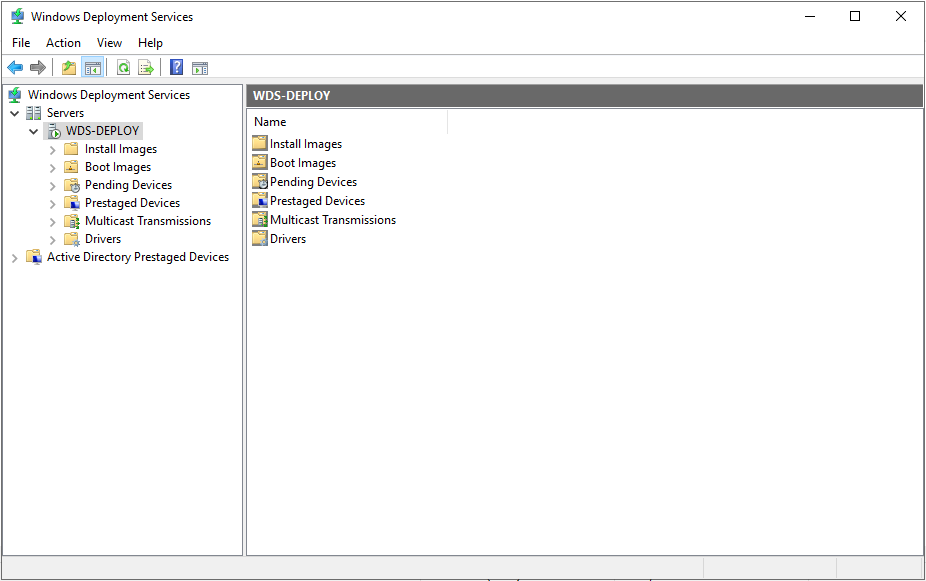
Exit regedit, back in the WDS management window opened earlier, right click your WDS server select All Tasks and Start (or Restart if services are already running). Ensure that the WDS server has a green play button as shown below:
ESXi on WDS
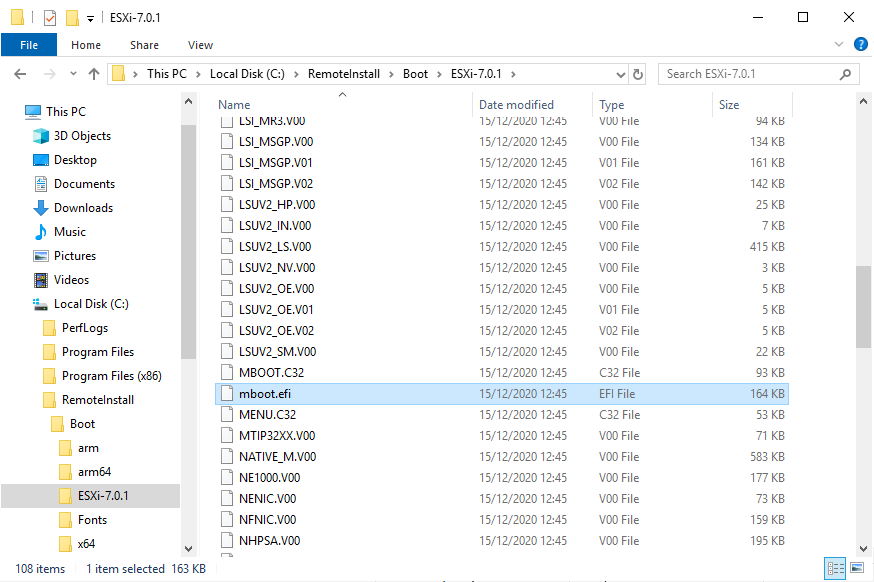
Extract the ESXi ISO image to a folder under the C:\RemoteInstall\Boot folder. I’m going to deploy ESXi 7.0 Update 1, so I’ll put my ESXi files in C:\RemoteInstall\Boot\ESXi-7.0.1, keeping the folder structure from the ISO image:

Next, copy the file C:\RemoteInstall\Boot\ESXi-7.0.1\EFI\BOOT\BOOTX64.EFI to C:\RemoteInstall\Boot\ESXi-7.0.1 and rename the file to mboot.efi:
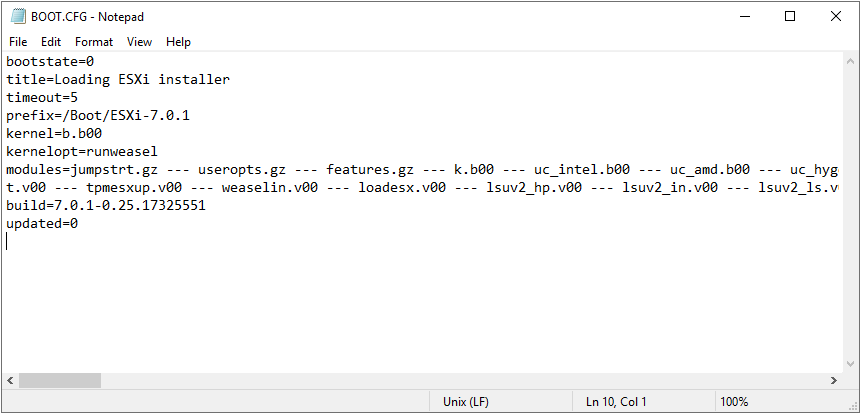
Next we need to update the boot.cfg file in C:\RemoteInstall\Images\ESXi-7.0.1 folder. There are three changes we need to make:
| Original Config | Modified Config | Changes Made |
| modules=/jumpstrt.gz (etc) | modules=jumpstrt.gz (etc) | Remove the '/' prefix from all modules |
| prefix=/ | prefix=/Boot/ESXi-7.0.1 | Change to match ESXi files location |
| kernel=/b.b00 | kernel=b.b00 | Remove the '/' prefix |
| kernelopt=cdromBoot runweasel | kernelopt=runweasel | Remove 'cdromBoot' |
The final file after changes should resemble the following:
Next, lets configure the DHCP server to use the ESXi image.
Click Start, Windows Administrative Tools, DHCP, expand the ESXi deployment scope created above, right click IPv4 and select Define Vendor Classes.
Click Add and enter the following:
- Display Name = PXEClient (UEFI x64)
- Description = PXEClient:Arch:00007
- ASCII = PXEClient:Arch:00007
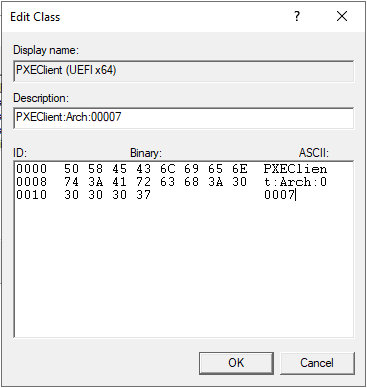
Click OK and Close to save.
Next, lets create a boot policy to tie all of the above up.
Open the ESXi Deployment scope created earlier and select Policies for the scope (as opposed to Polices for the whole DHCP server):
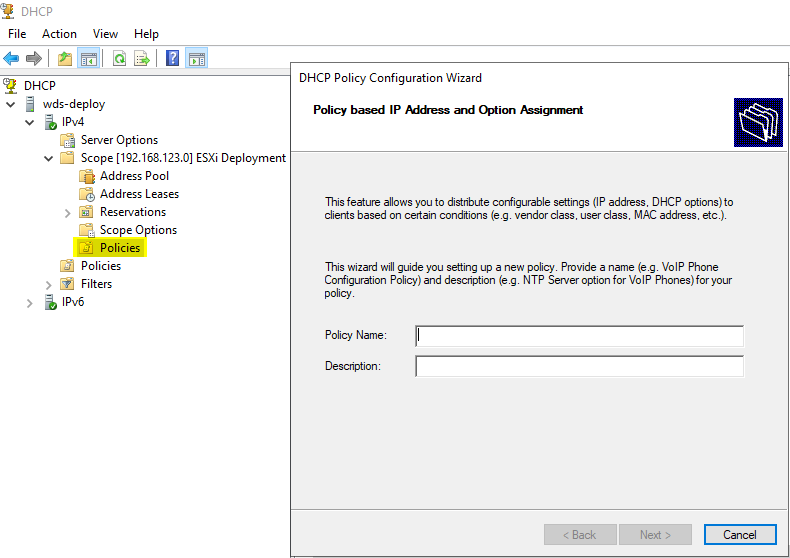
Name the policy ESXi UEFI Boot Policy and click Next.
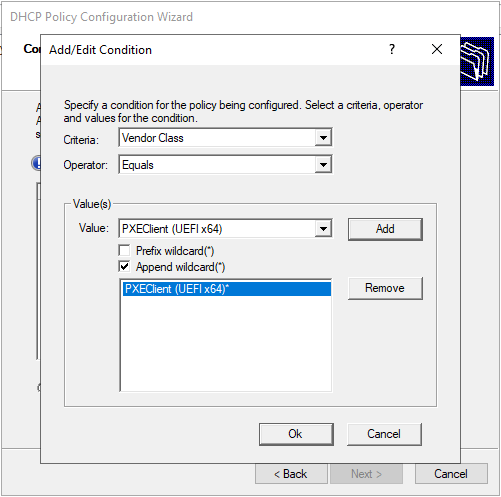
Click Add, and set the following:
- Criteria = Vendor Class
- Operator = Equals
- Value = PXEClient (UEFI x64)
- Append Wildcard = Ticked
Click Add. Confirm configuration resembles the following, click OK:
Click Next, No to configuring an IP range and Next.
At the Options dialogue, tick and configure the following:
- 66 Boot Server Host Name = IP Address of the WDS Sever (In my case 192.168.123.2)
- 67 Boot File Name = Path to mboot.efi file moved earlier (In my case \Boot\ESXi-7.0.1\mboot.efi)
Click Next and confirm that the configuration resembles the following:
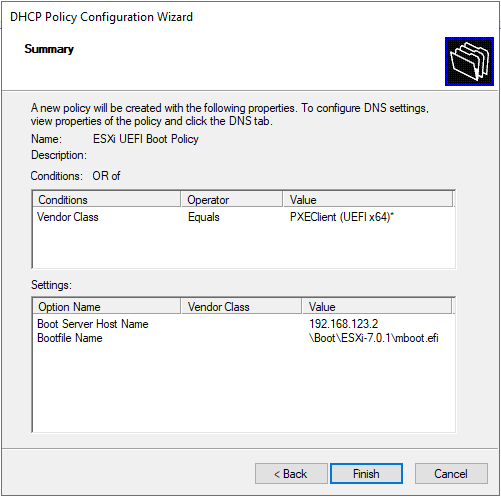
Finally, click Finish
To double check, select Scope Options and confirm that the configuration resembles the following:
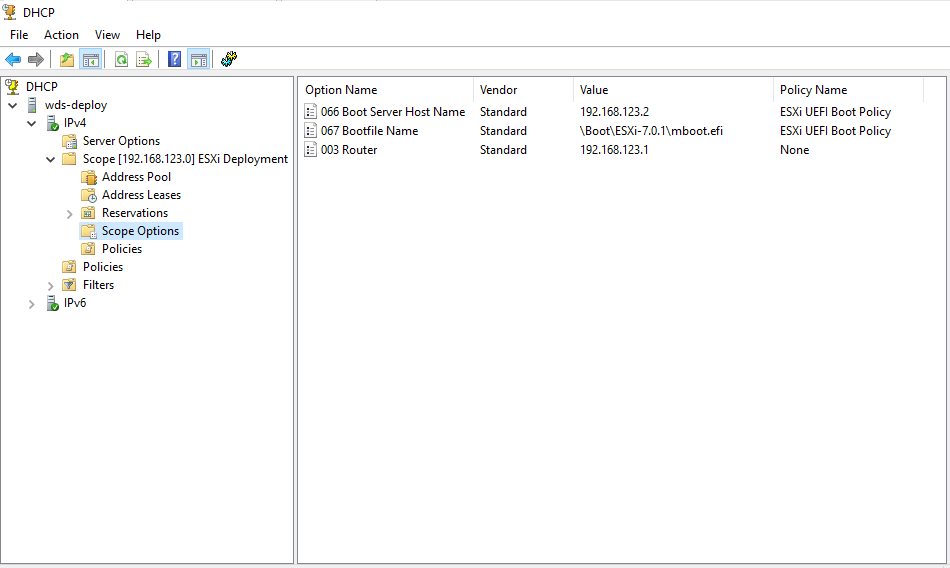
Restart DHCP server by clicking on the server name in the DHCP Server tree, choosing All Tasks and Restart.
Testing and Troubleshooting
Before we test, lets double check a few things.
Confirm Settings after Reboot
Lets reboot the WDS server one more time, check a couple of settings are as we left them before the reboot.
After the reboot, let’s double check our DHCP scope options:
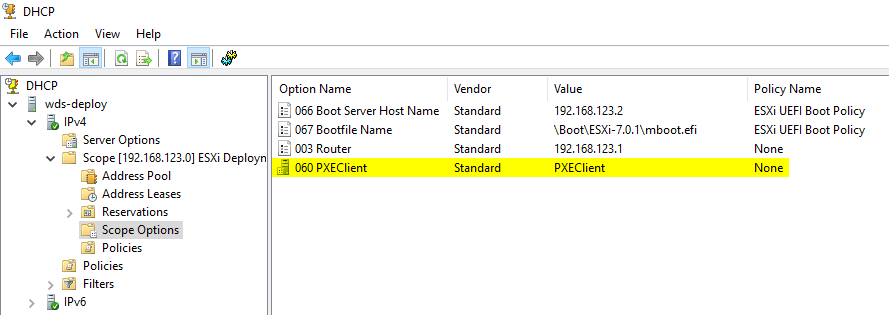
We seem to have picked up an additional unwanted 060 PXEClient scope option, even though we did not have it set earlier!
To remove, open WDS management, right click on server name, select Properties and DHCP. Untick the Configure DHCP ooptions to indicate that this is also a PXE Server option:
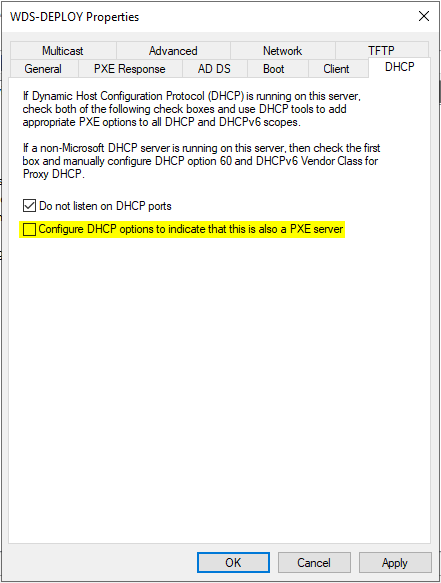
Click Apply and OK (if you receive a file not found error, just ignore it and close the option dialogue using Cancel). Restart both WDS service and DHCP services - or reboot again. Double check that the 060 PXEClient scope option has disappeared.
Slow ESXi Boot
If you test and find that the ESXi image is taking an age to boot, there are two settings we can change to drastically improve the speed of the ESXi boot.
Open WDS management, right click on server name, select Properties and TFTP.
Set:
- Maximum Block Size = 1450
- Enable Variable Window Extension = Unticked
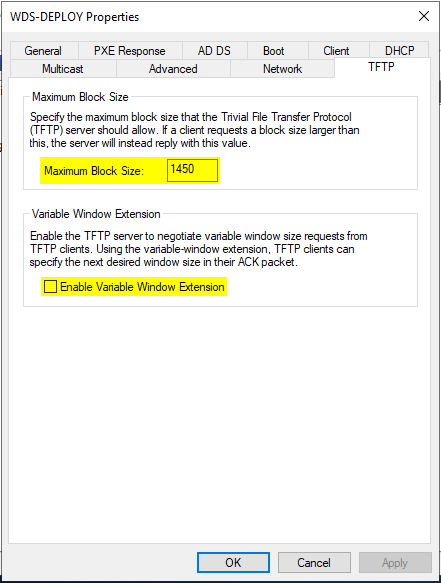
Click Apply and OK. Restart the WDS service - or reboot again and test again.
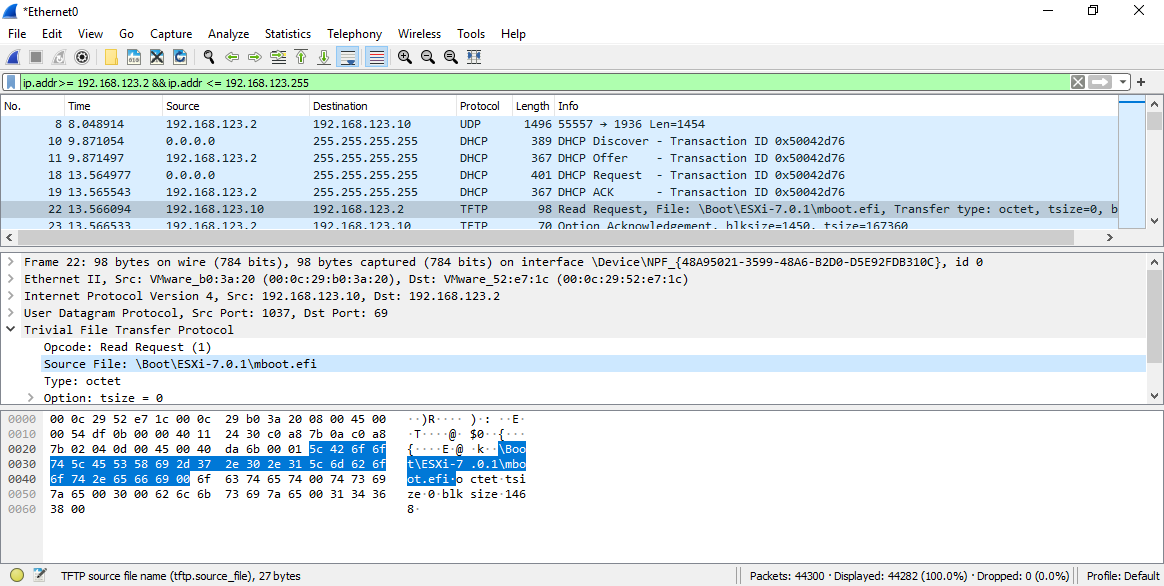
If All Else Fails
Remember Wireshark is your friend!
Install on your WDS server and kick off a capture. You should be able to see the whole network boot process from start to finish:
Conclusion and Wrap Up
So there we have it. In this post we:
- Installed a DHCP server
- Installed a Windows Deployment Services (WDS) server
- Configured both DHCP and WDS
- Extracted and configured an ESXi image to be deployed via WDS
- Fixed a couple of common pitfalls
- Detailed a way of diagnosing issues further using Wireshark
Nice!
Oh and we found out that it has been just over five years since I last looked at this!
Am I feeling old? Probably… ![]()
-Chris