


 In this post, I’m going to talk about a “greenfield deployment”. For those unfamiliar with the term, let us get accustomed with the term greenfield deployment.
A greenfield deployment refers to the installation of some IT infrastructure where previously there was none. This term is derived from the construction industry, where new development on previously undeveloped land is often called a greenfield development. Greenfield deployment may refer to a network, datacenter or other major IT projects when they are built from the ground up.
This type of development is often beneficial because it is not subject to constraints posed by existing networks, infrastructure, etc.
Overview
The Problem
Imagine the following scenario: you are installing vSphere to a greenfield site. The only infrastructure that you have on site are the ESXi server or servers that you have already built. You may / may not have some shared storage (iSCSI / NFS / etc) set up ready for deploying VMs on to.
You do however have enough storage available to deploy a vCenter server.
What’s more, you need to install vCenter to proceed to the next stage of the build. To deploy vCenter you require DNS and optionally NTP. See Prerequisites for Deploying the vCenter Server Appliance - Network
BUT WAIT! Your environment does not yet have a either DNS or NTP servers setup, however according to the vCenter prerequisites cannot deploy vCenter without them.
How do you deploy vCenter?
You could deploy a quick Linux or Windows DNS and NTP server to get you over this hurdle, but who has time for that? Surely there has to be a simpler / cleverer way.
Keep reading. There is…
NTP: Easy
The easy one first. The vCenter installer will allow the use of the ESXi server as a time source. It achieves this via the VMtools package that comes bundled with vCenter. Simple. Easy fix.
DNS: vCenter Server Installer GUI
After some research of various blogs, forum posts, etc it was suggested that when using the vCenter Installer Graphical User Interface (GUI) you can either:
- Point the vCenter installer DNS setting to use the Gateway IP - so that the installer could at least see an online IP address
- Point the vCenter installer at itself for DNS - use
127.0.0.1as the DNS server IP address
After much testing with vCenter 7.0U3a, solution 1 (setting the installer to use the Gateway IP) results in:
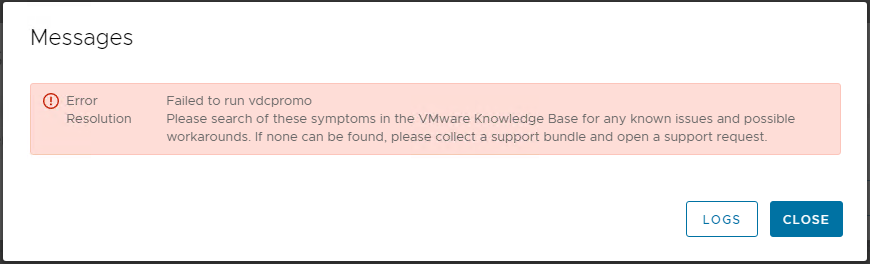
During stage 2 of the GUI installer, the VMware Authentication Framework fails to start resulting in the above “Failed to run vdcpromo” error.
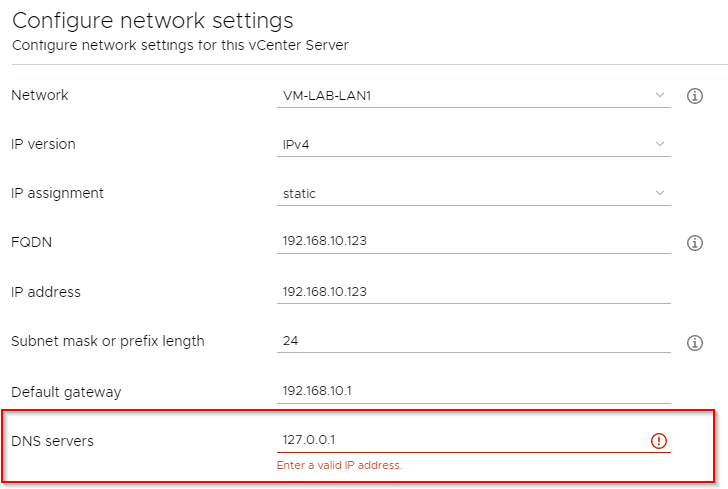
Solution 2 (setting the vCenter installer to use 127.0.0.1) is deemed by the GUI installer as an invalid configuration:
So what is the fix then?
DNS: vCenter Server Installer CLI
Luckily enough for us, the Command Line Interface (CLI) installer is much more forgiving. It will allow us to implement solution 2 from above - namely to set 127.0.0.1 as the DNS server for the vCenter.
Using the vCenter Server Installer CLI
To use the CLI installer, you need to provide it with a JSON formatted answer file.
Templates of the installer JSON files can be found at \vcsa-cli-installer\templates\install within the vCenter Installer ISO file.
Below follows vCenter CLI Installer json updated to use:
- 127.0.0.1 as the vCenter DNS server via
"dns_servers": ["127.0.0.1"]setting - Use VMtools to sync time via
"time_tools_sync": truesetting
{
    "__version": "2.13.0",
    "__comments": "Template: Deploy vCenter to ESXi without DNS+NTP",
    "new_vcsa": {
        "esxi": {
            "hostname": "<ESXI_IP_ADDRESS>",
            "username": "root",
            "password": "<ESXI_PASSWORD>",
            "deployment_network": "<VM_PORTGROUP>",
            "datastore": "<DATASTORE_NAME>"
        },
        "appliance": {
            "thin_disk_mode": true,
            "deployment_option": "<VC_SIZE>",
            "name": "<VC_INVENTORY_NAME>"
        },
        "network": {
            "ip_family": "ipv4",
            "mode": "static",
            "system_name": "<VC_IP_ADDRESS>",
            "ip": "<VC_IP_ADDRESS>",
            "prefix": "<SUBNET_MASK_PREFIX>",
            "gateway": "<GATEWAY_IP_ADDRESS>",
            "dns_servers": [
                "127.0.0.1"
            ]
        },
        "os": {
            "password": "<VC_PASSWORD>",
            "time_tools_sync": true,
            "ssh_enable": true
        },
        "sso": {
            "password": "<SSO_PASSWORD>",
            "domain_name": "vsphere.local"
        }
    },
    "ceip": {
        "settings": {
            "ceip_enabled": false
        }
    }
}
The above generic settings are broken down as below and should be updated / replaced prior to vCenter deployment:
| JSON File Setting | Details |
|---|---|
<ESXI_IP_ADDRESS> |
IP Address of ESXi Host to run vCenter |
<ESXI_PASSWORD> |
ESXi Host root password |
<VM_PORTGROUP> |
vSwitch Portgroup for the new vCenter |
<DATASTORE_NAME> |
Datastore for the new vCenter |
<VC_SIZE> |
New vCenter deployment size. One of the following: tiny / small / medium / large / x-large |
<VC_INVENTORY_NAME> |
VM Inventory Name for the new vCenter VM (Cosmetic - Not used by vCenter or DNS) |
<VC_IP_ADDRESS> |
IP Address for the new vCenter |
<SUBNET_MASK_PREFIX> |
Subnet prefix for the new vCenter eg “24” = 255.255.255.0 |
<GATEWAY_IP_ADDRESS> |
Gateway IP address for the new vCenter |
<VC_PASSWORD> |
root account password for the new vCenter |
<SSO_PASSWORD> |
[email protected] password (Best practice: <VC_PASSWORD> should match <SSO_PASSWORD>) |
For further details on any of the above settings, see Required Information for Deploying a vCenter Server Appliance.
Next we need to construct our vCenter CLI installer command. I open a command prompt and run command from the folder containing the CLI installer exe file. This can be found in \vcsa-cli-installer\win32\ folder of the downloaded vCenter installer ISO file.
The CLI installer switches are pretty self explanatory so I won’t go into detail here. For further details on any of the installer switches, see Syntax of the CLI Deployment Command.
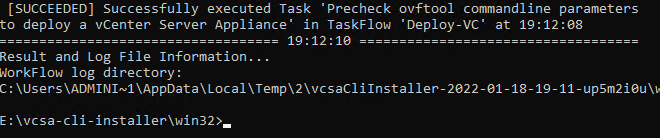
To test the constructed json file and test vCenter deployment readiness, use the following command. My updated copy of the above json file is available to the installer at D:\Deploy-VC.json:
vcsa-deploy.exe install --accept-eula --acknowledge-ceip --no-ssl-certificate-verification --precheck-only "D:\Deploy-VC.json"Should the precheck complete OK, you should see something like this being returned:
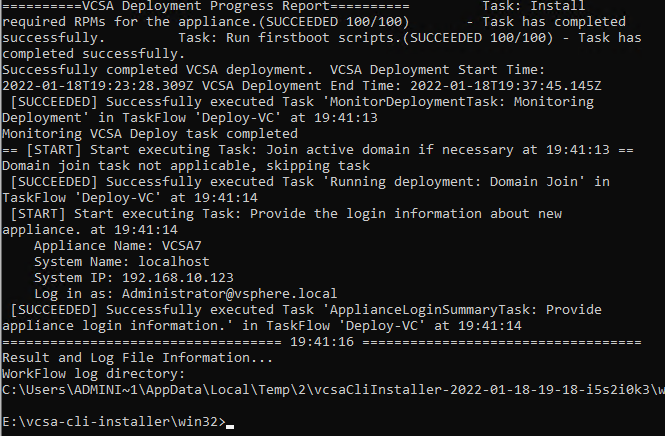
OK, let’s deploy vCenter for real. Use the following command. Again, my json file is available to the installer at D:\Deploy-VC.json:
vcsa-deploy.exe install --accept-eula --acknowledge-ceip --no-ssl-certificate-verification "D:\Deploy-VC.json"When the installer successfully completes, something like the following will be returned:
Nice. vCenter installed without the need for DNS and NTP. ![]()
When DNS Returns
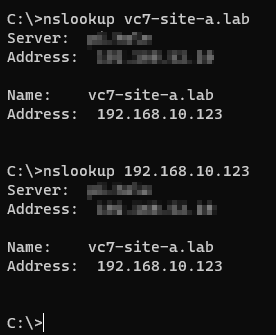
OK, so you are further down the road and you now have access to DNS. First step is to confirm that you can both forward are reverse resolve your vCenter in DNS:
The following should NOT be completed until this is the case.
OK, let’s login to the vCenter appliance management interface at https://<VC_IP_ADDRESS>:5480. Credentials are typically root and <VC_PASSWORD> set during the CLI deployment above.
Upon selecting Networking from the menu, the following can be seen:
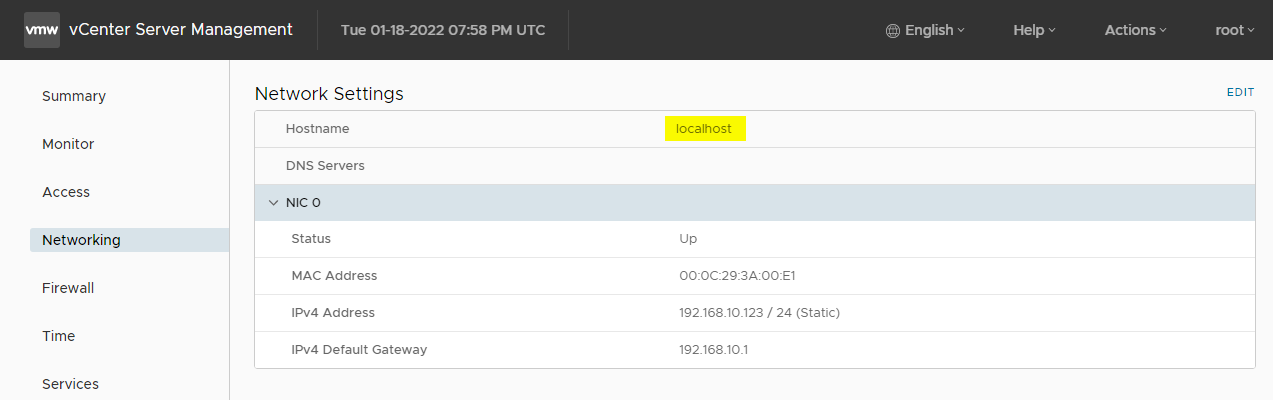
The hostname is set to localhost and the DNS servers setting is blank.
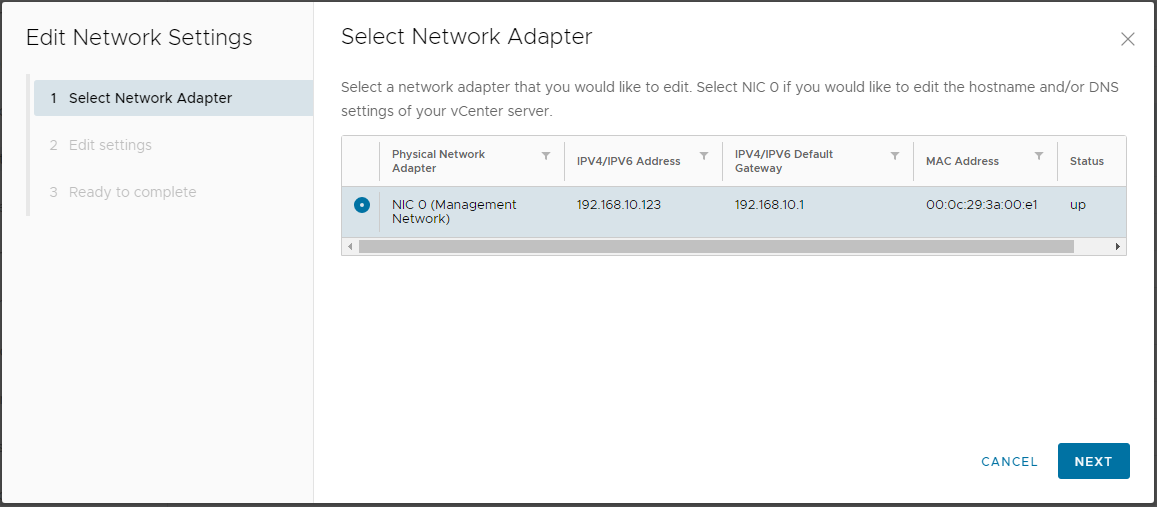
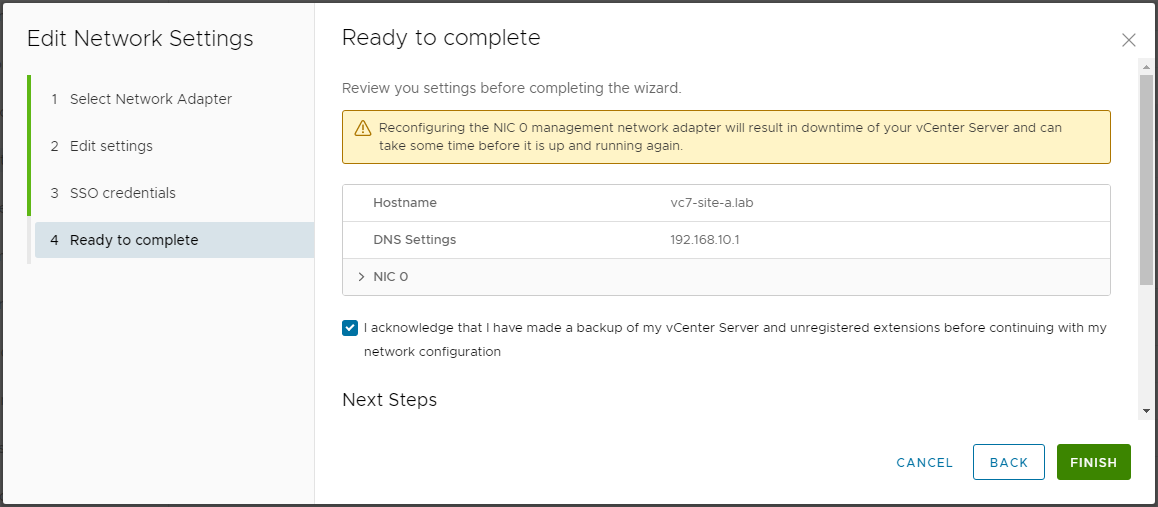
Click Edit in the top right hand corner. Select the interface that you wish to modify:
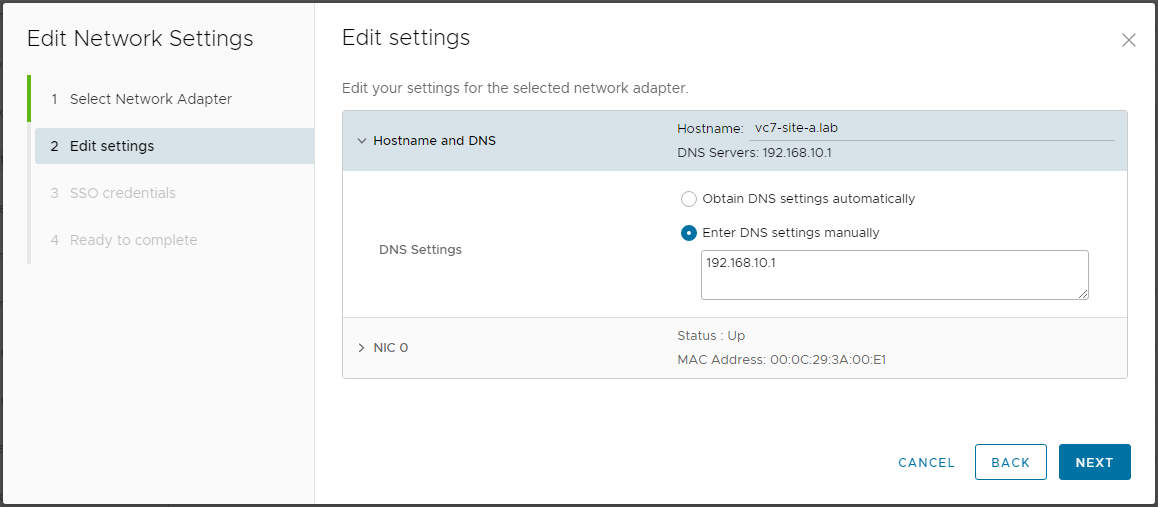
Enter Fully Qualified Domain Name (FQDN) of the vCenter server (lowercase recommended) and the IP address of the DNS server:
Credentials are typically [email protected] and the <SSO_PASSWORD> set during the CLI deployment above.
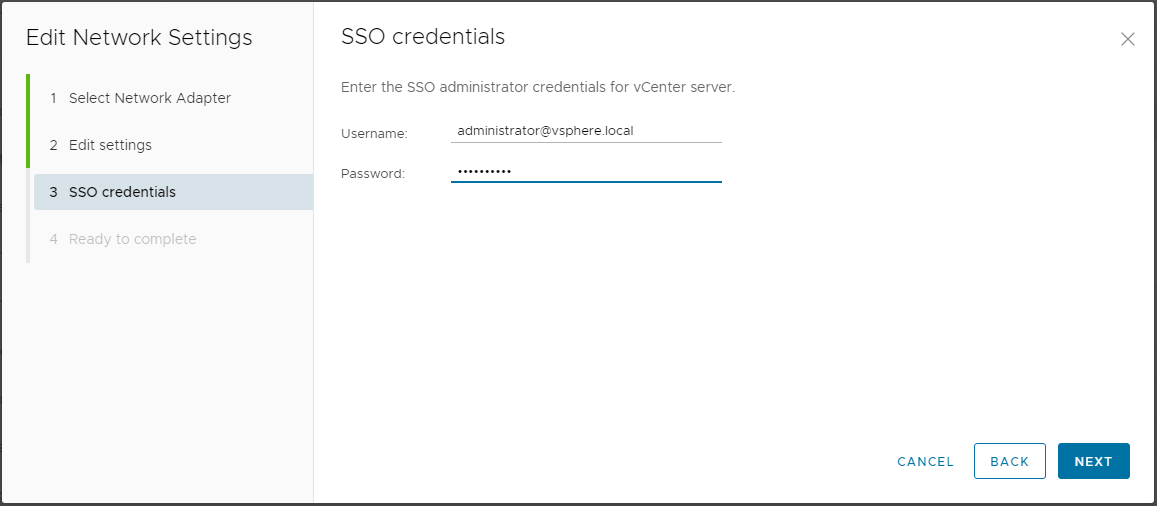
Acknowledge that you have a backup of vCenter.
You do backup your vCenter don’t you? (HERE you go ![]() )
)
Also confirm that any vCenter plug-ins (SRM, etc) if you have them may need to be re-registered due to the name change:
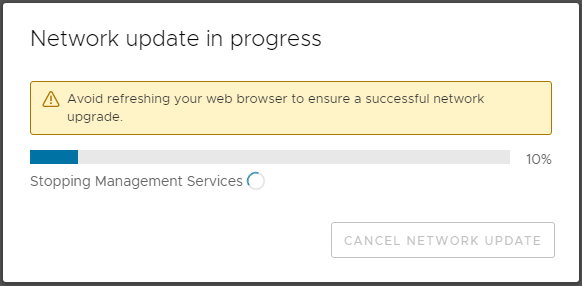
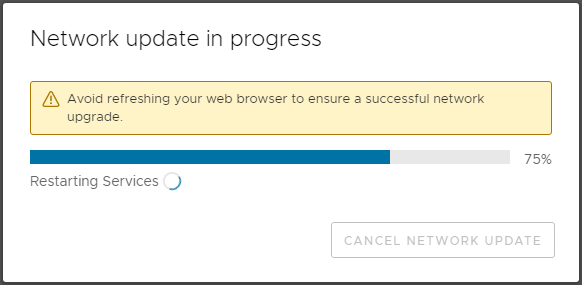
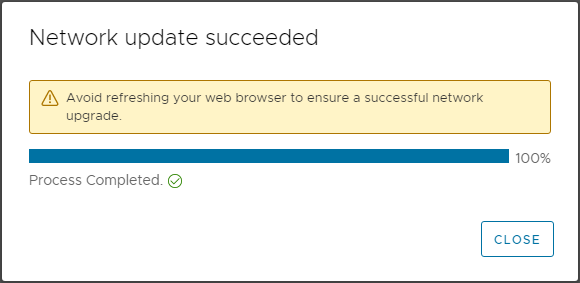
Once launched, the wizard will stop vCenter services:
Login again at https://VCENTER-FQDN:5480:
Job done:
Configuring NTP
OK, an NTP server is now available. Lets configure our deployed vCenter to use it.
Login to the vCenter appliance management interface at https://<VC_IP_ADDRESS>:5480. Credentials are typically root and <VC_PASSWORD> set during the CLI deployment above.
Select Time from the menu. Click Edit and set the correct time zone.
Click Edit, set the Mode to NTP and enter the IP address of your NTP server:
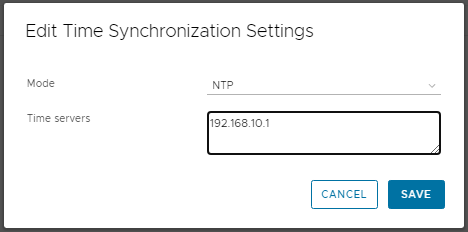
Once saved, a green tick is is placed against the NTP server IP address set to signify that the vCenter is receiving valid NTP information.
Conclusion and Wrap Up
So there we have it. A deployment of vCenter without DNS or NTP.
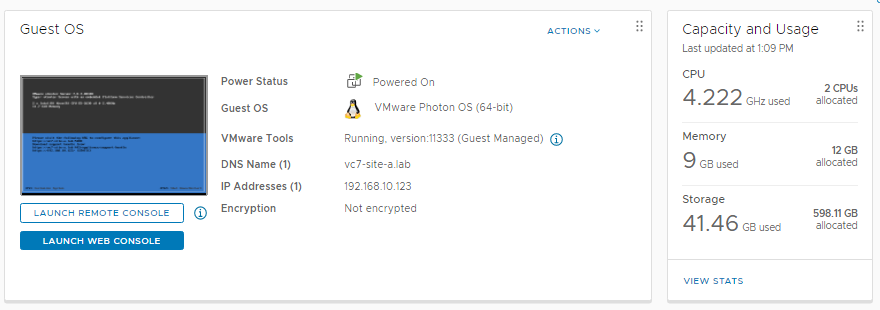
All we really needed was an ESXi server with enough storage space to house the vCenter VM to be deployed. In my testing a newly deployed tiny v7.0 Update 3a vCenter when thin provisioned runs at under 45GB storage space used:
Of course you mileage may and will vary - especially with later versions of vCenter.
Nice. ![]()
![]()
![]()
-Chris