


 The NSX distributed firewall is able to allow or deny traffic based on the protocol version or encryption cipher of a Transport Layer Security (TLS) connection made across it. In this post we will explore and use this functionality.
Overview
The Setup
As you can see from the diagram below, a standard single flat network is in play with all servers, external clients and ESXi hosts connected to the same VLAN:
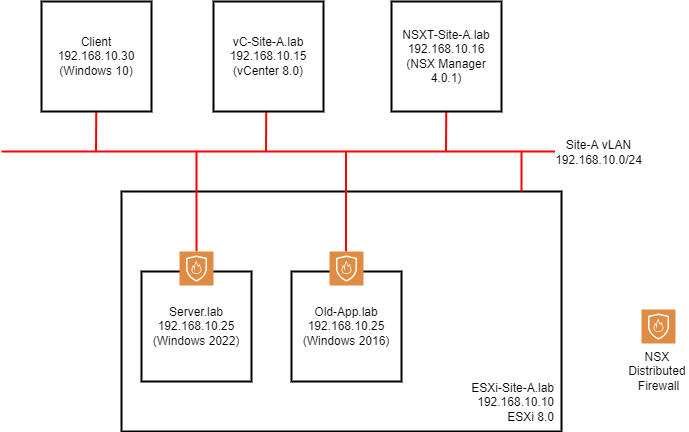
Working clockwise around the setup:
- Client - Windows 10 (22H2) client machine on the wider network
- vC-Site-A.lab - vCenter Server 8.0
- NSXT-Site-A.lab - A single NSX Manager VM (in normal deployments there should be at least three of these for redundancy)
- Site-A VLAN - Our standard VLAN to which everything is attached
- ESXi-Site-A.lab - An ESXi Server prepared for NSX
- Old-App.lab - A legacy application server running Windows Server 2016
- Server.lab - A complex application server running Windows Server 2022
Looking at the ESXi virtual switch configuration:

A single distributed switch with two portgroups. Looking closer at the portgroups:
- SITE-A-MGMT - A standard portgroup used for ESXi Server management
- SITE-A-MICRO-SEG - An NSX portgroup used for VM connectivity (notice the “N” on it’s icon?)
Both our servers (Server.lab and Old-App.lab) are running on our NSX prepared ESXi server. Therefore they are both protected by the NSX Distributed Firewall (DFW), as denoted by the orange shield in the top diagram.
You could say that with the help of the NSX DFW, these servers occupy their own “Micro Segments” of the network.
The Problem
Given what we now know about the above set up, consider the following scenario:
The application server server.lab is delivering a complex application via a TLS connection hosted on TCP/IP port 443. As such, server.lab supports connectivity via TLS v1.0, TLS v1.1, TLS v1.2 and TLS v1.3. The security department have mandated that all access to the complex application running on server.lab should be achieved via TLS v1.3 ONLY, given that the complex application supports TLS v1.3 as is today.
Other servers such as old-app.lab also need to connect to server.lab via TLS on port TCP/IP port 443 to upload data to the complex application. However due to their legacy operating systems, they do not support TLS v1.3. They support TLS v1.2 at a maximum.
To meet the security mandate of TLS v1.3 throughout, the following needs to happen:
- Every client accessing the complex application need to run an operating system that supports TLS v1.3
- All legacy servers need to migrated to an operating system that supports TLS v1.3 in order to be able to continue to upload data to the complex application. Windows 2016 does not support TLS v1.3
- The complex application on needs to be reconfigured to allow access via TLS v1.3 connections only
But:
- Migrating legacy servers will involve significant costs and downtime, both of which are not available for 6+ months
- The application developers want $100,000,000 to recode their application to support TLS v1.3 only
 …its a complex app!
 ![]()
Still, on the plus side, all clients run Windows 10 which supports TLS v1.3 as is today!
How can NSX help us here?
The Solution
With the TLS version and cipher filtering capability built into the NSX DFW we can achieve the following:
- Ensure all clients access the complex application via TLS v1.3 only
- Ensure legacy servers can access complex application via TLS v1.2 only
- Ensure no one can access complex application via TLS v1.0 and TLS v1.1
- Shelve the requirement for downtime
- Save money on complex application recoding
We can get as close as we possibly can to the security mandate, whilst still saving downtime and costs.
How?
Simple. Two NSX distributed firewall rules:
- Allow client access via TLS v1.3 only
- Allow legacy server access via TLS v1.2 only
Environment Current State Capture
First, lets see what access to the complex application looks like before we start work.
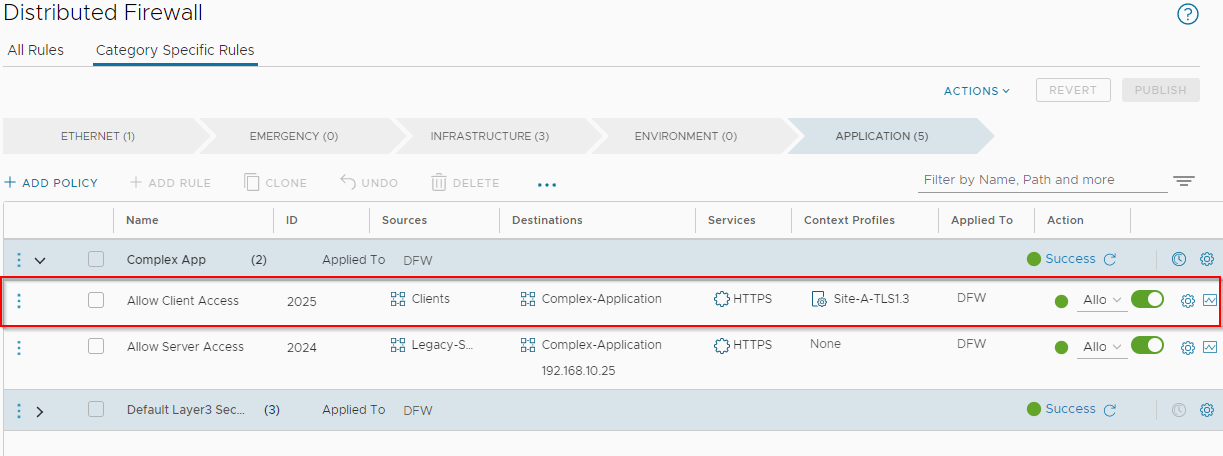
Investigating the firewall rules in place for Complex Application access:
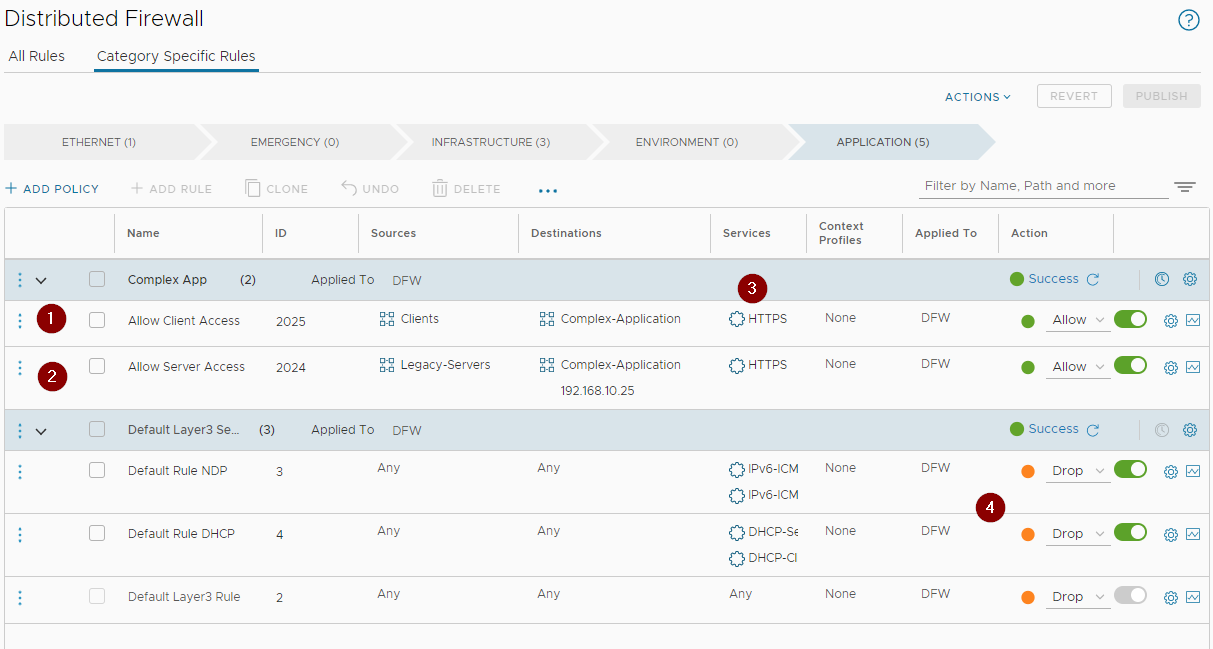
Clients (1) and servers (2) access our complex application via the Layer 7 HTTPS service (3) only. All other traffic is dropped (4).
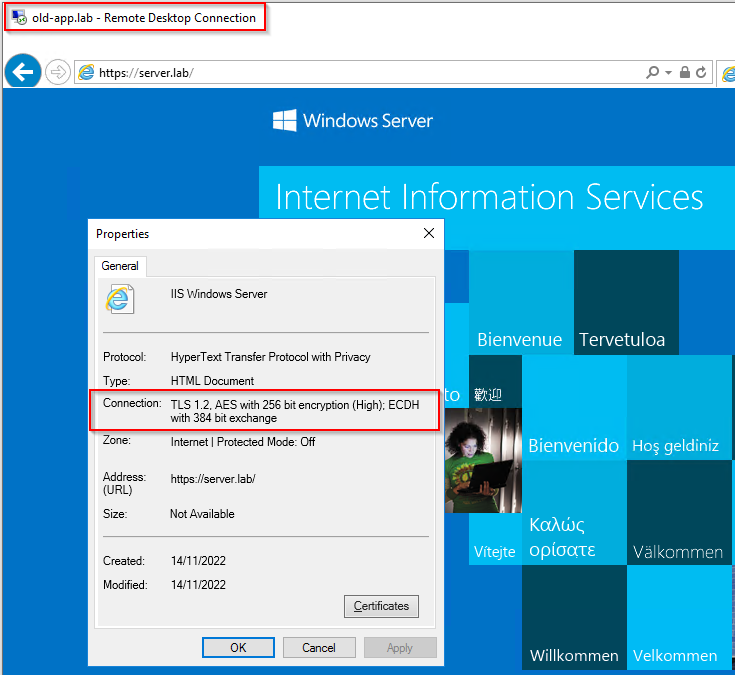
Testing access to the complex application from a client:
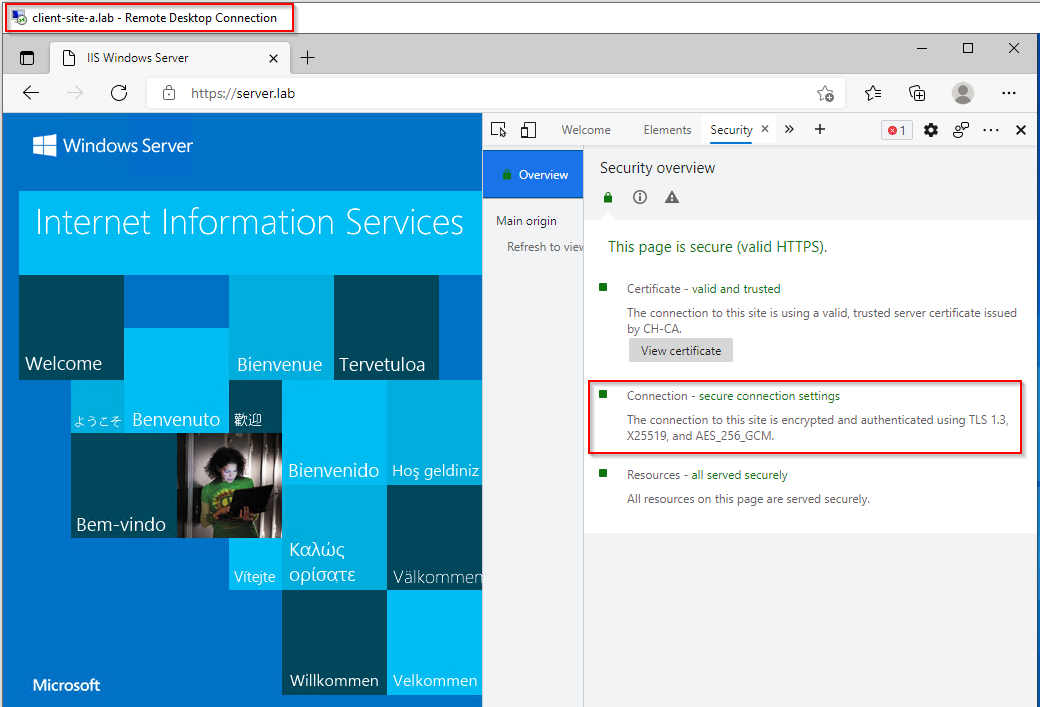
Yep, a “complex” application and we are connecting via TLS v1.3 already Nice! ![]()
Not so fast… Using something other than a web browser as browsers will generally connect at the highest level security level possible:
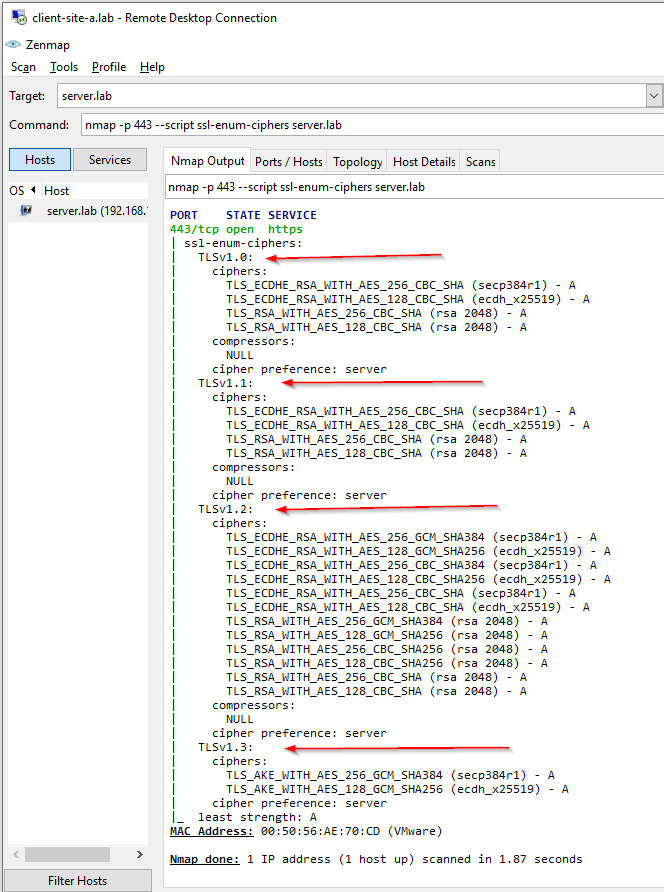
Ah… Clients are able to connect via TLS v1.0, TLS v1.1, TLS v1.2 and TLS v1.3.
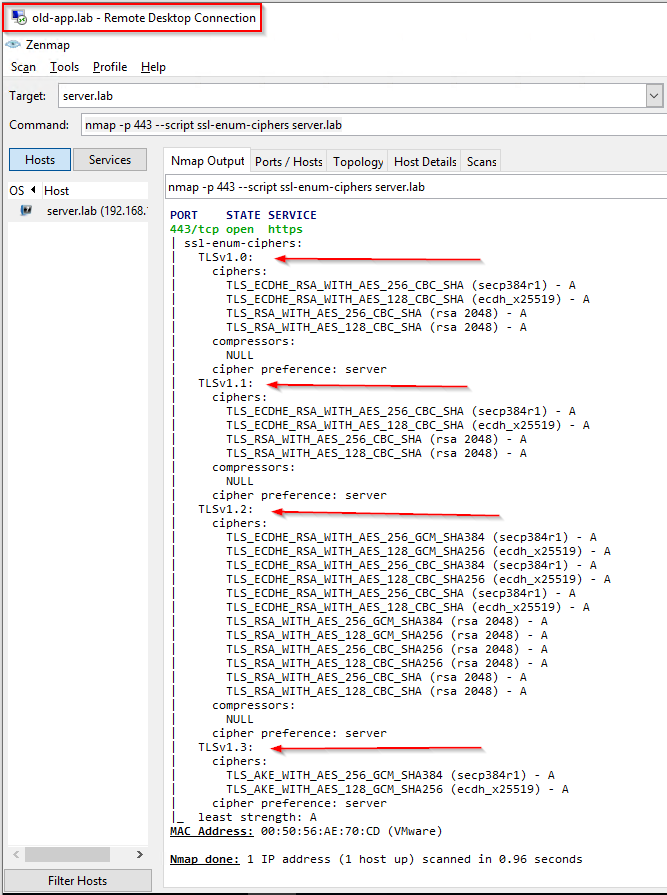
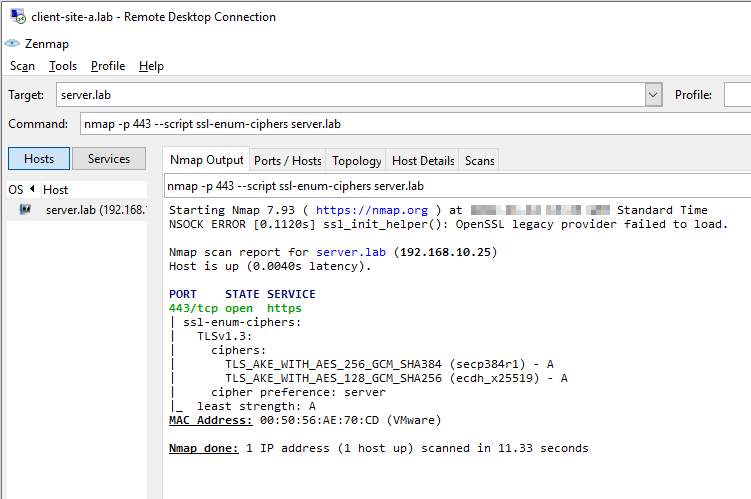
Looking from our legacy server, we can only connect at TLS v1.2 level:
However, we can also see the full suite of TLS ciphers from our legacy server too:
Implementing TLS Cipher Filtering
To achieve TLS filtering we need to understand two NSX technologies.
NSX Layer 7 App IDs
Layer 7 attributes (App IDs) identify which application a particular packet or flow is generated by, independent of the port that is being used. Signature-based identification and enforcement enables users to match the particular application/protocol a flow belongs to, and the version of that protocol, for example TLS version 1.0, TLS version 1.2 or different versions of CIFS traffic. This allows you to have visibility into or restrict the use of protocols that have known vulnerabilities for all deployed applications.
See this page of the NSX product documentation for further details.
NSX Layer 7 Context Profiles
A context profile can specify one or more App IDs and can also include sub-attributes for use in distributed firewall (DFW) rules and gateway firewall rules.
When a context profile is used in a rule, any traffic coming in from a virtual machine is matched against the rule table based on the 5-tuple. If the rule matching the flow also includes a Layer 7 context profile, the packet is redirected to a user-space component called the vDPI engine. Subsequent packets are sent to the vDPI engine for each flow. After the App ID has been determined, the information is stored in the in-kernel context table.
When the next packet for the flow comes in, the information in the context table is compared with the rule table again, and is matched on 5-tuple and the Layer 7 App ID. The appropriate action as defined in the fully matched rule is taken, and if there is an ALLOW rule, all subsequent packets for the flow are processed in the kernel, and matched against the connection table. For fully matched DROP rules, a reject packet is generated.
See this page of the NSX product documentation for further details.
Allow Client Access via TLS v1.3 Only
Lets create our TLS v1.3 Context Profile.
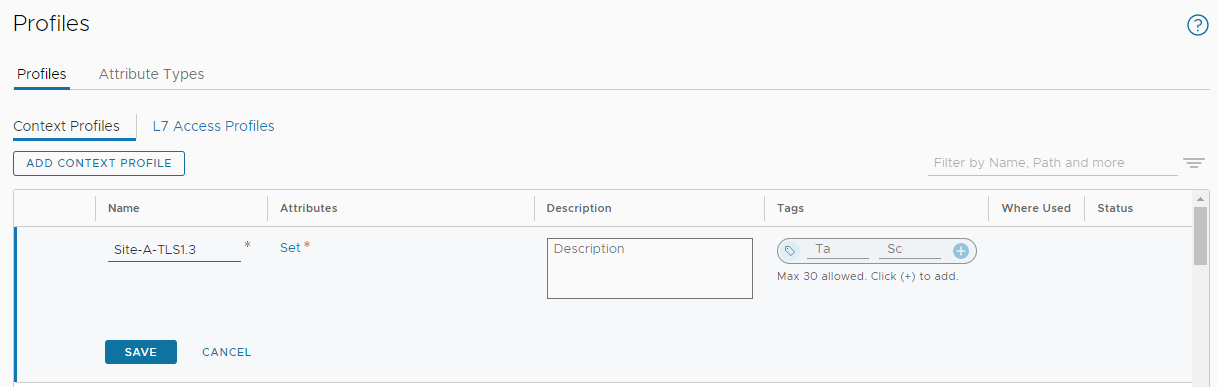
In NSX Manager, select Inventory > Profiles > Add Context Profile. I’ll name mine Site-A-TLS1.3:
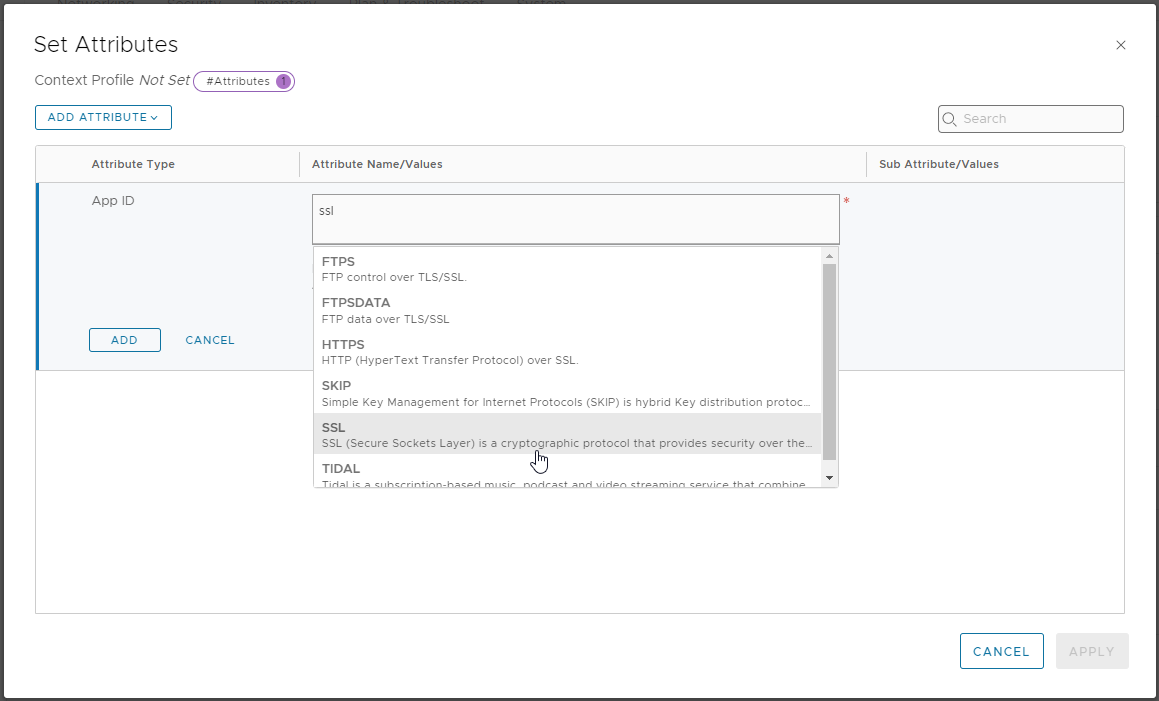
Next, select Set > Add Attribute > App ID and choose SSL:
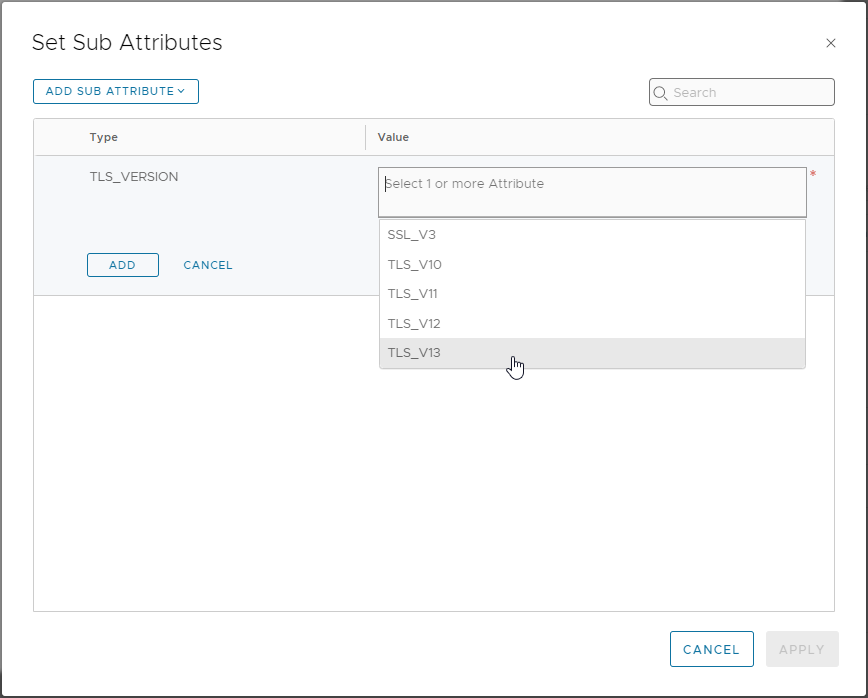
Click Set from the Sub Attribute/Values column, select Add Sub Attribute, select TLS_VERSION and choose TLS_V13:
Finally, click Add > Apply > Add > Apply > Save to save.
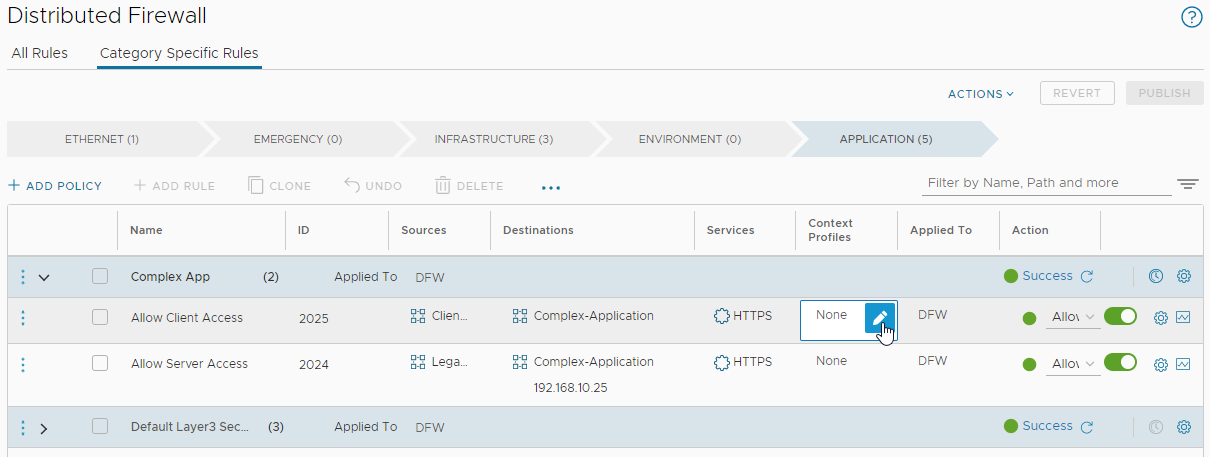
From NSX menu, select Security > Distributed Firewall and lets update our client access rule. Select the Context Profiles entry for the client access rule and edit:
Filter on and select our previously created Site-A-TLS1.3 profile:
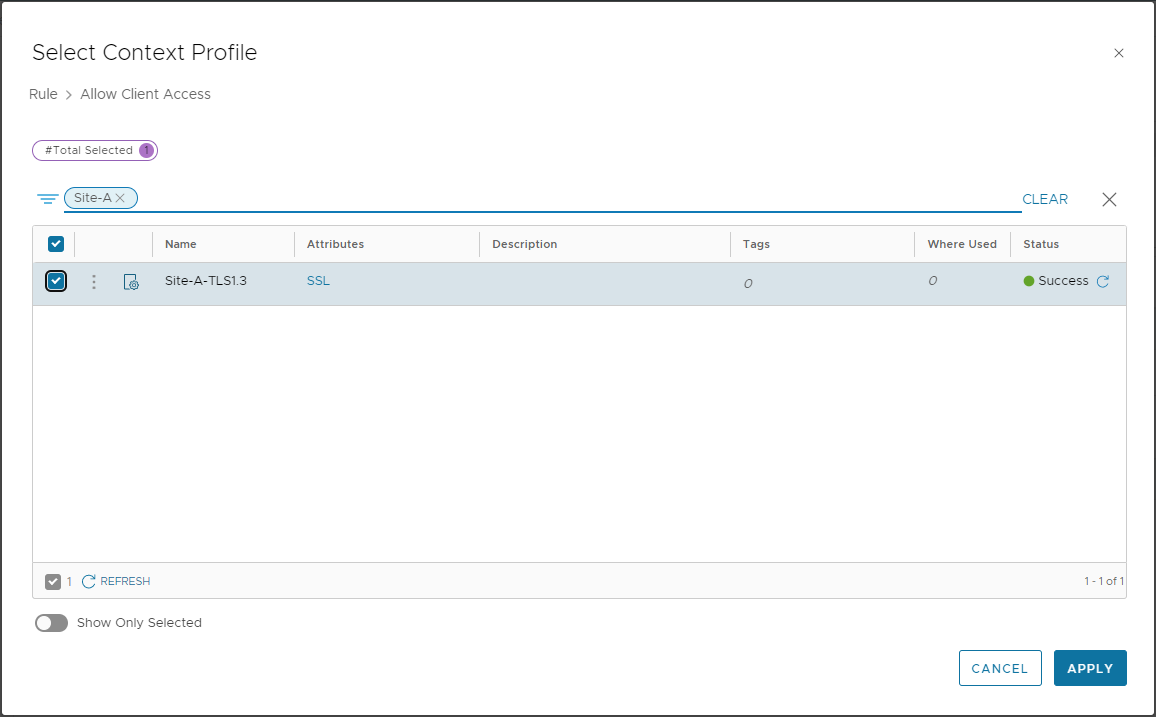
Click Apply and Publish to finish updating the client access rule. Quick Double check:
Yep, looks good. Lets test again.
Yep can still access my “complex” application OK:
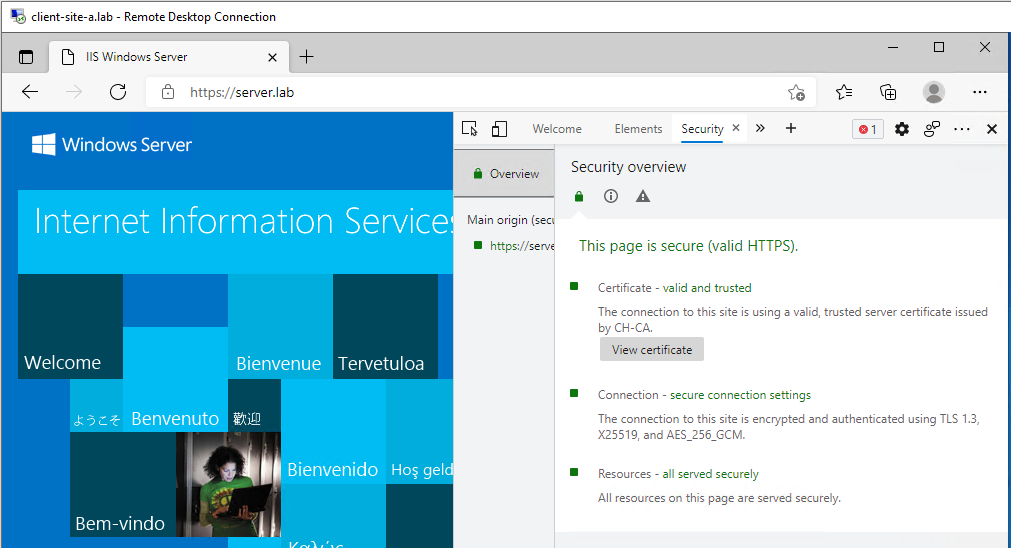
Double checking TLS version:
We are able to access our complex application via TLS v1.3 only. TLS v1.0, TLS v1.1, TLS v1.2 connectivity has been blocked by the NSX distributed firewall. Nice!
Allow Legacy Server Access via TLS v1.2 Only
Essentially this is a ‘rinse and repeat’ of the above. However, we have another trick up our sleeve.
Notice that this post is titled “TLS Cipher Filtering” yet so far we have only done TLS version filtering?
Let’s fix that. ![]()
Back in NSX Manager, select Inventory > Profiles > Add Context Profile. I’ll name mine Site-A-TLS1.2-Cipher:
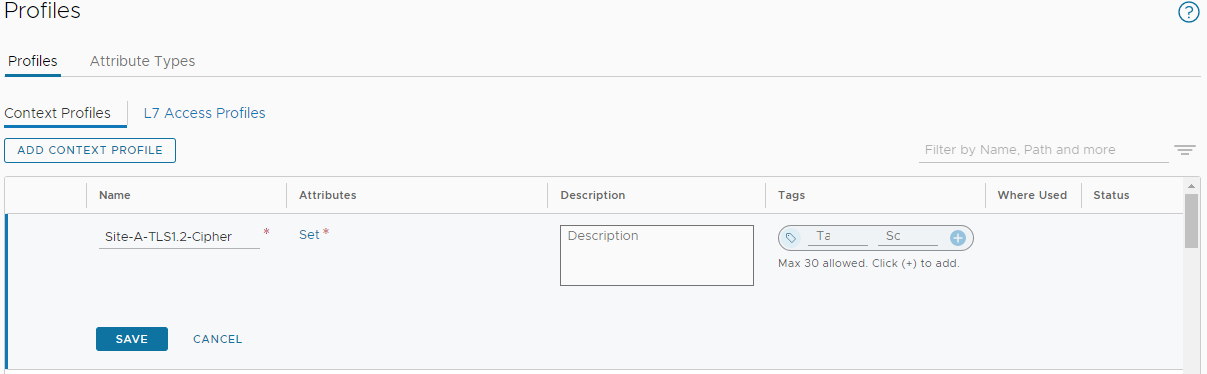
Next, select Set > Add Attribute > App ID and choose SSL:
Click Set from the Sub Attribute/Values column, select Add Sub Attribute, select TLS_VERSION and choose TLS_CIPHER_SUITE. In the Value column let’s add:
- TLS_ECDHE_RSA_WITH_AES_256_GCM_SHA384
- TLS_ECDHE_RSA_WITH_AES_128_GCM_SHA256
- TLS_ECDHE_RSA_WITH_AES_128_CBC_SHA256
- TLS_RSA_WITH_AES_256_GCM_SHA384
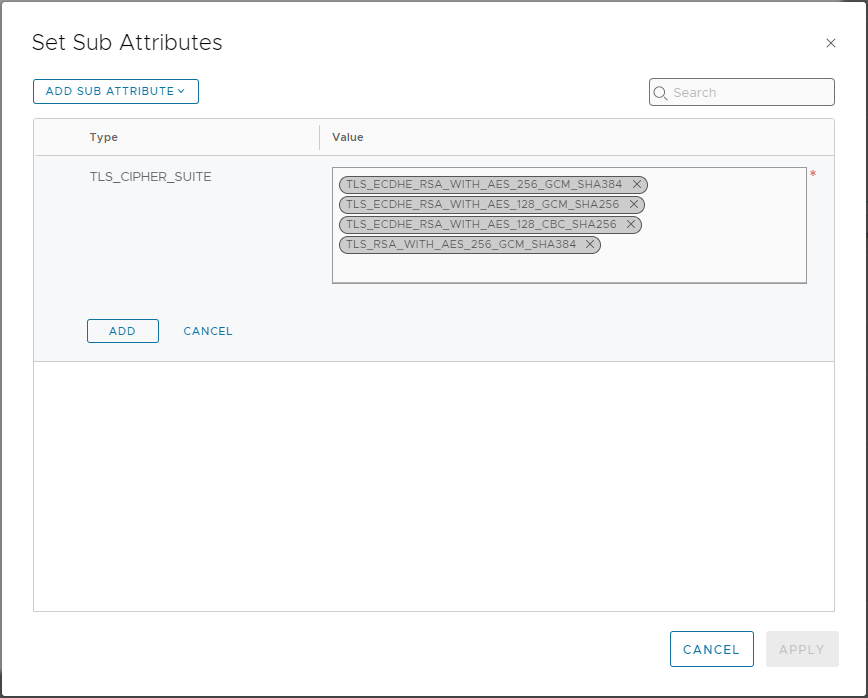
Finally, click Add > Apply > Add > Apply > Save to save.
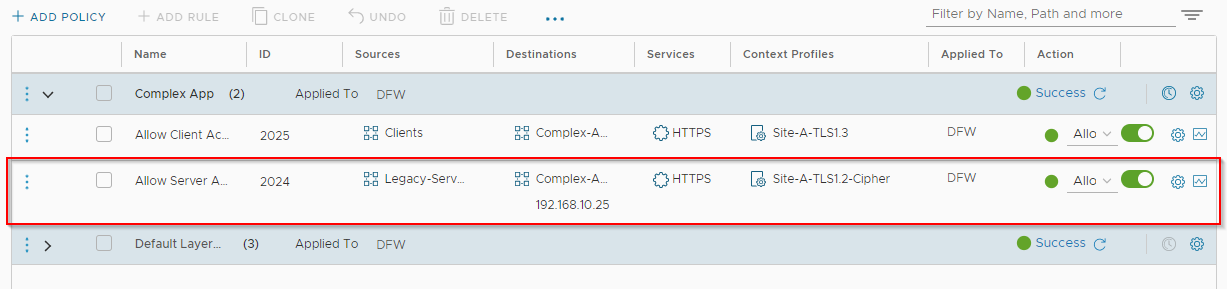
From NSX menu, select Security > Distributed Firewall and lets update our server access rule. Select the Context Profiles entry for the client access rule and edit:
OK, let’s test from our legacy server. Yep we can still access our “complex” application without issue:
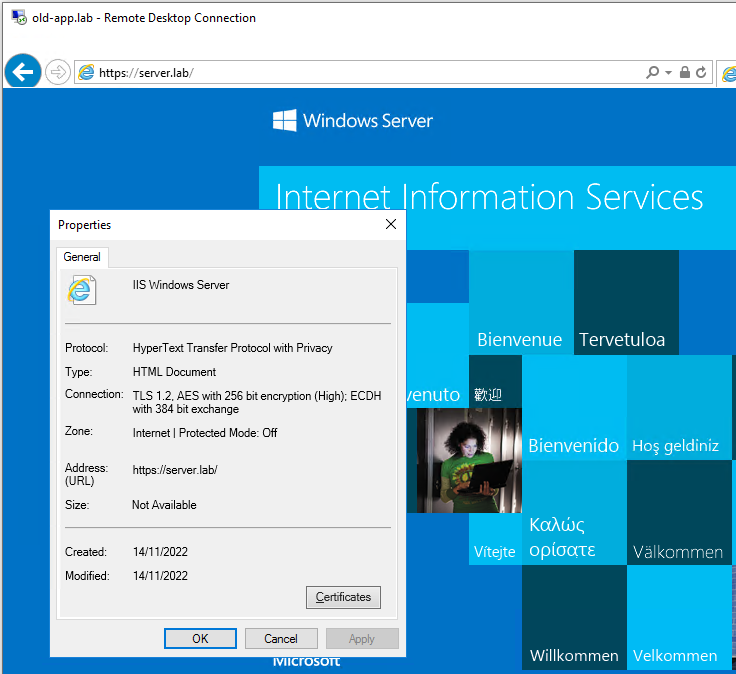
Double checking TLS version:
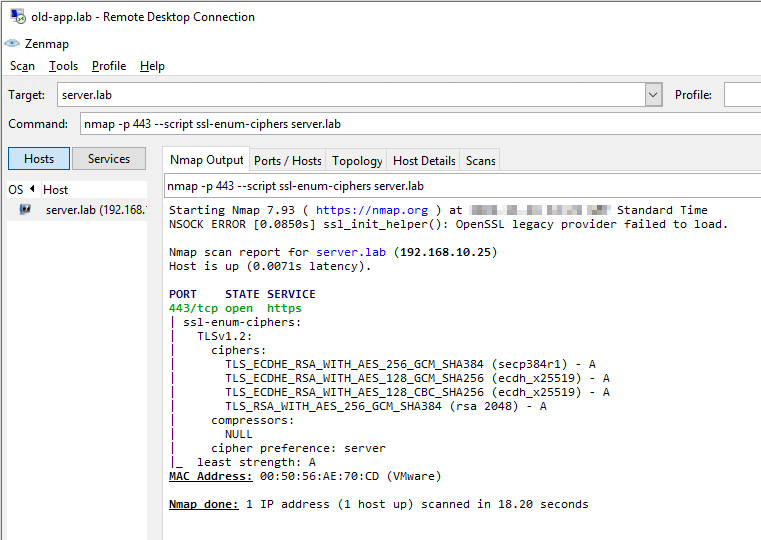
We are able to access our complex application via TLS v1.2 only. Not only that, we have cut down our list of available ciphers from twelve TLS v1.2 ciphers to just four.
Double nice!
Choosing TLS Ciphers
How did I settle on the four ciphers above?
Put simply, I looked it the ciphers supported by my “complex” application (IIS10, built into Windows 2022) in comparison with the list of ciphers my 2016 legacy server supported and went from there.
If you are stuck deciding on which TLS ciphers to allow, NSX has five default cipher lists built in. Just filter the built in context profiles on “owasp”:
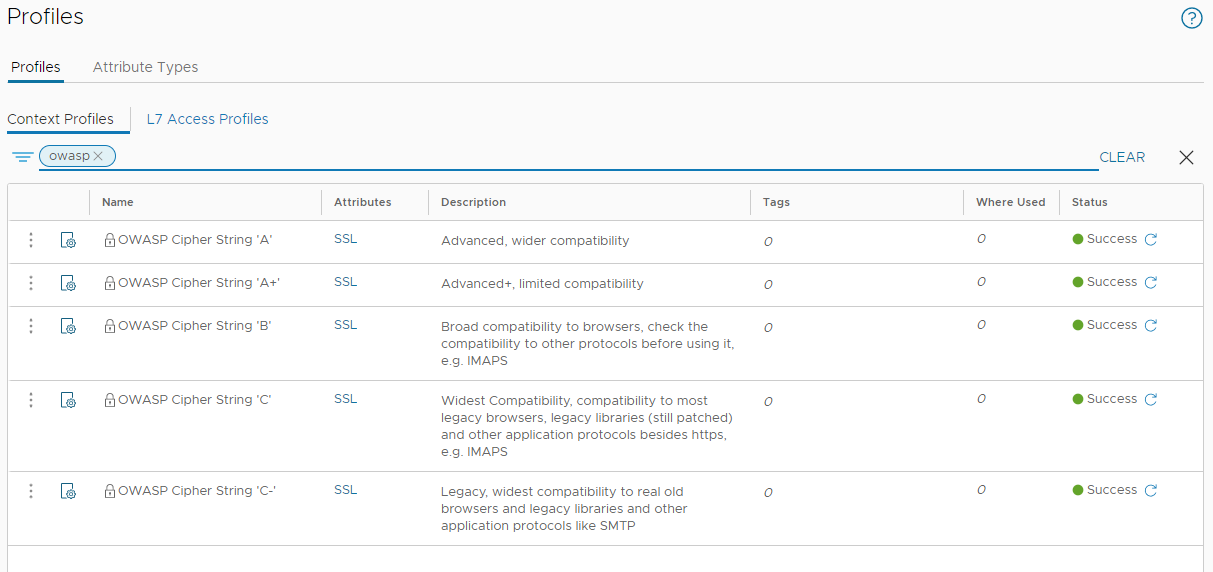
Further details on Open Web Application Security Project (OWASP) profiles can be found in their TLS Cipher String Cheat Sheet.
Conclusion and Wrap Up
In this post, with the help of NSX App IDs and Context Profiles we have been able to apply rules to further enhance the security of our environment.
We can now hand on heart confirm, thanks to the NSX DFW, that clients access our application via TLS v1.3 only. Our legacy servers and only our legacy servers can access our application via a TLS v1.2 connection and only then via a restricted subset of more secure TLS v1.2 ciphers.
As all other traffic (TLS traffic included) is being dropped by the NSX distributed firewall, there is zero access to our application via TLS v1.0 or v1.1.
A 10,000 Feet View
Sure the basis of this post was a bit cheesy (how much to recode an application?!?) and our “complex application” is anything but; however the premise still stands.
Simply allowing TLS traffic at a layer 7 level will no longer suffice. To ensure the highest level of security, the version and ciphers used by the TLS connection should also be inspected with the use of less secure versions and ciphers restricted where possible.
Remember, Transport Layer Security is not only used for web traffic. TLS is used for securing many protocols from email (SMTPS), to IP address lookups (DNS over TLS), to private network connectivity (VPN) to voice calls (SIPS), to name just a few protocols that use TLS for security.
As we have seen in this post, the NSX distributed firewall leveraging App IDs and Context Profiles can be used to secure TLS connectivity not only to version level but to cipher level too.
-Chris