


 One of the simpler VMware NSX-T deployments is a Micro-Segmentation only deployment. Talking with other VMware consultants, typically 60 to 70% of projects start off with the deployment of just Micro-segmentation and then build up from there.
Thus this makes a good starting point on our journey into NSX-T.
But what is Micro-segmentation? The VMware Glossary defines Micro-segmentation as follows:
Micro-segmentation is a network security technique that enables security architects to logically divide the data center into distinct security segments down to the individual workload level, and then define security controls and deliver services for each unique segment. Micro-segmentation enables IT to deploy flexible security policies deep inside a data center using network virtualization technology instead of installing multiple physical firewalls. Also, micro-segmentation can be used to protect every virtual machine (VM) in an enterprise network with policy-driven, application-level security controls. Because security policies are applied to separate workloads, micro-segmentation software can significantly bolster a company’s resistance to attack.
With the above in mind, how can we deploy NSX-T into our vSphere environment to allow us to micro-segment our workloads and improve our resistance to attack?
Why, with a NSX-T Micro-Segmentation deployment - that’s how! ![]()
As this is the first NSX-T related post on this site, I’m going to break down the required NSX-T configuration items first, after which we will go through a manual deployment into a ready built vSphere 7.0 environment. As I will cover in a separate post, yes there is a an NSX-T configuration wizard built into NSX-T that can be used to implement a Micro-segmentation only setup, however for our first run through let’s configure this manually. In a later post, I’ll go though the Micro-segmentation setup wizard.
Overview
Why Configure Manually?
Configuring an NSX-T Micro-segmentation setup manually (that is not following the wizard) will allow us to:
- Improve our understanding in concepts behind the configuration
- Correctly create the configuration items
- See where configuration items are stored in the NSX-T interface
And finally:
- Improve our chances for reconfiguration and / or troubleshooting in the future.
Whilst this post will include everything needed create an NSX-T Micro-segmentation deployment, along with explanations of the configuration items required, I will link to official NSX-T 3.2 documentation for further reading.
NSX-T Micro-Segmentation Configuration Items
To enable us to deliver a correctly configured environment the following NSX-T configuration items need to be understood:
Segments
If we are going to deploy Micro-segmentation, we need to understand segments!
In NSX-T, a segment is a virtual layer 2 domain. Whilst there are two types of segments that can be defined in NSX-T, overlay and VLAN, when deploying a Micro-segmentation only environment the we are only interested in VLAN backed segments.
A VLAN backed segment is a layer 2 broadcast domain that is implemented as a traditional VLAN in the physical infrastructure. As you will see later on, a NSX-T VLAN backed segment appears within vSphere as a VLAN backed portgroup on our NSX vSphere Distributed Switch (VDS).
Further reading: Segments.
Transport Zone
Transport zones dictate which hosts and VMs can participate in which networks. This is achieved by limiting which hosts (and therefore which VMs) can participate which network segments. Transport zones are used to group segments.
A host may belong to one or more transport zones. A segment can belong to only one transport zone.
There are two types of transport zones; Overlay and VLAN. A segment created in a VLAN transport zone will be a VLAN backed segment, while, as you can guess, a segment created in an overlay transport zone will be an overlay backed segment.
Again, for a Micro-segmentation only deployment we will be using just VLAN transport zones.
Further reading: Create Transport Zones.
Uplink Profile
Those familiar with vSphere should be familiar with the concept of uplinks. Essentially an uplink is the connection between your virtual switch and the physical network external to your host.
An uplink profile defines configuration policies for the uplinks. Further reading: Create an Uplink Profile.
Transport Node Profile
A transport node is essentially our ESXi host, our KVM host or our physical server that we wish to participate in our NSX-T networking deployment.
A transport node profile defines configuration policies for our vSphere cluster of ESXi hosts. Further reading: Add a Transport Node Profile.
The Lab Setup
First lets take a very quick look at the layout of the lab that I’m going to be deploying NSX-T into:
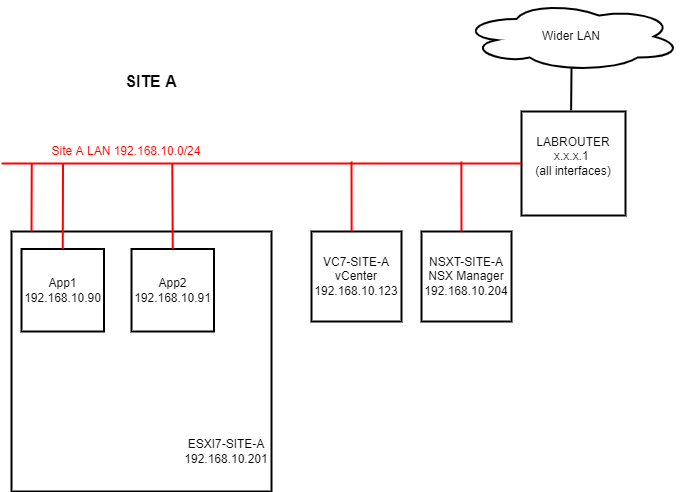
Yep, as simple as can be. Breaking the servers down:
- LABROUTER: pfSense Router Server (all firewalling disabled)
- ESXI7-SITE-A: ESXi 7 Host
- VC-SITE-A: vCenter 7 Server
- NSXT-SITE-A: NSX-T 3.2.0.1 Management Server
- App1 + App2: Application Servers (Win 2019)
Yes, I could deploy my vCenter and my NSX-T servers inside my ESXI7-SITE-A server, however given that this all running nested inside ESXi anyway, there is hardly any point. Also, having vCenter and NSX-T manager external to ESXi7-SITE-A mimics a setup where you would potentially have them running on a separate management cluster anyway. That’s my excuse and I’m sticking to it! ![]()
Also in a production NSX-T deployment there must be a cluster of three NSX Managers. This is to avoid the potential of an outage to the management and control planes should any of the managers fail, however this being a lab environment, one manager will do us just fine.
Looking closer at the datacenter and cluster configuration of SITE-A in the Lab:
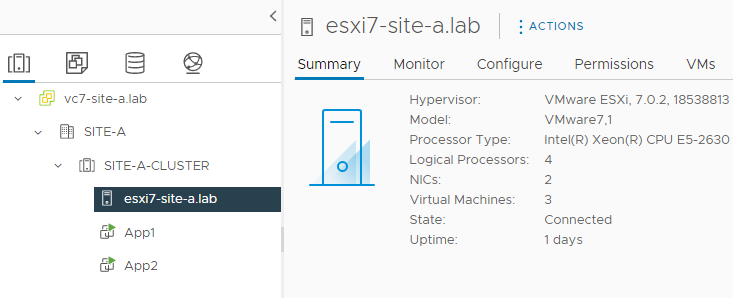
A cluster containing a single host. Looking closer at the networking configuration of my ESX7-SITE-A host:
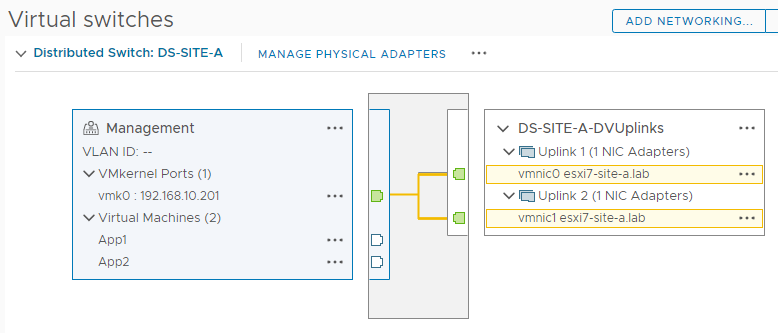
The host is using a vSphere 7 distributed switch called DS-SITE-A for connectivity with:
- A single “Management” port group defined
- Two active uplinks configured
Again as simple as can be.
NSX-T Download
Unlike NSX-v, you can download a free 60 day trial of NSX-T.
Grab your copy now from VMware NSX-T
Product Evaluation Center.
The How To
Finally, the “meat and potatoes” or “TL,DR” of this post. Yep, you made it!
Environment Preparation
This being our first NSX-T deployment, we will quickly look at how to hook our newly deployed NSX-T manager into our vCenter. For brevity, let’s pickup at the first logon after deploying and powering on the NSX-T manager for the first time.
Logon to NSX-T manager using admin and the password set during OVA deployment. Once logged on, accept the licence agreement, choose whether to join the Customer Experience Improvement Program and complete the product tour - if you wish.
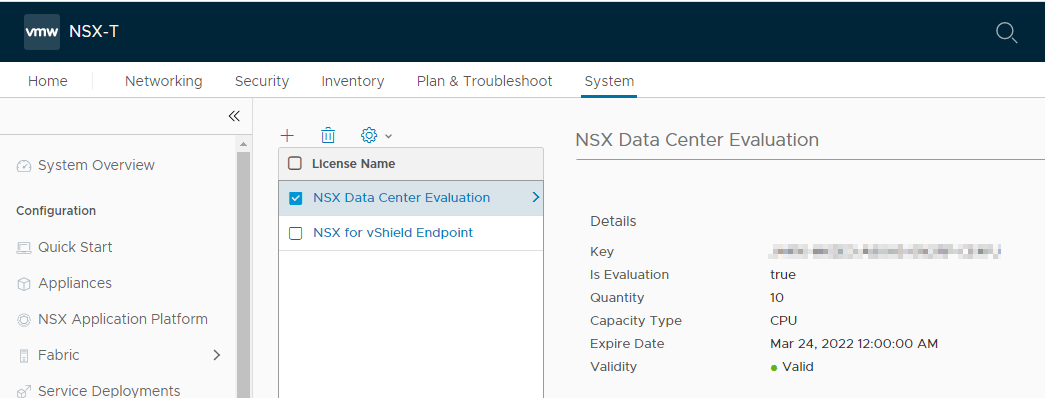
Next, navigate to System > Licences and enter your NSX-T (evaluation) licence key:
Next, navigate to System > Fabric > Compute Managers and click Add Compute Manager. Complete the wizard, click Add and accept the thumbprint when prompted:
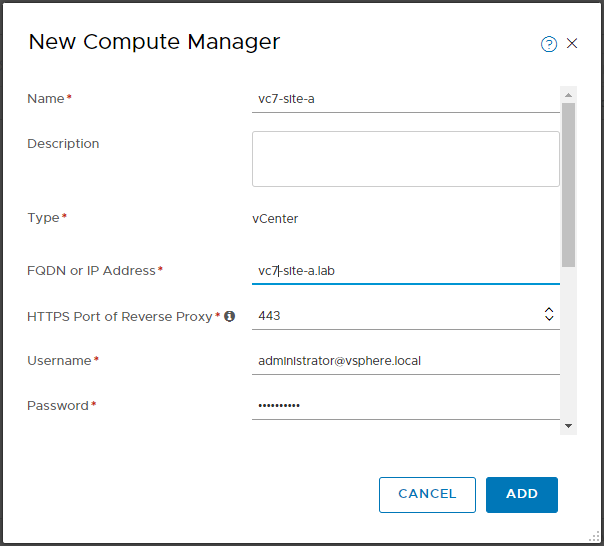
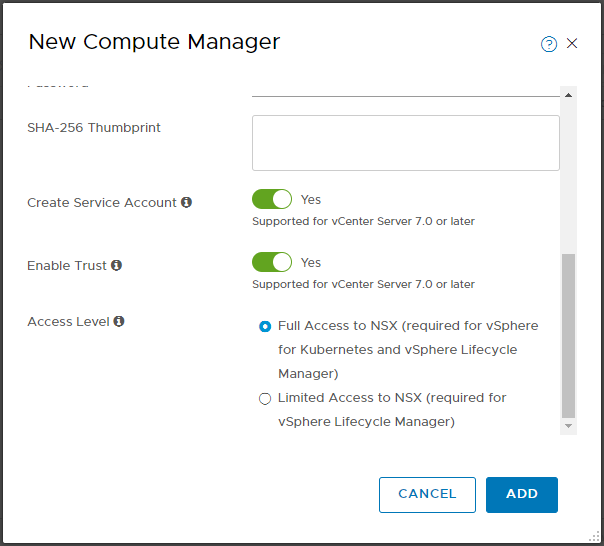
Confirm registration status and connection status are both good:

Manually Configure NSX-T for Micro-Segmentation
Next, let’s enter the configuration items discussed above.
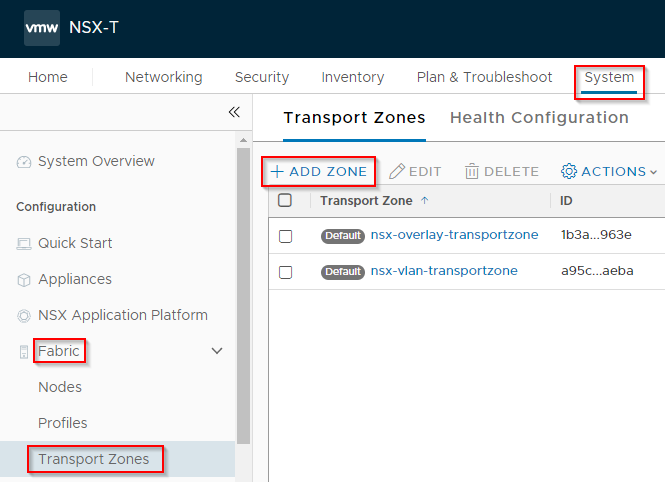
Transport Zone
Navigate to System > Fabric > Transport Zones and click Add Zone:
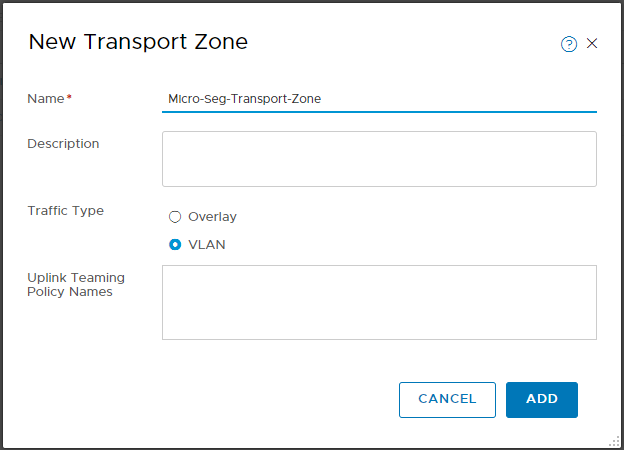
Name the Zone and set the traffic type to VLAN. As discussed above, we are not leveraging any overlay networking in this setup. Click Add when done:
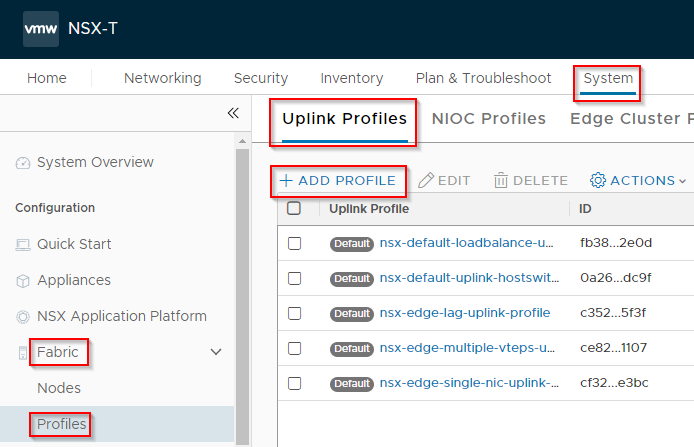
Uplink Profile
Navigate to System > Fabric > Profiles > Uplink Profiles and click Add Profile:
Name the Uplink Profile:
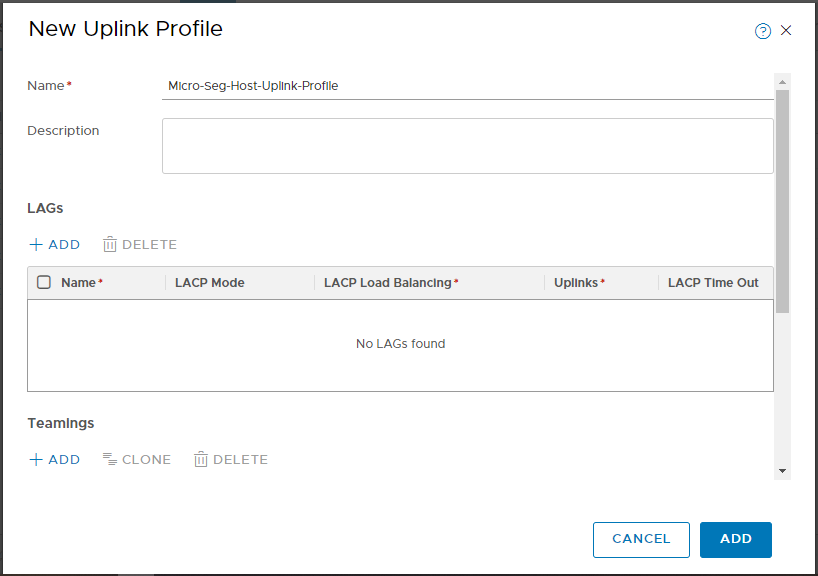
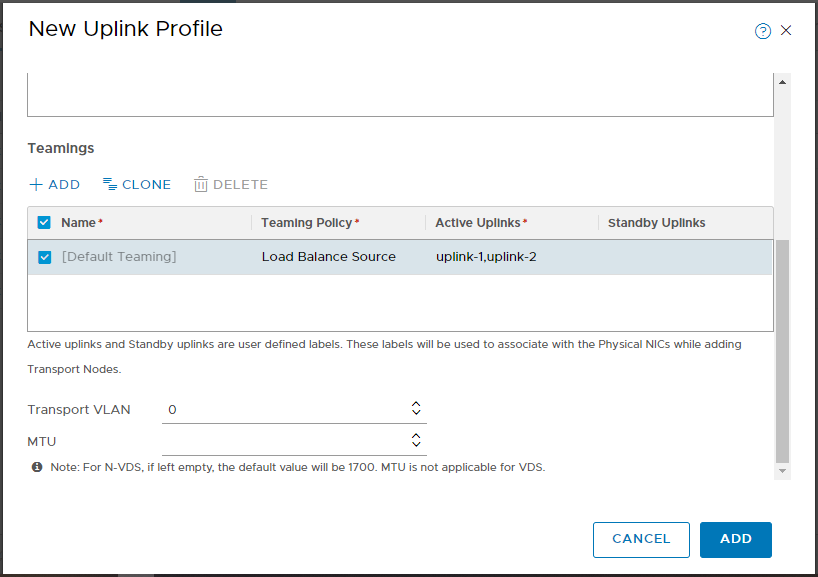
Configure the Teaming Policy. Load Balanced Source in my case. Yours may be different depending on configuration of your physical network and / or the configuration of your existing VDS.
Configure the Active Uplinks. In my case my VDS is using two uplinks, so I enter uplink-1,uplink-2.
The Transport VLAN can be left at 0 and the MTU can be left blank. Finally, click Add:
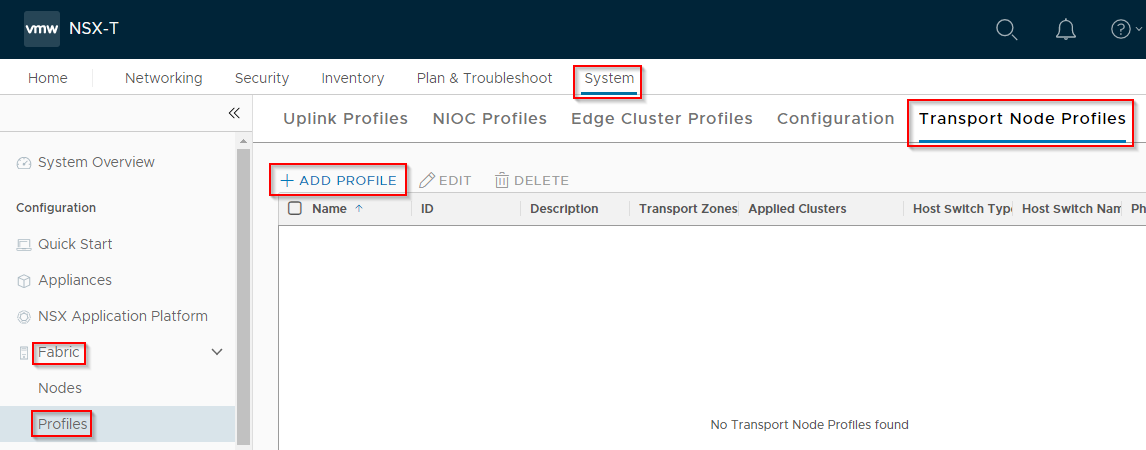
Transport Node Profile
Navigate to System > Fabric > Profiles > Transport Node Profiles and click Add Profile:
Name the profile, select VDS (vSphere Distributed Switch) and Standard.
From the dropdowns, select the vCenter added earlier and the correct distributed switch to be leveraged by NSX-T. Then select the Transport Zone created earlier:
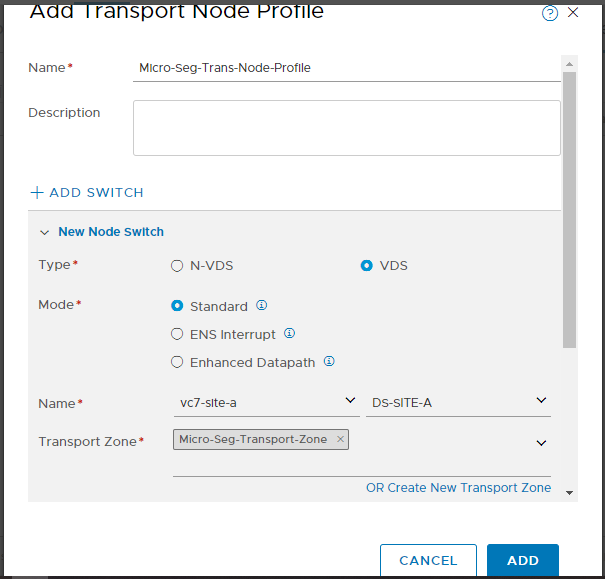
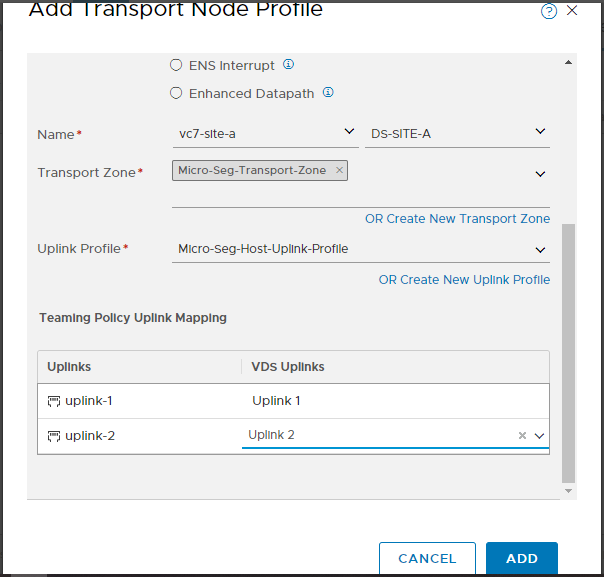
From the dropdown, select the Uplink Profile created earlier. Finally select the uplinks and click Add:
Host Cluster Configuration
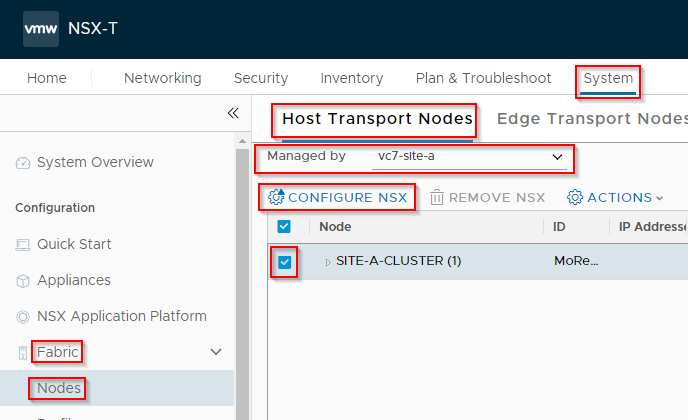
We are now ready to configure our host cluster for our Micro-segmentation deployment.
Navigate to System > Fabric > Nodes > Host Transport Nodes, select the vCenter added earlier, select the cluster and click Configure NSX:
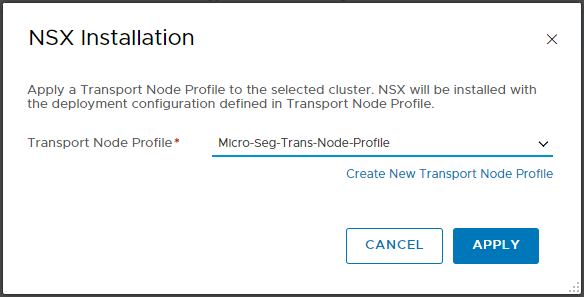
Select the Transport Profile created earlier and click Apply:
Monitor the configuration:
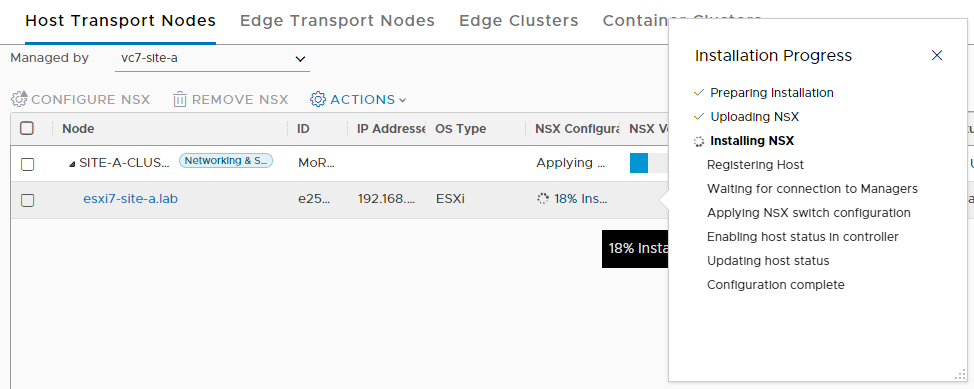
Once complete the following should be seen:

Segments
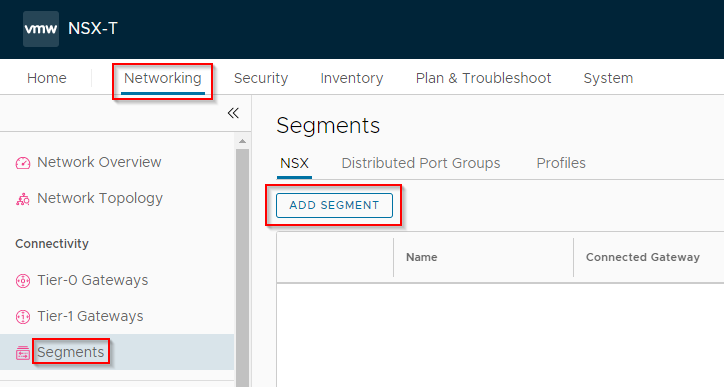
Finally, lets create some Segments for our VMs to connect to.
Select Networking > Segments and click Add Segment:
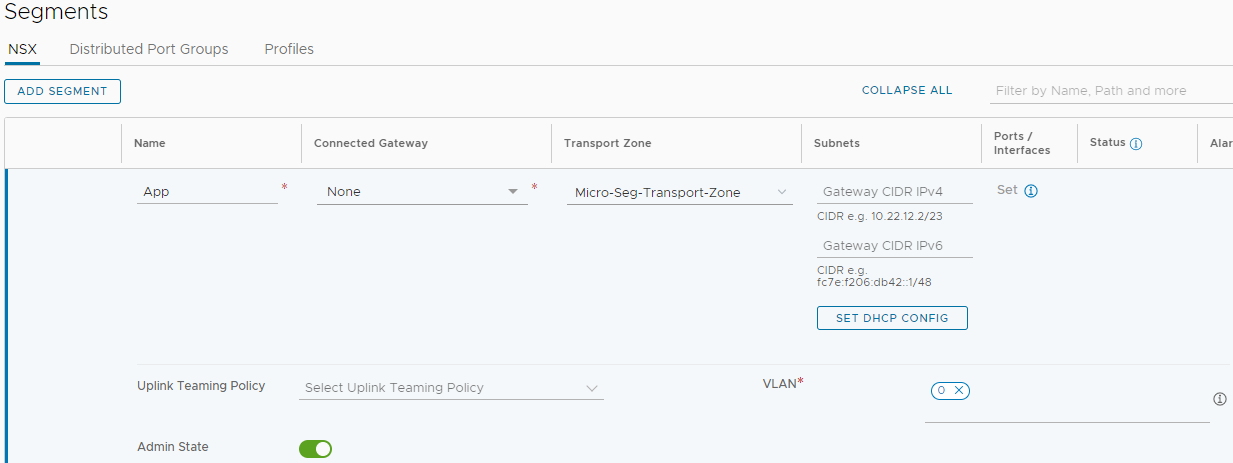
Name the segment, select the transport zone created earlier, enter a VLAN ID (to match a physical VLAN ID), scroll down and click Save:
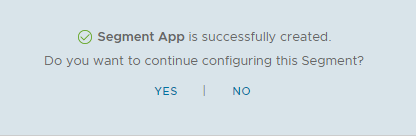
When prompted, click No:
Repeat for any further segments as required.
Hooking Up VMs
Back in vSphere, simply modify a VM’s network config and select the required NSX-T segment:
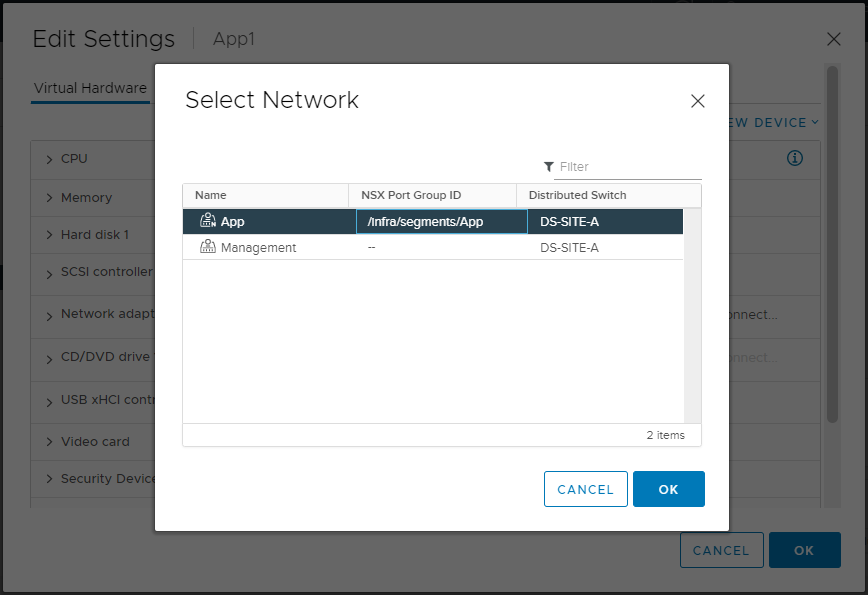
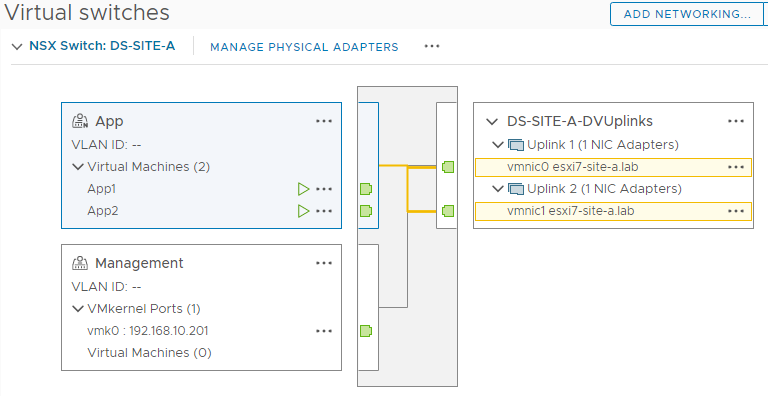
Take a look at the VDS configuration and you should see the NSX-T segment listed with VMs connected:
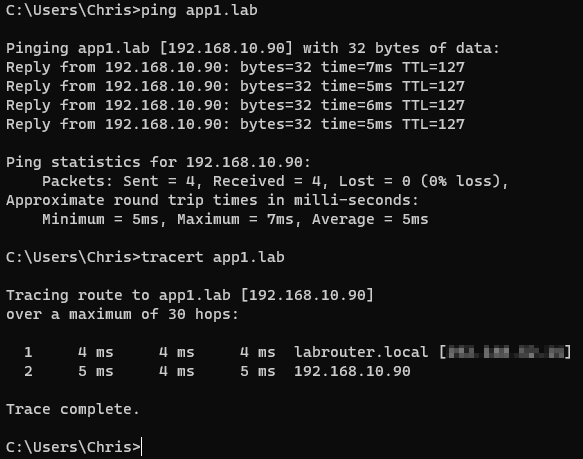
Test that you can still access your newly migrated VMs:
Nice ![]() And we are done!
And we are done!
Conclusion and Wrap Up
“But Chris, what about firewall rules?!?” I hear you ask.
OK dear reader you are correct, the whole point of Micro-segmentation is firewall rules!
Having said that, this post is quite long enough as it is already…
In this post we have taken a vanilla vSphere 7 environment, deployed an NSX-T 3.2 manager, hooked the manager up to the vSphere environment and configured the whole ‘shebang’ for a Micro-segmentation deployment. Along the way we have also learnt about Segments, Transport Zones, Uplink Profiles and Transport Node Profiles.
Next time, we’ll look at deploying the same setup using the NSX Configuration Wizard - for completeness. After that, we will look at setting up those elusive firewall rules - I promise!
For those that simply cannot wait, take a look in NSX-T Manager > Security > Distributed Firewall > Category Specific Rules. You’ll find what you need there. ![]()
Oh and doesn’t NSX-T do more than Micro-segmentation?
Yes, yes it does. Much, much more!
Baby steps!!
-Chris