


 Recently I found myself needing to extend a disk partition and finding I couldn’t do it. As usual, this was not the first time I had come up against this problem.
A problem of my own making too. ![]()
Why? read on…
Overview
Primer
First off, a very quick primer for those not familiar with the terms MBR and GPT:
What’s an MBR?
MBR stands for Master Boot Record. An MBR is method of containing information on how a disk’s logical partitions, containing file systems, are organized on the disk. The concept of a MBR was first introduced in 1983. If you wish, find out more at Wikipedia here.
What’s a GPT?
GPT stands for GUID Partition Table. Again a GPT is method of containing information on how a disk’s logical partitions, containing file systems, are organized on the disk, this time using universally unique identifiers, which are also known as globally unique identifiers (GUIDs). GPT’s have been with us since the late 2000’s. If you wish, find out more at Wikipedia here.
The Problem
So what’s the problem? This:
- When originally partitioning my disk, way back when, I had chosen to use MBR
- The maximum partition size for an MBR partitioned disk is 2 terabytes (TB)
- I wanted to extend my partition beyond 2TB as I was running out of free disk space
Which meant I could not extend the partition. ![]()
Traditionally, the method to deal with this situation is to backup the data on the MBR partitioned disk, delete the MBR partition, create a GPT partition on the disk and restore the data back in to the GPT partition, or purchase disk partition management tools such as Acronis Disk Director (£55+).
Unfortunately without making special arrangements, I did not have a spare 2TB free disk space “floating around” that I could use for my backup. Neither did I want to spend money on software I’ll only use a couple of times.
Surely (Shirley) there must be another way… Besides we aren’t living in the computing dark ages any more Elaine…

The Solution: MBR to GPT Conversion WITHOUT Data Loss
Luckily the solution turned out to be a one line command run from a Linux based boot CD (or boot USB) that could save all that deleting and restoring of data.
At this point standard disclaimers apply. Follow at your own risk. Backup your data before following. You are responsible for your own actions etc.
The TL;DR
Too Lazy; Didn’t Read? - Boot GParted Live and use gdisk.
The Full How To
With the TL;DR’s out of the way, here’s how we do this. First off, here is the environment:
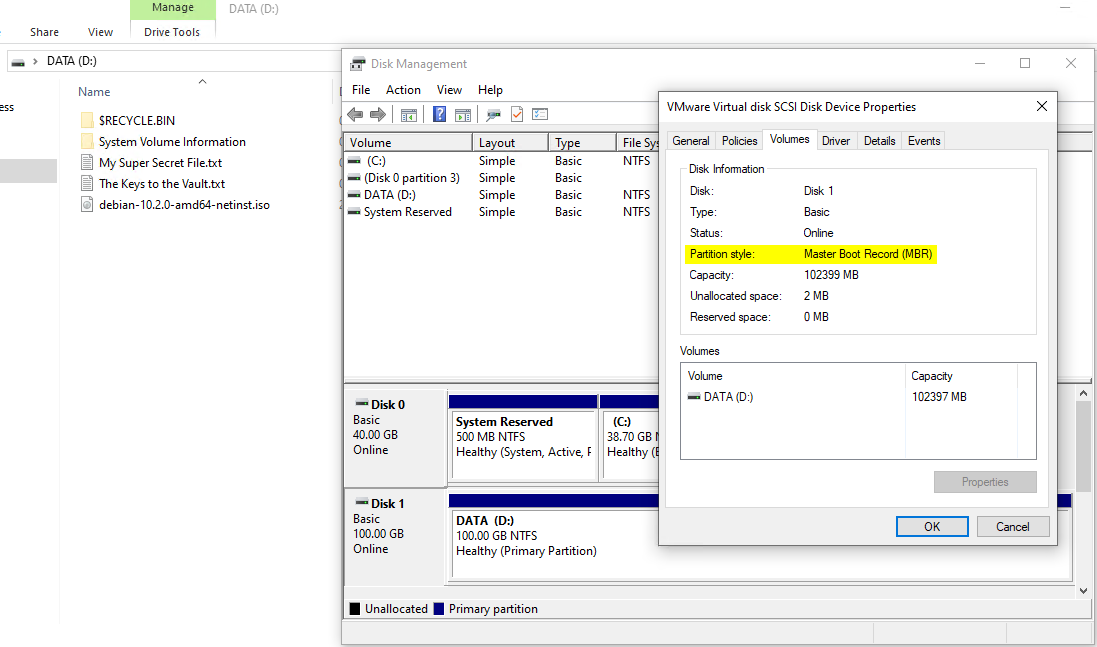
As you can see from the above, we have a machine running Windows 10 with an MBR partitioned 100GB D:\ drive containing some “super sensitive” files and a Debian install ISO.
I want to convert the D:\ drive from MBR to GPT.
Step one is to download a copy of GParted Live from here. Next we need to boot the machine from the downloaded GParted ISO.
I booted GParted Live with the default Settings, selected British English and chose to boot into the graphical user environment. Next I used the drop down in the top right hand corner of GParted app to select my 100GB D:\ drive:

As can be seen from the above, the GParted Live instance sees my 100GB D:\ drive as /dev/sdb. The drive you wish to convert may be identified differently; just make a note of it’s identification. You should be able to tell from the drive size.
Next, double click the Terminal icon  to open a terminal.
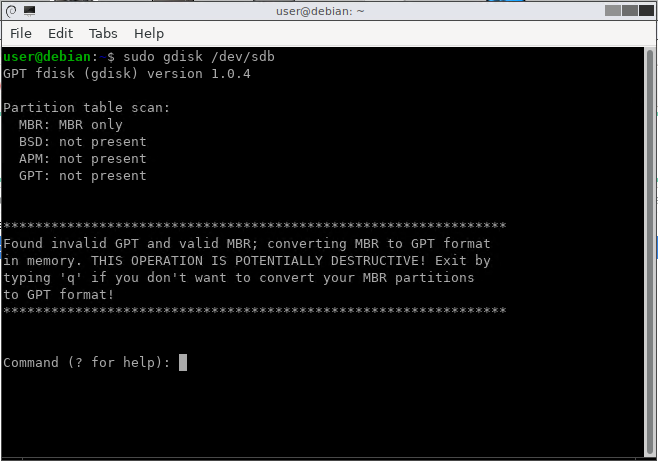
Once the terminal opens, enter the command sudo gdisk <your identified drive> In my case, I entered sudo gdisk /dev/sdb:
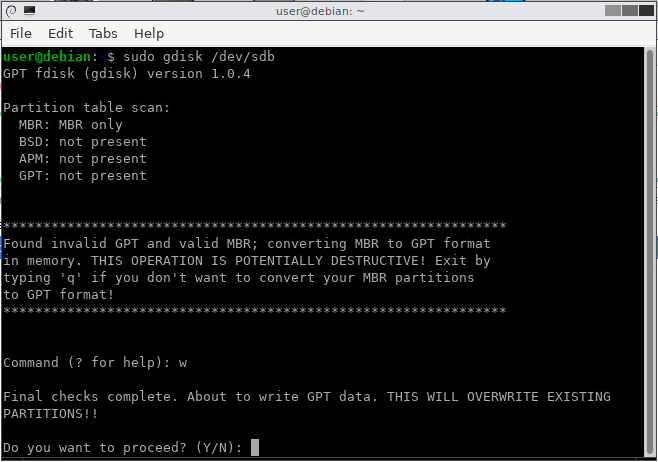
Next hit w to replace the MBR with a GPT. Take heed of the warning (you did backup your data right?!? ![]() )
)
Enter y to proceed and commit to writing the GPT:
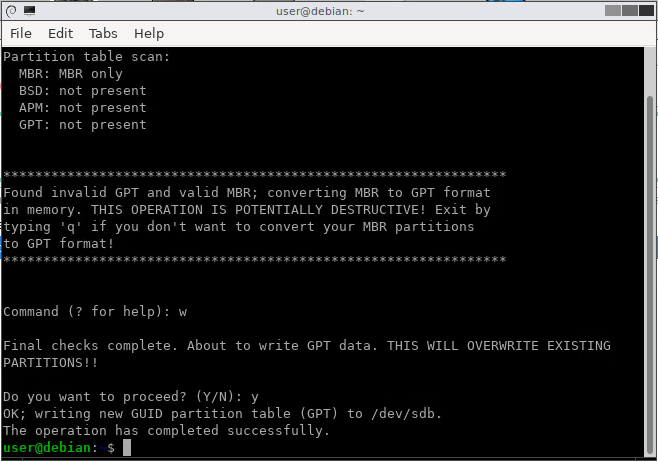
gdisk done!
Finally, double click the Exit icon  to exit GParted and reboot.
Back in windows, a double check in file explorer and in disk management, we can see that my “super sensitive” files and a Debian install ISO are intact and my partition has been converted to GPT:

Job done! Boom! ![]()
Conclusion
In this post we converted a Windows Master Boot Record (MBR) partition to a GUID Partition Table (GPT) partition. We booted a GParted Live CD (or bootable USB) and converted the partition simply, quickly and with zero data loss.
What’s more, we got this done quickly, easily and for free!
-Chris