


 Last time we looked at what needs to happen should we loose the input mains electricity supply to our newly acquired Uninterruptable Power Supply (UPS). For example during a power cut.
We also got familiar with the hardware and software needed to action a controlled shutdown should it be required. If you’ve not seen that post, catch up now. It’s a great read. ![]()
As mentioned, this post is part 2 of a multipart series. Find the other parts here:
- Part 1: Hardware, Requirement, Software, Solution
- Part 2: This part - Connectivity and Software Installation
- Part 3: Scripting for the win… or should that be for the failure?
To recap, we are going to make our Raspberry Pi “the brains of the operation” in our solution.
Overview
Solution (Refresher)
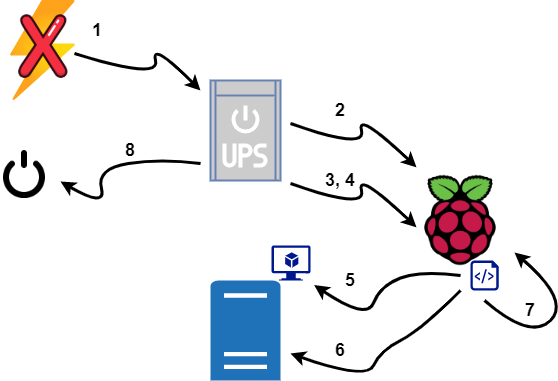
- Mains electricity fails… power cut!
- The UPS signals to the Raspberry Pi that there is a power cut
- The UPS signals its battery charge state to the Raspberry Pi
- The UPS battery charge falls below a predetermined threshold and signals this to the Raspberry Pi
- The Raspberry Pi runs a script to shut down all powered on VMs
- The Raspberry Pi runs a script to shut down the ESXi host
- The Raspberry Pi runs a script to shut itself down
- The UPS stops supplying power from battery and shuts down which also shuts down the modem, router and network switch
Let’s get to it.
Hardware Connectivity
Like this:
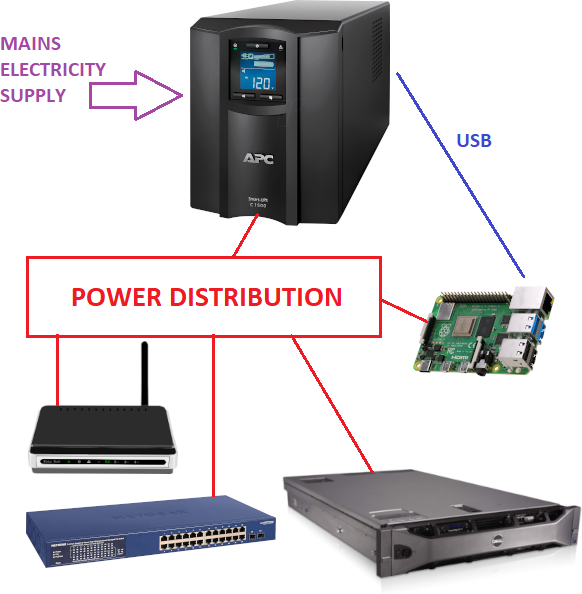
- The UPS is connected to the incoming mains electricity supply
- The UPS and Raspberry Pi are connected via a USB cable
- All kit is powered via the UPS
Check Raspberry Pi + APC UPS Connectivity
After connecting the UPS and Raspberry Pi via a USB cable, lets check UPS to RPi USB connectivity:
$ lsusb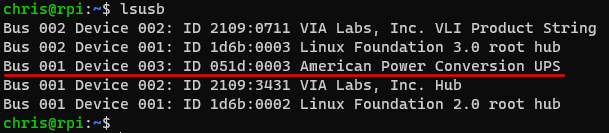
Yep, one APC UPS found. So far, so good.
Software Installation
Install APC UPS Daemon (apcupsd)
Next, lets install the APC UPS Daemon on the Raspberry Pi:
$ sudo apt-get install apcupsdOnce installed, we need to configure apcupsd to work with our UPS. This is achieved via editing the /etc/apcupsd/apcupsd.conf config file:
$ sudo nano /etc/apcupsd/apcupsd.confWithin the file you will find lots of comments detailing each configuration item. Rather than list the whole file comments and all, I’ve listed just our configuration items below:
UPSNAME SMC1500I
UPSCABLE usb
UPSTYPE usb
LOCKFILE /var/lock
SCRIPTDIR /etc/apcupsd
PWRFAILDIR /etc/apcupsd
NOLOGINDIR /etc
ONBATTERYDELAY 6
BATTERYLEVEL 10
MINUTES 10
TIMEOUT 0
ANNOY 300
ANNOYDELAY 60
NOLOGON disable
KILLDELAY 0
NETSERVER on
NISIP 127.0.0.1
NISPORT 3551
EVENTSFILE /var/log/apcupsd.events
EVENTSFILEMAX 10
UPSCLASS standalone
UPSMODE disable
STATTIME 0
STATFILE /var/log/apcupsd.status
LOGSTATS off
DATATIME 0
Next step is to mark apcupsd as configured:
$ sudo nano /etc/default/apcupsdSet to equal yes:
ISCONFIGURED=yesFinally lets restart the apcupsd service and test to see if apcupsd discovers our UPS:
$ sudo apcupsd restart
$ apcaccess status
Nice:
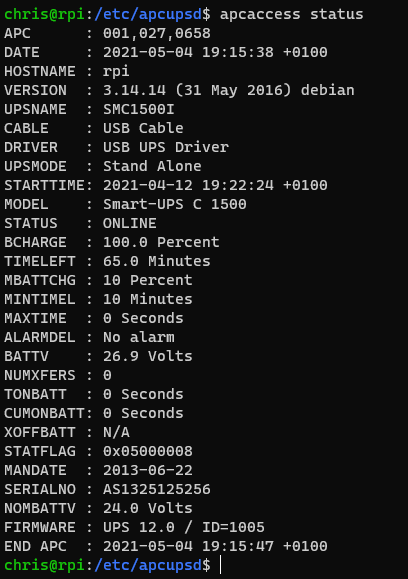
That is apcupsd daemon installed and working.
Install PowerShell Core on Raspberry Pi
Next step is to install PowerShell Core.
There are two packages that we need to install prior to downloading and extracting PowerShell: libssl1.0 and libunwind8.
We then download a copy of PowerShell for ARM64 and extract.
Finally we link the pwsh executable to /usr/bin so that it can be launched from any folder on the Raspberry Pi:
$ sudo apt-get install '^libssl1.0.[0-9]$' libunwind8 -y
$ cd ~/
$ wget https://github.com/PowerShell/PowerShell/releases/download/v7.1.3/powershell-7.1.3-linux-arm64.tar.gz
$ mkdir ~/powershell
$ tar -xvf ./powershell-7.1.3-linux-arm64.tar.gz -C ~/powershell
$ sudo ln -s ~/powershell/pwsh /usr/bin/pwsh
OK, lets launch PowerShell to see if it runs OK:
$ pwsh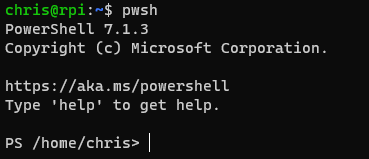
Yep that works!
Install VMware PowerCLI on Raspberry Pi
OK, lets next install PowerCLI using the PowerShell Install-Module cmdlet and set our PowerCLI configuration options:
$ sudo pwsh
Install-Module VMware.PowerCLI -Scope AllUsers
Set-PowerCLIConfiguration -Scope AllUsers -InvalidCertificateAction Ignore -ParticipateInCEIP $false -Confirm:$false
Finally, lets take PowerCLI for a little spin and connect to a test lab ESXi host:
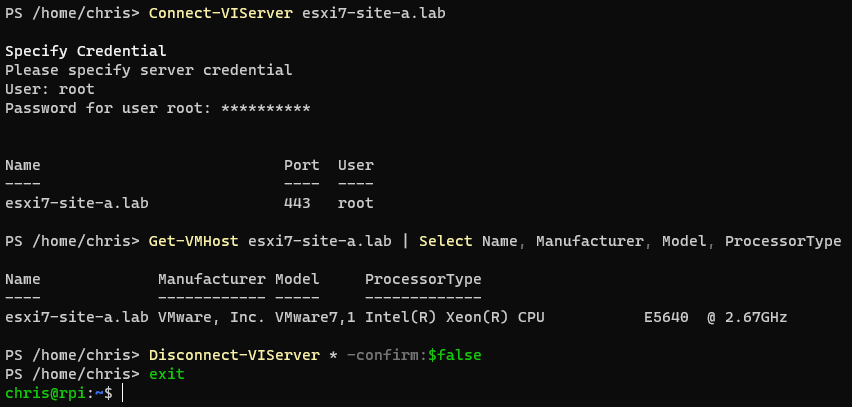
Boom! That’s the end of our software installations ![]()
Conclusion and Wrap Up
That’ll do it for part two.
In this post we hooked up our hardware, checked UPS and Raspberry Pi connectivity via USB and installed all of our required software. Next time we’ll look at getting everything to work nicely together.
This post is part 2 of a multipart series.
Find the other parts here:
- Part 1: Hardware, Requirement, Software, Solution
- Part 2: This part - Connectivity and Software Installation
- Part 3: Scripting for the win… or should that be for the failure?
Look out for future parts coming soon!
-Chris