So you've taken the plunge and bought one of those flashy digital 'straight to memory card' video camcorders.
Excellent. So you've shot all this video and now you would like to put it onto DVD before wiping the memory card and starting again.
The problem is what's the easiest way to convert it to DVD? The DVD needs to be 100% standards compliant so that it will play in any DVD player any-time anywhere.
Sure there are lots of commercial conversion tools around that will do the job just fine, but why pay the money when you can achieve perfect 100% standards compliant results using free software? Is this possible?
The answer is a most definite YES! What's more, here's how:
Software Required
You will need three pieces of software (two if you have a DVD burning application already installed)
Step 1 - Create MPEG2 file
If you already have a preferred DVD burning application installed then feel free to use that. If not, here is how to use CDBurnerXP.
If you get stuck or want to create DVD's with Menus etc. Here are the more advanced guides:
Job done!
Pretty easy really. Honest!
By the time you converted your fourth or fifth video, you'll have the process down.
- Chris
Excellent. So you've shot all this video and now you would like to put it onto DVD before wiping the memory card and starting again.
The problem is what's the easiest way to convert it to DVD? The DVD needs to be 100% standards compliant so that it will play in any DVD player any-time anywhere.
Sure there are lots of commercial conversion tools around that will do the job just fine, but why pay the money when you can achieve perfect 100% standards compliant results using free software? Is this possible?
The answer is a most definite YES! What's more, here's how:
Software Required
You will need three pieces of software (two if you have a DVD burning application already installed)
- gui4ffmpeg - Used to convert the AVI / MP4 / DivX / XviD file to a DVD compliant MPEG2 video stream. Direct download link here. To install, extract the zip file to a folder of your choice. Ensure you extract with folders intact!
- DVDAuthorgui - Used to convert the MPEG2 video stream into DVD VOB files ready for burning onto DVD. Direct download link here
- (Optional) CDBurnerXP - Used burn the files onto DVD disk. Direct download link here
Step 1 - Create MPEG2 file
- Open your video file and make sure that the video file plays OK. Also make a note of the aspect ratio of the file to be converted. Is it normal (4:3) or widescreen (16:9)?
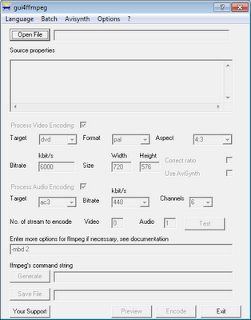
- Launch gui4ffmpeg.exe. You should be presented with a window that looks like this:
- Open your AVI / MP4 / DivX / XviD file using Open File button
- Select "dvd" in the Target drop down box
- Select your appropriate format (PAL = Europe, NTSC = North America) in the Format drop down box
- Using the Aspect drop down, select the aspect ratio noted down in step 1
- Ensure that the Bitrate stays at "6000"
- Change the audio target to "mp2"
- Click Save File and chose a filename and location to save the converted video
- Click the Generate button. This will populate the command sting box next to the Generate button
- Click Encode
- The ffmpeg command line tool will start and run in a command line window
- The command line window will show conversion progress. Go make a cup of tea. This may take a while
- Close the window once the encoding is complete
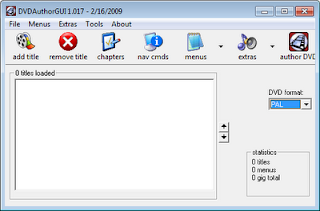
- Launch DVDAuthorgui. You should be presented with a window that looks like this:
- Select your appropriate format (PAL = Europe, NTSC = North America) in the DVD Format drop down box
- Click "add title"
- Change the file type to "mpeg with NAV packets" and open the mpg file created by gui4ffmpeg.exe
- The file should show up in the Titles Loaded box
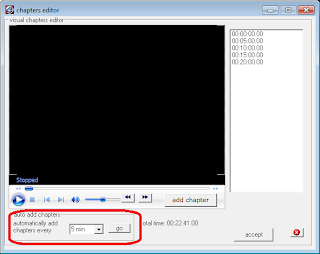
- (Optional) I like to add some chapters to my video to make skipping forward through the DVD easier. Add chapters by clicking "Chapters", "Visual Editors", OK, and "go" to auto add 5 minute chapters
- (Optional) you can be more precise with the chapters using the visual editor if you want to be. [I personally can never be bothered.] Click accept
- When you are happy, click "author DVD"
- Specify the name of the folder where you want the DVD output to be written to and click save
- Put your feet up again. This shouldn't take that long - certainly not as long as the gui4ffmpeg conversion
If you already have a preferred DVD burning application installed then feel free to use that. If not, here is how to use CDBurnerXP.
- Launch CDBurnerXP
- Select Data Disc and click OK
- Click File and "Video DVD Layout"
- Navigate and select the VIDEO_TS folder created under the the output folder created by DVDAuthorGUI
- Click Create Movie Image and OK
- Click Burn
If you get stuck or want to create DVD's with Menus etc. Here are the more advanced guides:
Job done!
Pretty easy really. Honest!
By the time you converted your fourth or fifth video, you'll have the process down.
- Chris


