Having scoured the internet and drawing a blank when looking for a simple process to follow when adding a VLAN and subsequent VMware VM access port group and to a Cisco Nexus 1000v switch, I ended up stitching together the Cisco commands after reading lots and lots of Cisco Nexus configuration guides.
The annoyance is that whilst you can monitor the configuration of your Nexus 1000v through VMware Virtual Center, you cannot configure it. All Nexus 1000v configuration must be done at the command line.
In this post I present to you the configuration commands I use when adding an additional VLAN to a Nexus 1000v switch.
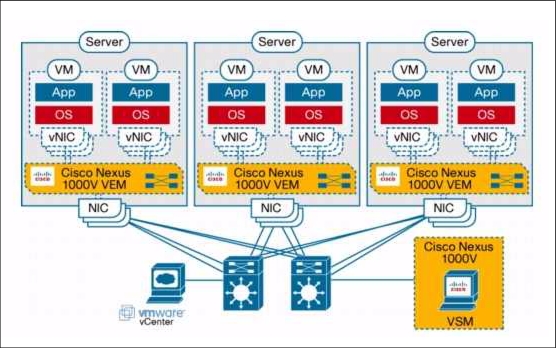
If not, put simply a Nexus 1000v replaces / augments a standard VMware distributed switch as shown below:
A single Nexus 1000v consists of a minimum of 2 modules:
VEM = Virtual Ethernet Module - Installed on the ESXi host itself
VSM = Virtual Supervisor Module - The 1000v management VM
Of course, if you were setting your Nexus 1000v from scratch, you would know which VLANs to add 'right off the bat', so would have no need to add additional VLANs.
However as we all know change happens.
conf t
vlan 456
name VM_Prod_VL456
end
conf t
port-profile type vethernet VM_Prod_VL456
vmware port-group
switchport mode access
switchport access vlan 456
vmware max-ports 512
no shutdown
state enabled
end
conf t
port-profile SYSTEM-UPLINK
switchport trunk allowed vlan add 456
end
copy run start
Job done. Time to start creating some VM's and hooking them into my newly created "VM_Prod_VL456" port group.
- Chris
The annoyance is that whilst you can monitor the configuration of your Nexus 1000v through VMware Virtual Center, you cannot configure it. All Nexus 1000v configuration must be done at the command line.
In this post I present to you the configuration commands I use when adding an additional VLAN to a Nexus 1000v switch.
First off - What is a Cisco Nexus 1000v?
Well if you have a spare 5 minutes and 17 seconds, have a watch of the following:If not, put simply a Nexus 1000v replaces / augments a standard VMware distributed switch as shown below:
A single Nexus 1000v consists of a minimum of 2 modules:
VEM = Virtual Ethernet Module - Installed on the ESXi host itself
VSM = Virtual Supervisor Module - The 1000v management VM
Setting up a Nexus 1000v
Have a read of Kendrick Coleman's excellent guide here: Standing Up The Cisco Nexus 1000v In Less Than 10 MinutesOf course, if you were setting your Nexus 1000v from scratch, you would know which VLANs to add 'right off the bat', so would have no need to add additional VLANs.
However as we all know change happens.
Adding VLANs to Cisco Nexus 1000v
Yes, I'm not a network administrator, however these commands work for me. They should work for you too.Create a VLAN and name it correctly:
First step is to create a VLAN and give it a name. I like to name my VLANs in line with their VMware port group name. Here I'm creating VLAN 456 and calling it "VM_Prod_VL456":conf t
vlan 456
name VM_Prod_VL456
end
Create a VMware Access Port Group and give it a friendly name
Next step is to create the VMware port group as it would appear in Virtual Center Networking. Here I'm calling my VMware port group "VM_Prod_VL456" and hooking it to my VLAN 456. I'm also going to give my "VM_Prod_VL456" port group 512 access ports to plug my VMs into:conf t
port-profile type vethernet VM_Prod_VL456
vmware port-group
switchport mode access
switchport access vlan 456
vmware max-ports 512
no shutdown
state enabled
end
Add VLAN to the trunk port group
Final step is to allow the newly crated VLAN 456 access to the rest of the network via the ESXi physical network cards. Sometimes referred to as the Nexus 1000v trunk ports. In my example, these ports are called "SYSTEM-UPLINK". I'm also going to save my configuration via "copy run start":conf t
port-profile SYSTEM-UPLINK
switchport trunk allowed vlan add 456
end
copy run start
Job done. Time to start creating some VM's and hooking them into my newly created "VM_Prod_VL456" port group.
- Chris


