


 Nutanix Flow Network Security Next-Gen (FNS) versions 5.2 and above include Service Insertion, a feature that redirects network traffic through virtual machines running specific network functions. This enables you to leverage the superior capabilities of external services, such as firewalls, packet capture systems and analytics tools, which are specifically designed for their respective functions.
By tapping into these services, you can offload these tasks from your Nutanix environment allowing it to focus on core responsibilities such as infrastructure virtualisation.
Overview
Overview
Service Insertion works by intercepting traffic flows and steering them through designated service VMs before they reach their final destination. Think of it as adding inspection points into your network paths, enabling you to apply third-party security controls, capture packets for analysis, or perform deep packet inspection - all without reconfiguring your applications.
In this post, I’ll demonstrate how Service Insertion can be leveraged with FNS to achieve inline security measures and comprehensive packet capture. We’ll also look at the specific requirements for implementing service insertion on Nutanix AHV clusters, giving you practical guidance to get started.
Whether you’re looking to strengthen your network’s security posture or gain deeper insights into traffic patterns, Service Insertion provides a flexible approach to integrating external network functions directly into your Nutanix environment.
The Setup
Perhaps the simplest to demonstrate and most widely implemented example of service insertion is web filtering; blocking access to undesirable websites.
I will be using a Fortinet FortiGate Next-Generation Firewall VM as my FNS network function VM. This is purely because:
- FortiGate Next Generation Firewall is validated by Nutanix for Service Insertion
- Fortinet offer a free Permanent trial mode FortiGate-VM Firewall*, making it perfect for labs, demos and blog posts such as this
*Requires a free Fortinet account at support.fortinet.com
For a list of Nutanix validated products that support service insertion, see Nutanix Compatibility and Interoperability Matrix.
Deploying Network Service VM
To deploy the FortiGate network service VM, follow the standard steps for creating a new Nutanix VM. First, download and obtain the disk image of the FGT_ VM64_ KVM FortiGate-VM (in this case, v7.6.4 - latest available at time of writing). Next, allocate the necessary system resources to the VM during creation:
- 1 CPU
- 2 GB of memory
- An additional 30GB blank disk space
NOTE: 1 CPU and 2GB memory are the maximum resources allowed by the permanent trial VM. If not using the free trial these values can be increased.
For detailed instructions on creating and configuring your FortiGate-VM, refer to the guide: Creating the FortiGate-VM.
Once created, we will need to add two Network Function NICs (alongside our management interface) to our FortiGate VM:
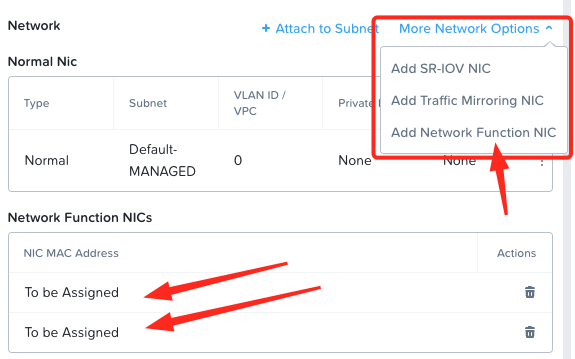
MAC addresses are populated during VM creation. Let’s make a note of these MAC addresses for later:
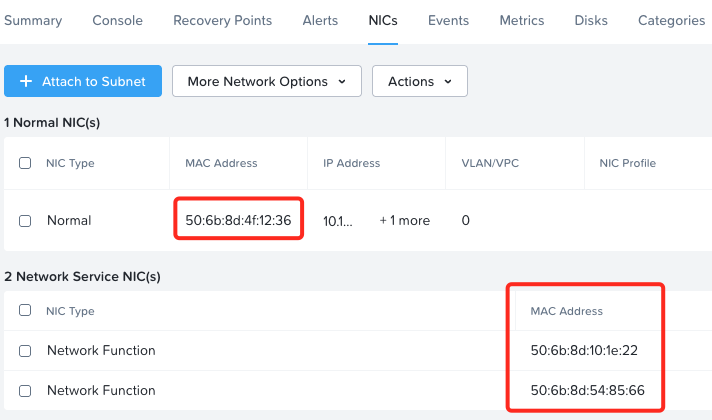
Next, once booted, let’s double check our MAC addresses at our FortiGate VM console:
get hardware nic port | grep Hwaddr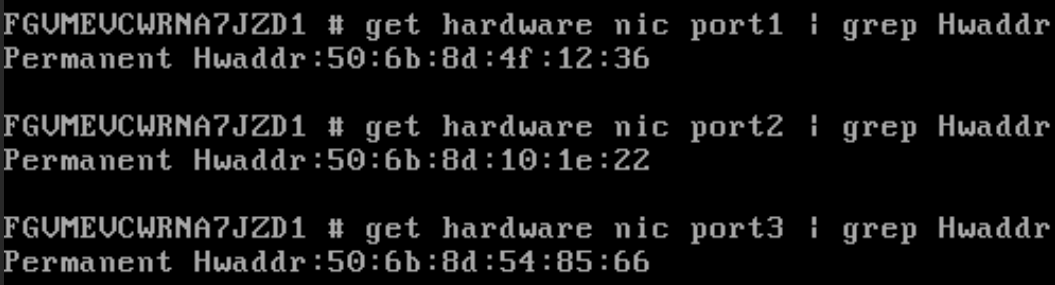
Good.
Port 1 is our FortiGate VM management interface.
Ports 2 and 3 are our function interfaces. Let’s assign IP address and DNS details to the management interface, again via the VM console:
config system interface
edit "port1"
set mode static
set ip <IP_ADDRESS> <SUBNET_MASK>
set allowaccess ping https ssh http

config router static
edit 1
set gateway <GATEWAY>
set device "port1"
end

config system dns
set primary <DNS_1>
set secondary <DNS_2>
set domain <LOCAL_DOMAIN_NAME>
end
Browsing to the VM we can login and licence the firewall.
FortiGate Network Service VM Configuration
Follows is the configuration of FortiGate. See conclusion and wrap up for configuration of other firewalls.
Virtual Wire
First off we need to “bond” our Network Function NICs into a Virtual Wire. From the management interface, select Network > Interfaces > Create New > Virtual Wire Pair. Name the Virtual Wire, add the Network Function NIC interfaces and enable Wildcard VLAN to allow all VLAN-tagged traffic to pass through the virtual wire pair:
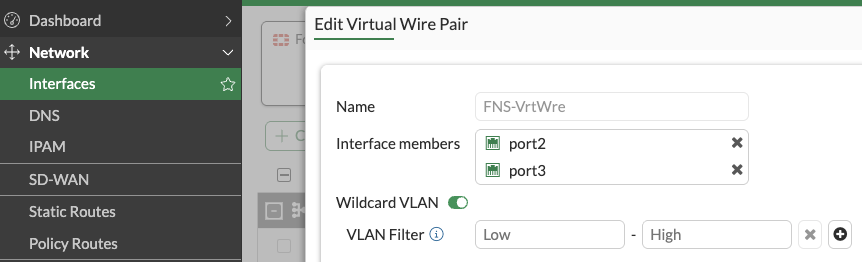
OK when done.
HealthCheck
Nutanix FNS is able to monitor the health of Network Service VMs to aid with Network Service VM clustering, reporting, alerting, etc. This is done by FNS pinging our FNS inbound NIC and expecting to see the ping exit the Network Service VM on the Network Service outbound NIC.
FNS uses the 169.254.100.0/24 subnet for this healthcheck traffic. To allow this traffic to traverse our firewall virtual wire we need to create the following.
First let’s create an address in Policy + Objects > Addresses > Create New and complete the config:
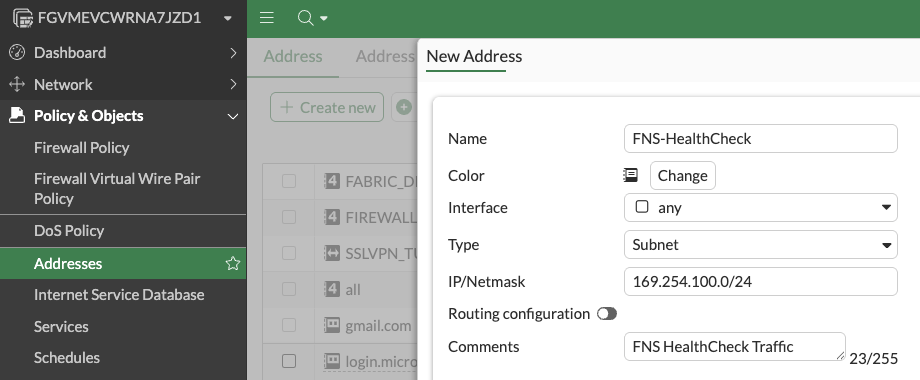
OK when done.
Next, let’s allow the healthcheck traffic across our virtual wire in Policy + Objects > Firewall Virtual Wire Pair Policy > Create New and complete the config:
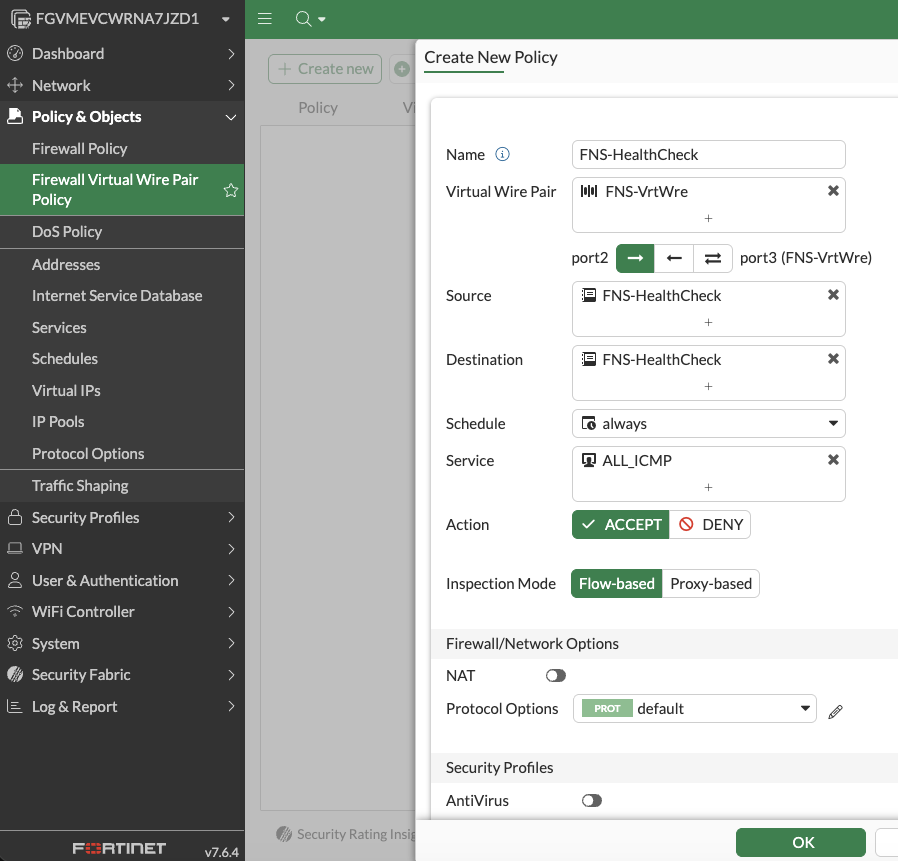
OK when done.
 (Click to zoom)
With that done, lets head back to Nutanix Prism Central and configure our Network Function in Infrastructure > Network + Security > Security Policies > Network Functions > Create Function. Network Function and VM Details.
To match the Firewall Virtual Wire Pair Policy created earlier, select the correct vNIC MAC addresses as discovered and configured earlier, traffic flowing from port2 (in my case function vNIC MAC ending in 22) to port3 (in my case function vNIC MAC ending in 66):
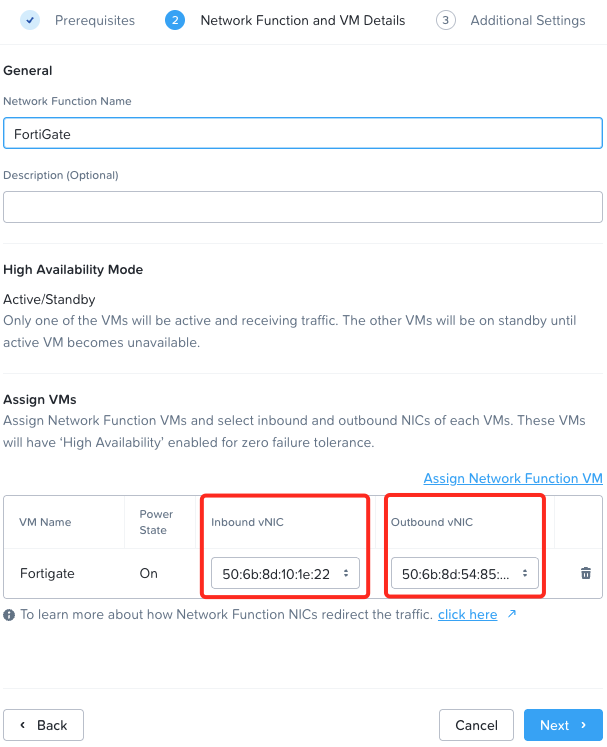
Next, we’ll configure the health check to run every five seconds, mark as healthy or unhealthy after three consecutive failures / successes:

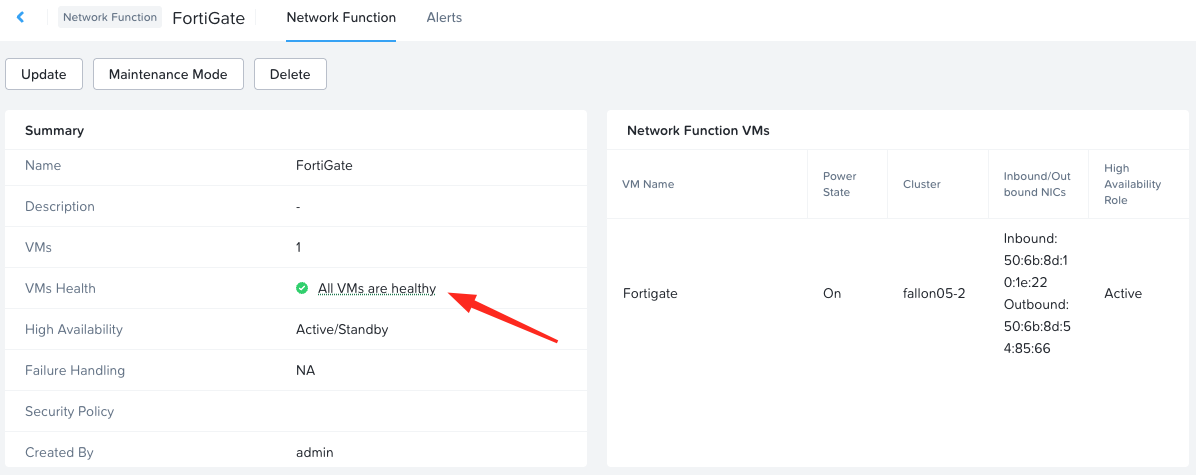
Create to complete. After a few moments:
 (Click to zoom)
FNS is reporting that all network function VMs are healthy.
Filtering and Content Inspection
Right, let’s configure what we came here for - some filtering and content inspection!
Create Web Filter Policy
Back at the FortiGate management console, select Security Profiles > Web Filter > Create new. Name the policy and enable FortiGuard Category Based Filter. Next, in this example, I’ll opt to block a category of websites highlighted in blue in the below screenshot:
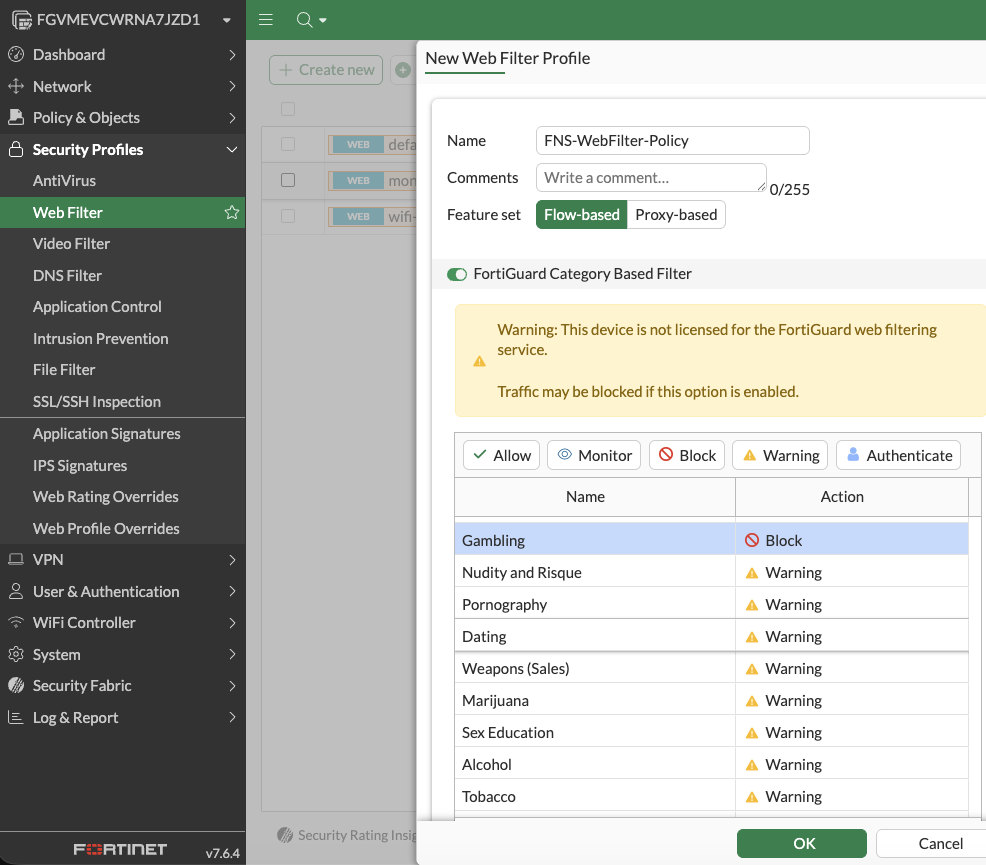
OK when done.
Apply Web Filter Policy
Next, we’ll attach the policy to the virtual wire. Back in Policy + Objects > Firewall Virtual Wire Pair Policy > Create New.
We’ll name the policy, select the virtual wire pair, set source and destination to all, select dns http https services, enable web filter and select our FNS-WebFilter-Policy created earlier. (I’ll setup SSL inspection later):
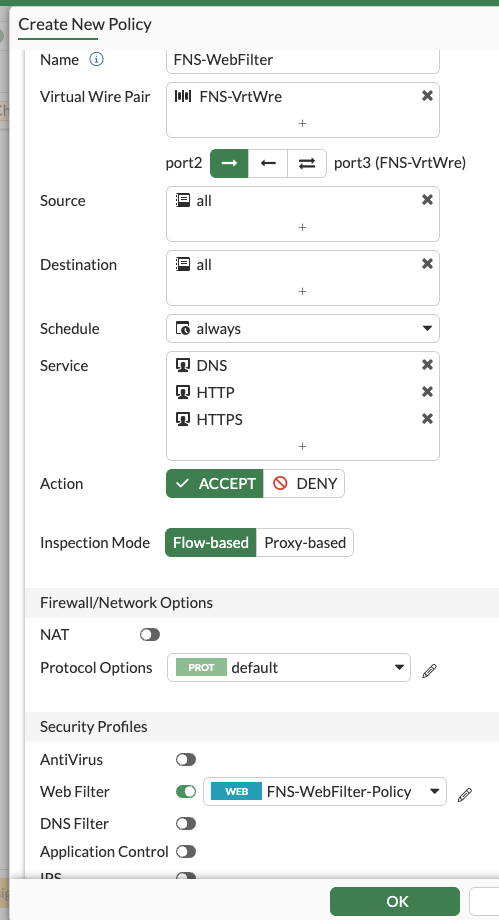
As I’m using a DNS server on the internet (as opposed to internal DNS servers), I’ve opted to add the DNS service to my filter policy. If you are using internal DNS servers, you may not want or need to add the DNS service here.
OK when done.
 (Click to zoom)
Flow Network Security with Content Inspection
Finally, let’s configure an FNS policy to make use of our network function. If you’ve already read my post Microsegmentation with Nutanix Flow Network Security then you’ll know your way around creating FNS policies.
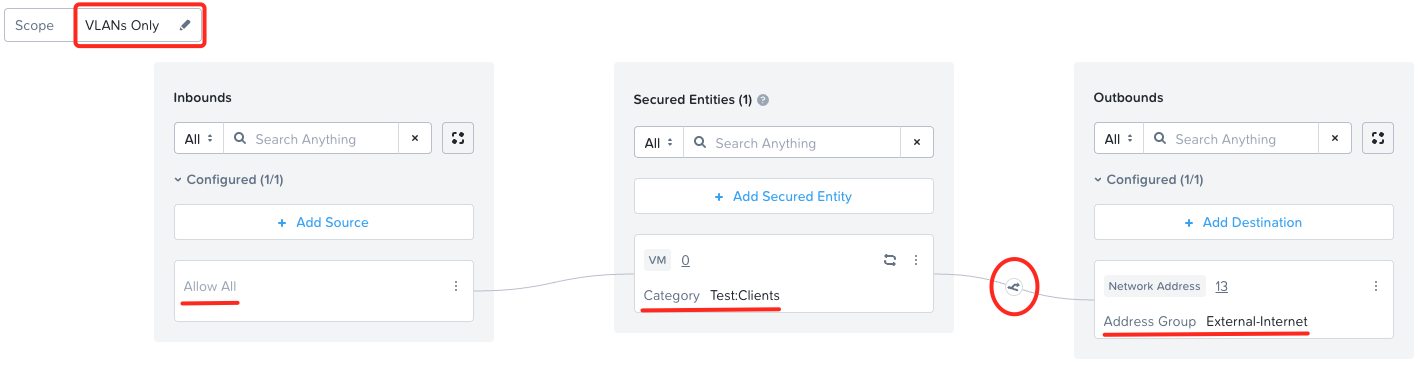
From Nutanix Prism Central, select Infrastructure > Network + Security > Security Policies > List > Create Security Policy.
Create and name an Application policy, configure secured entities, inbounds and outbounds. Remember to select VLAN Scope (other scopes will be supported soon):
 (Click to zoom)
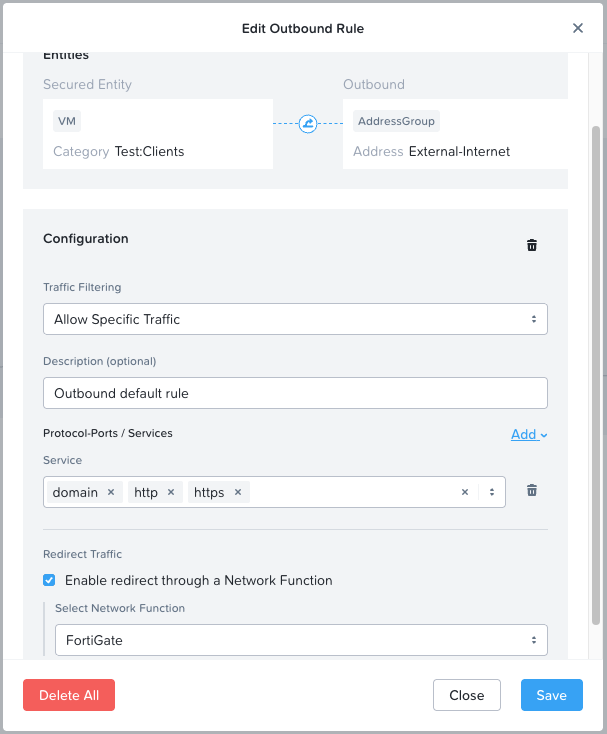
I’ll configure my outbound rule to the internet to redirect DNS (domain) HTTP and HTTPS traffic via my FortiGate network function VM:
Next > Apply (Enforce) > Confirm.
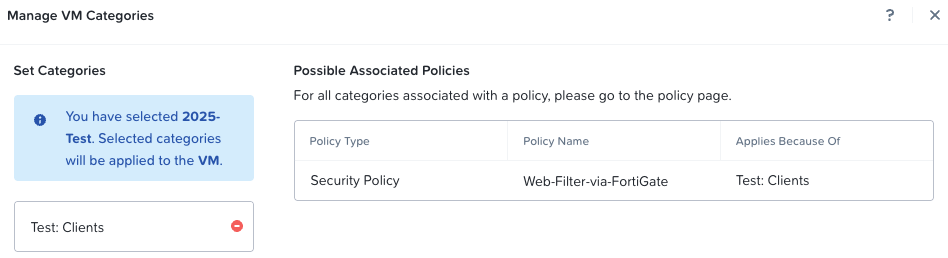
To conclude, I’ll add my 2025-Test VM to the secured category:
Testing
So the fun stuffs !
First off let’s try to get to a standard website from our 2025-Test web client VM:

Nice, the FortiGate is allowing us to browse quality websites such as this. ![]()
Next, let’s try a site that we know will be in our blocked category:
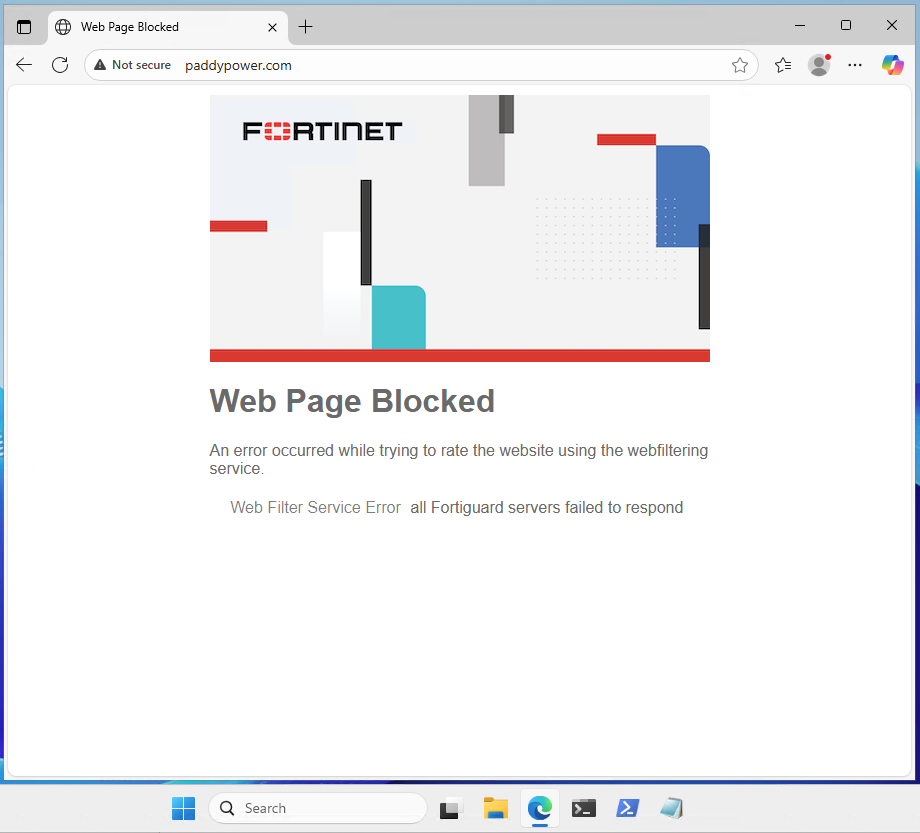
Boom! Happy days, the FortiGate network service VM has blocked access to the website.
The “Web Filter Service Error all Fortiguard servers failed to respond” message I believe is because we are running with a trial license. Let me know in the comments below if not.
Conclusion and Wrap Up
So there we have it!
Another screenshot heavy post, however this post also doubles as a FortiGate deployment and basic web filtering configuration from scratch post… You’re welcome. ![]()
As touched on earlier, other vendor firewall software validated to support service insertion with FNS is listed here and if you are interested in FNS Service Insertion with Palo Alto VM firewalls, then take a look at a post written by my colleague Stephen Martin:
If you are interested in more Nutanix Flow Network Security content closer to home, on this here blog, feel free to head over to any/all of these posts:
- Microsegmentation with Nutanix Flow Network Security
- Traffic Discovery with Nutanix Flow Network Security
- Zero-Trust Architecture Implementation on Nutanix: A Guide
Oh and yes… Service Insertion:

Back on a serious note, you can find the Nutanix Flow Network Security Service Insertion documentation here.
-Chris