


 In today’s complex security landscape, it can be tempting to try and anticipate every possible threat. However, this approach often leads to an overwhelming number of rules and exceptions that are difficult to manage. Instead, smart policies focus on what you actually want to allow, rather than trying to block everything bad.
Think of your application security policy as a carefully curated guest list. You specify exactly where and to whom your application should talk with and optionally get granular by defining the protocols and ports for those conversations. By focusing on allowing good traffic, rather than blocking bad traffic, you can create a more effective and manageable security posture.
Couple that with the fact that Nutanix Flow Network Security (FNS) configuration is slightly different to any other firewall or microsegmentation product you may have used in the past, then things can get super confusing super fast.
In this post, we’ll delve into the core principles of security policies in Nutanix FNS. You won’t find step-by-step instructions or troubleshooting solutions here - instead, you’ll gain valuable insights and best practices for building your own FNS ruleset.
Overview
- Core Principles for Security Policies
- Implicit Deny
- Use Categories for Grouping of Secured Entities
- Adopt an Application-Centric Approach
- Keep Shared / Application Category Groupings Small
- The Full Rule Priority Table
- Strategies for Different Policy Types
- Policy Lifecycle and Management
- Entity Groups
- Conclusion and Wrap Up
Core Principles for Security Policies
This post is written as a reference guide, distinct from other articles on this site that focus on step-by-step instructions or troubleshooting solutions. Instead, it provides an in-depth overview of Nutanix Flow Network Security (FNS) policies for readers seeking to gain a deeper understanding and appreciation of the subject matter.
Implicit Deny
FNS implements an implicit deny-all model where traffic that doesn’t match any defined allow rules is automatically blocked. This means you must explicitly create allow rules for legitimate traffic, as the system’s default behaviour is to deny everything unless specifically permitted. This can be seen when creating a new Application policy:
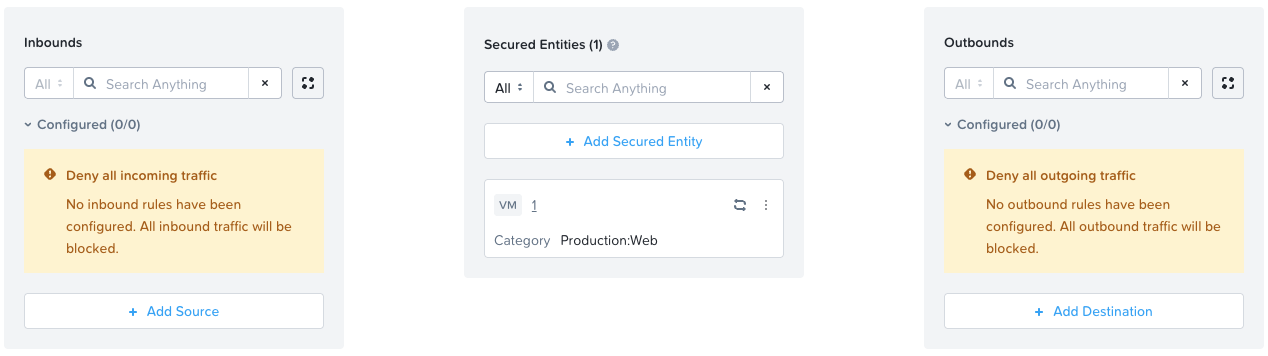 (Click to zoom)
Use Categories for Grouping of Secured Entities
Apply policies to categories (logical groups of entities) instead of individual VMs, Subnets, addresses etc. This approach is highly scalable and ensures that new entities are automatically secured when they are assigned to a category. Common built-in categories include AppType, AppTier, and Environment. You can also - and arguably should - create your own custom categories.
Adopt an Application-Centric Approach
Design category membership and policies around your applications and workloads rather than network attributes like IP addresses or VLANs. This makes your policies more resilient, as they remain effective even if a VM’s IP address changes or it migrates to another cluster.
Keep Shared / Application Category Groupings Small
Whilst large environment sized category groupings containing lots and lots of entities come into their own when using Isolation policies, categories for Shared Service or Application policies (see Policy Types below), traffic inside categories (also known as intra-tier traffic) needs to be considered also. This becomes easier when the VM members of a category perform the same function, possibly for the same application. Ultimately, remember the goal here is MICROsegmentation.
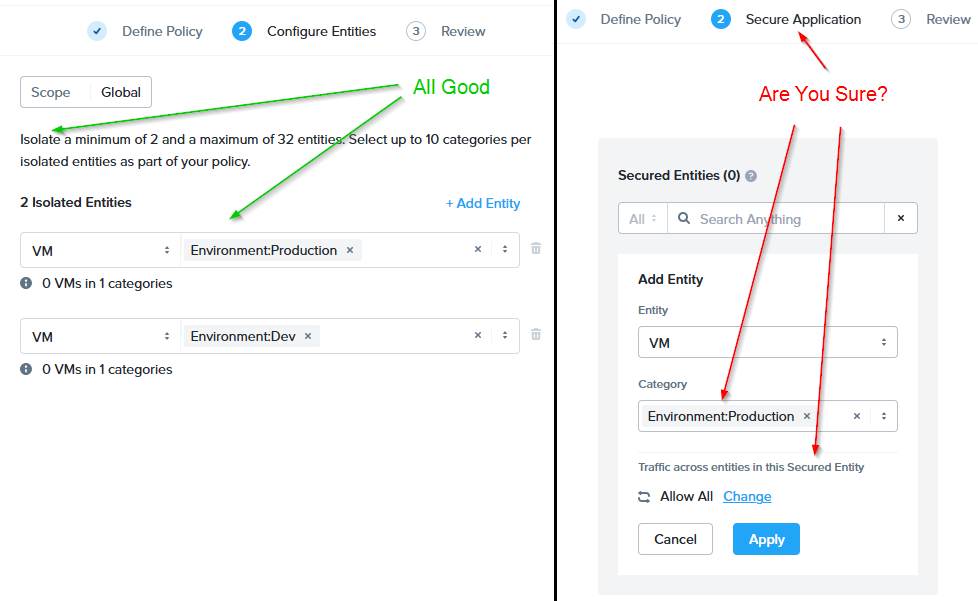 Left: Isolation Policy | Right: Application Policy
Large environment sized categories are great for isolation policies but not for application policies
Left: Isolation Policy | Right: Application Policy
Large environment sized categories are great for isolation policies but not for application policies
Why? Imagine this Scenario
As per the right-hand image above, I create an Application Policy and assign the category Environment:Production as the secured entity to the policy and (again as per the diagram) I’ll allow all traffic across the entities in the secured entity. I’ll save and enforce the policy. OK so far.
 (Click to zoom)
Next, I’ll create another Application Policy to allow my Production:DB database servers to talk to my Production:Web web servers only on TCP port 1234 (remember implicit deny). Again, all OK:
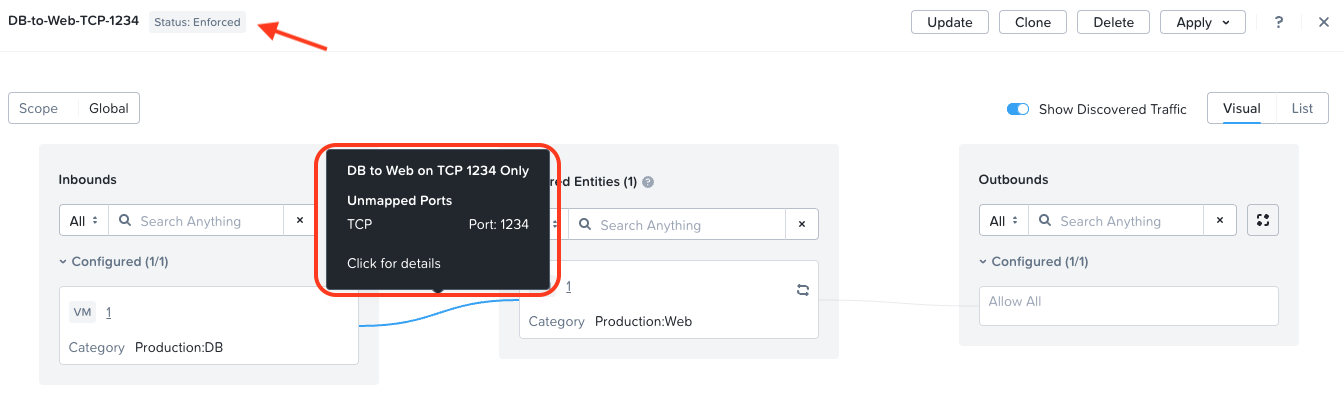 (Click to zoom)
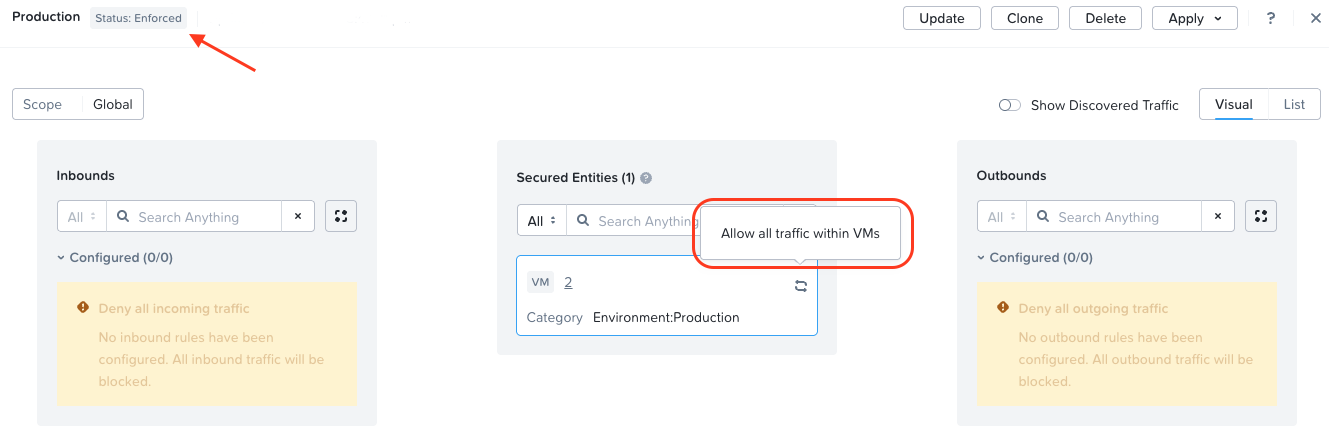
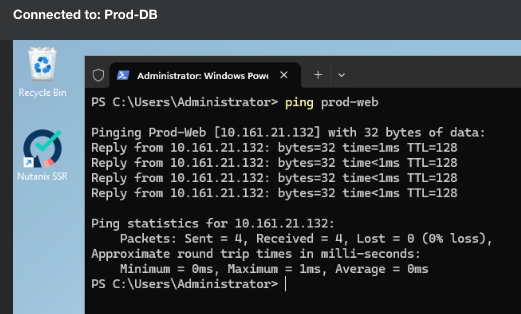
So in theory, the only traffic that can get from DB to Web is on TCP port 1234, nothing else. Let’s check our VM categories:

Yep, each VM is a member of the category Environment:Production along with their respective Production: categories.
I then test and I find that my Production:DB database servers can still talk to my Production:Web web servers on all ports, not just TCP port 1234. For example, I should not be able to ping Prod-Web from Prod-DB:
Hmmm, that is wrong. What is going on here?
The Why
Application policy intra entity rules take higher priority than other Application policy rules.
Let’s table Application polices in order of priority:

Our first Application policy created securing the Environment:Production category containing both our VMs with Allow all traffic within VMs is doing just that - allowing all traffic between VMs (above table row 1 in green). As intra-entity allow rules take priority over our application policy implicit deny rules created against Production:DB and Production:Web categories (table row 4 in red).
The Fix
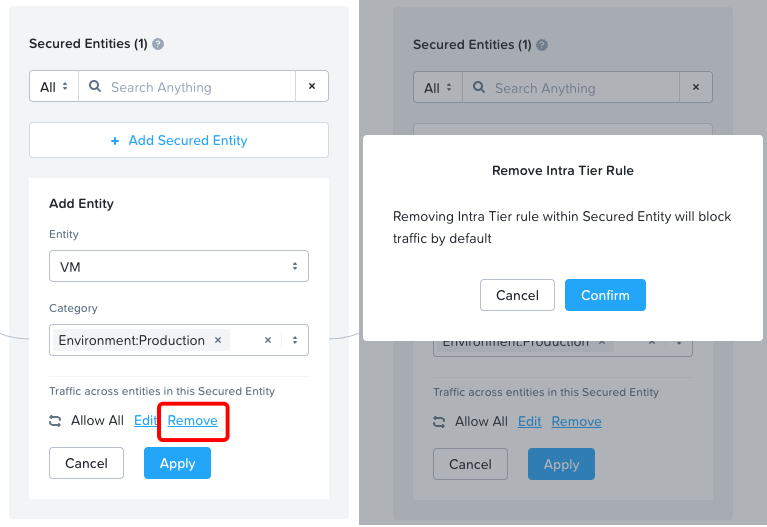
In FNS 5.2.1, the following new feature was introduced (Release Notes):
- Remove Intra-Tier Traffic Rule - While creating or updating a flow policy, you can now remove intra-tier traffic rule. After removing the intra-tier rule, to control VM-to-VM communication for a tier or category, you can define inbound or outbound rules.
Let’s see:
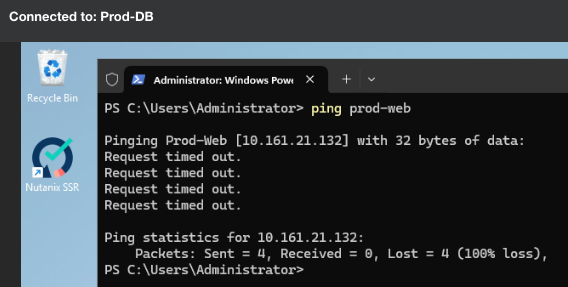
Yep, that’s working as required now, my ping traffic is showing as blocked (Remember 10.161.21.133 is the Prod-DB VM):
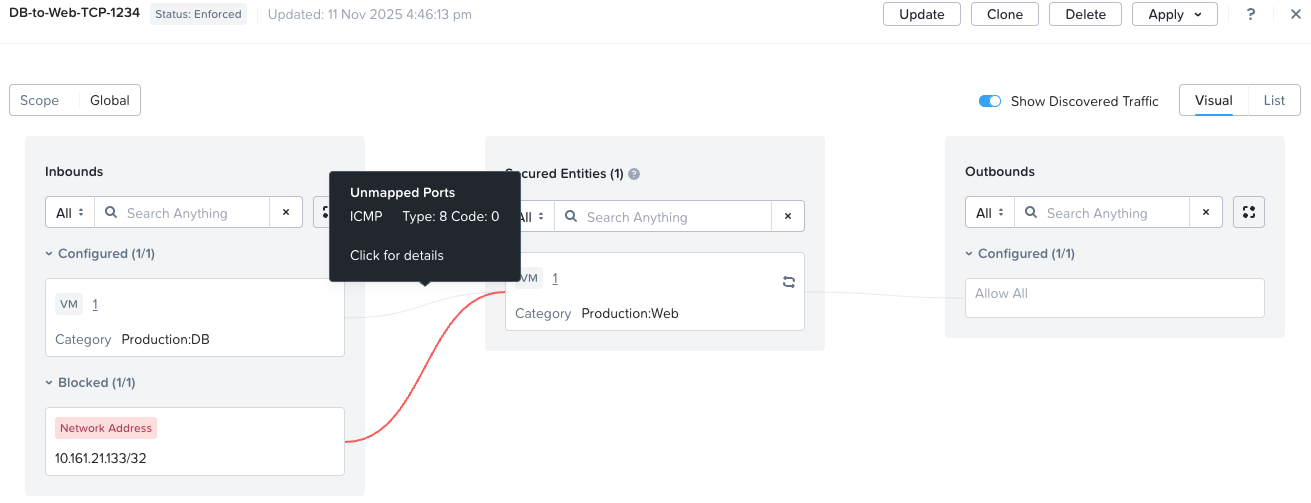 (Click to zoom)
The Full Rule Priority Table
“But Chris, what about the priority order shown by FNS in the Prism Central GUI - How does that fit in here?”
This one?
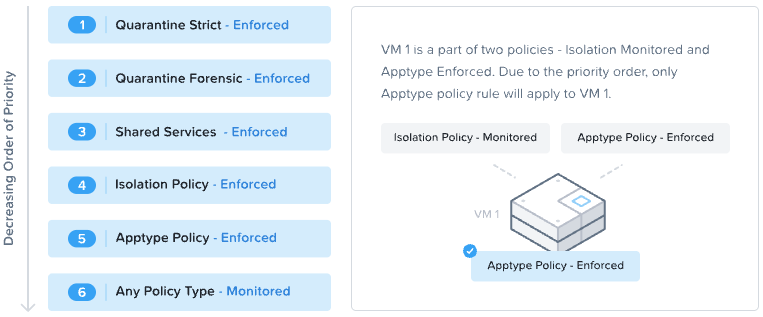
OK, let’s expand the table to show all policies in order of priority:
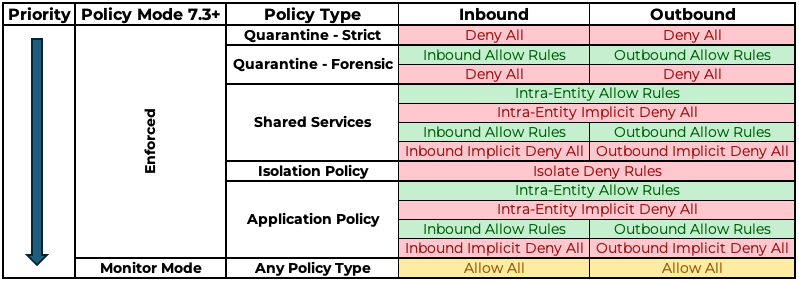
Credit to my colleague Stephen Martin for putting this table together. Check out Stephen’s Blog.
As you can see, whilst policies have a priority order, rules within policies have a priority order too.
Strategies for Different Policy Types
- Quarantine Policies: Familiarise yourself with the two system-defined quarantine methods for isolating a compromised VM:
- Strict: Blocks all network traffic to and from the VM.
- Forensic: Blocks all traffic except from designated forensic tools, which you can specify by adding their categories to the policy.
-
Shared Service Policies: Create these for Nutanix VM based common infrastructure services like Active Directory, DNS, NTP, and DHCP. A key benefit is that traffic allowed by a shared service policy will override a conflicting isolation policy, ensuring critical services are always reachable. You cannot use Shared Service Polices with external to Nutanix services such as backup appliances etc.
-
Isolation Policies: Use these to strictly block all communication between two or more groups of VMs, such as separating a
Productionenvironment from aDevelopmentenvironment. Note that VMs within the same isolated group can still communicate with each other by default. -
Application Policies: Use these for “ring-fencing” applications. Define the VMs that make up the application as the “Secured Entities” and then explicitly define allowed inbound and outbound communication paths. For multi-tier applications, use categories to define rules for traffic between tiers (e.g., Web-to-App, App-to-DB).
- VDI Policies: When securing a VDI environment, use VDI policies that integrate with Active Directory, Entra, etc. This allows you to create rules based on user and group identities. It is recommended to apply a default base policy to VDI VMs before user login to ensure they are secure from the moment they are powered on.
Policy Lifecycle and Management
-
Start in Monitor Mode: Always begin by applying a new policy in
Apply (Monitor) Mode. This allows all traffic to pass but visualises flows that would have been blocked, enabling you to fine-tune rules without impacting the application. -
Leverage Traffic Visualisation: Use the visualisation tools in Prism Central to monitor traffic flows. This helps you understand communication patterns and discover traffic that needs to be allowed before enforcing a policy. Once you are confident the policy is correct, move it to
Apply (Enforce) Modeto begin blocking unauthorised traffic. Remember the visualisation will show flows <24 hours old. -
Enable Policy Hit Logs: For auditing and troubleshooting, enable policy hit logs. These logs track which network flows were allowed or denied by a specific policy and can be forwarded to an external syslog server for analysis and tracking of flows greater than 24 hours old.
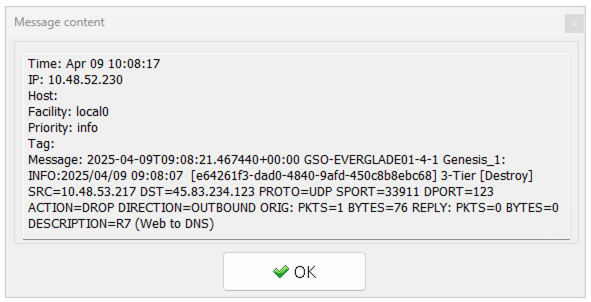 Syslog Entry
-
Use Reusable Components: Create and use
Services(protocol-port combinations) andAddress Groups(IPs, subnets) to avoid manual configuration errors and ensure consistency across policies. -
Utilise Role-Based Access Control (RBAC): Assign specific roles like
Flow Admin,Flow Policy Author, andFlow Viewerto delegate responsibilities securely. You can create custom authorisation policies to grant granular permissions, such as allowing a user to create a policy in monitor mode but not enforce it.
Entity Groups
In the same way that Services and Addresses can be grouped to allow for cleaner rule generation and reuse, Entity groups can be created to assist with entity selection. Consider the following:
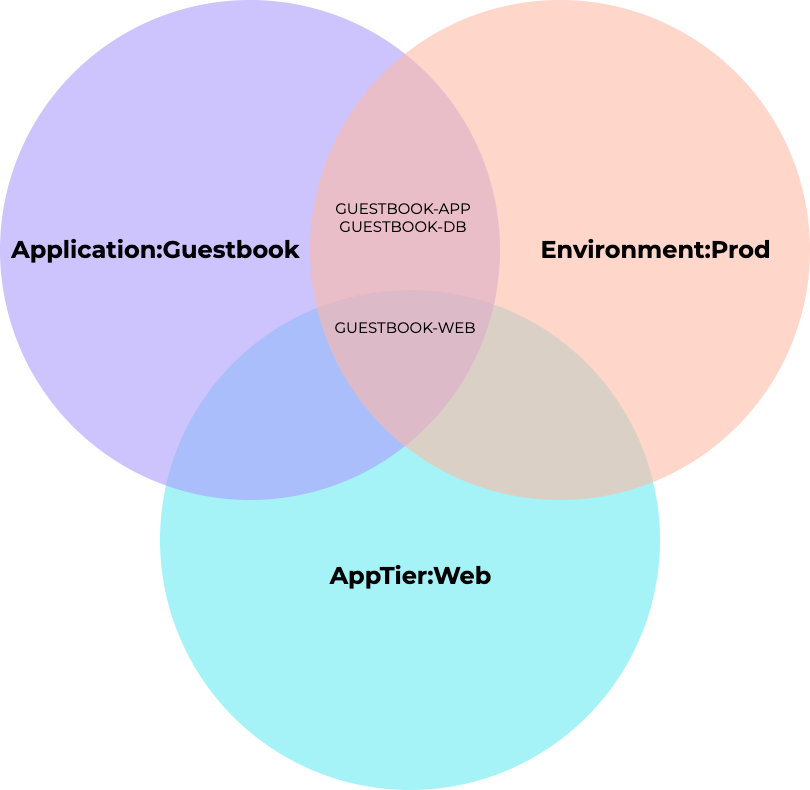
Let’s assume I wish to create a ruleset for a Guestbook application web server. The application consists of three VMs; GUESTBOOK-APP, GUESTBOOK-DB and GUESTBOOK-WEB. Of the three VMs, GUESTBOOK-WEB is the only VM that is a member of all three categories: Application:Guestbook, Environment:Prod and AppTier:Web.
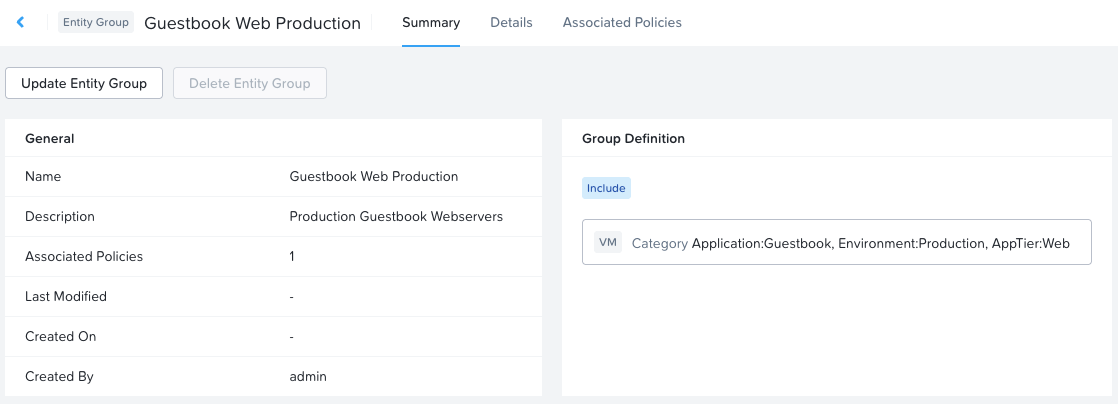
Because of this, I can create an Entity Group based on this membership. In practice, configuration is as follows:
 (Click to zoom)
My entity group Guestbook Web Production is defined by category membership of the three categories discussed earlier.
 (Click to zoom)
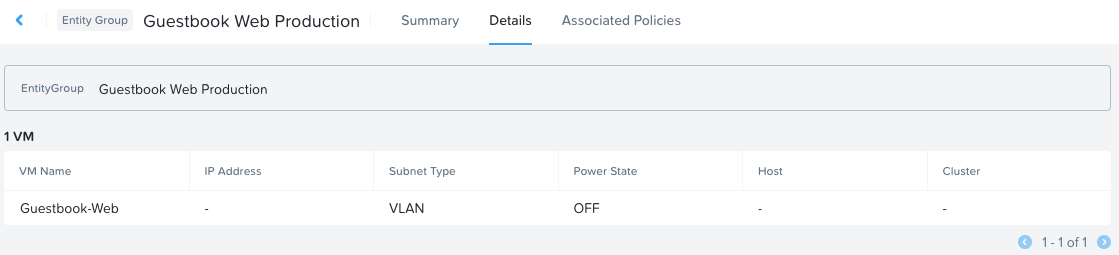
VM membership of the Guestbook Web Production group is resolved as just the GUESTBOOK-WEB VM
 (Click to zoom)
Checking Associated Policies, I can see that the entity group is associated with my Guestbook policy.
So as you can see, Entity Groups are a great way to ‘slice and dice’ your VMs into more manageable groups; groups that can then have policies constructed against them.
Conclusion and Wrap Up
So a bit of a different post to normal; more of a reference post detailing suggestions on how to build your own Nutanix Flow policy ruleset. Remember; this knowledge has been built via many engagements helping many clients get to grips with Nutanix Flow Network Security.
Whilst I’ve hopefully covered many of the FNS gotchas - none of this is prescriptive, every setup is different and most of all, you do you!
If you are interested in more Nutanix Flow Network Security content feel free to head over to any/all of these posts:
- Microsegmentation with Nutanix Flow Network Security
- Traffic Discovery with Nutanix Flow Network Security
- Zero-Trust Architecture Implementation on Nutanix: A Guide
- Service Insertion with Nutanix Flow Network Security
-Chris