


 In the first part of our Nutanix Kubernetes Platform Deployment series, we covered the essential prerequisites for installing NKP. From setting up our environment to creating a Nutanix Portal account, we are now well-equipped to embark on this exciting journey. Remember, container management doesn’t have to be overwhelming – with Nutanix and Kubernetes, you’ll be navigating the waters in no time.
As a recap, this is part two of a multipart series. Other parts of the series can be found:
- Nutanix Kubernetes Platform Deployment - Part 1: NKP Lab Deployment Preparation
- Nutanix Kubernetes Platform Deployment - Part 2: (This part) NKP Lab Deployment
This time in part 2 of the series, we are diving deeper into the NKP installation process itself; the good stuff.
Overview
Refresher
As discussed in part 1 and as a refresher, the NKP deployment process can be broken down into roughly ten steps:

KIND = Kubernetes IN Docker
Last time, we completed steps one to three of the graphic above; allowing us to kick off with the fun stuff this time; step 4 onwards.
Again, as per the graphic above, there are two methods that can be used to install NKP; the Terminal User Interface (TUI) method and the Command Line Interface (CLI) method. Let’s quickly look at both and pick one.
TUI Deployment Method
This has less to do with holidays and more to do with a Terminal User Interface (TUI).
Let’s take a look at the TUI. Simply run the following on the deployment machine:
root@deploy:~# nkp create cluster nutanixUpon start up the TUI resembles the following:
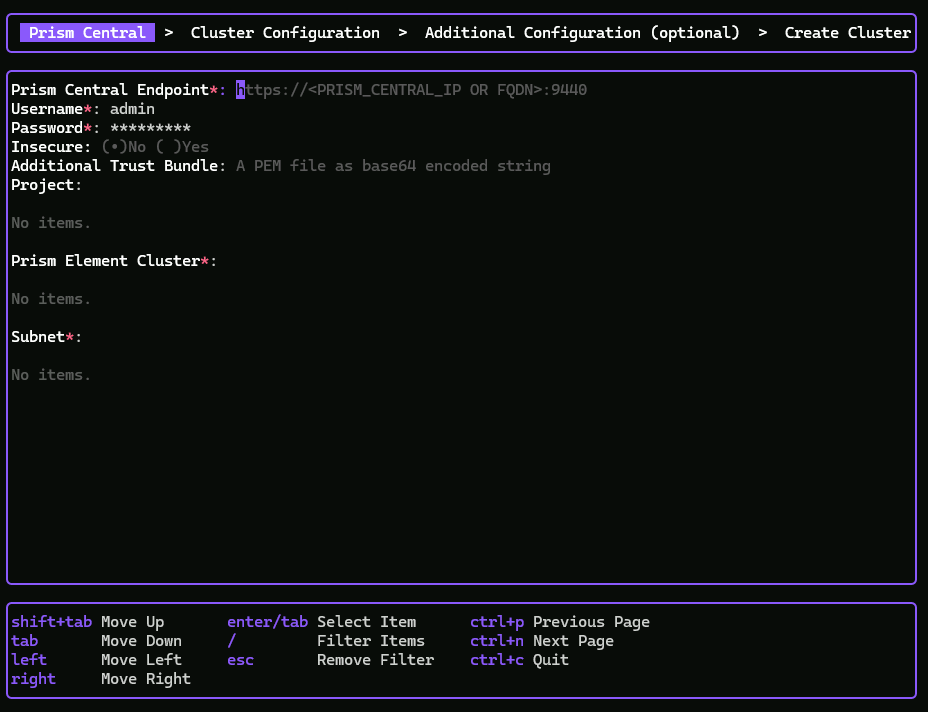
As you can see, the TUI is a simple four page user interface that can be used to create the following default NKP deployment:
| Cluster Nodes / VMs | Number Deployed | Configuration |
|---|---|---|
| Control | Three | 4 vCPUs, 16GB Memory |
| Worker | Four | 8 vCPUs, 32GB Memory |
As my single node Nutanix lab Prism Element cluster doesn’t have 176GB memory to spare, a TUI install of NKP is not going to work for me in this instance. Your lab may be different.
Once again, my colleague Winson Sou has put a video together showing the installation of NKP using the TUI:
I therefore need to “turn down” some of these configurations to allow NKP to install and run in my lab. That’s where the CLI installation method comes in.
CLI Deployment Method
Using the Command Line Installation (CLI) method gives us a large amount of flexibility to tailor our NKP installation to meet our needs, and perhaps more importantly for my lab scenario, simply fit an NKP installation into my lab.
The full CLI syntax of NKP can be accessed by running the following on the deployment machine:
root@deploy:~# nkp help create cluster nutanixI’m not going to cut and paste the full nkp flag list here… Let’s just say… it’s extensive! So extensive that perhaps the easiest method of setting the required flags is using environment variables. Simpler for tracking and making individual changes if required.
First, lets look at the variables and values used and then we’ll get to the flags after. The Minimum Recommendations for Managed Clusters from the documentation was used extensively here!
export CLUSTER_NAME=ch-nkp
export NUTANIX_USER=admin
export NUTANIX_PASSWORD=<PRISM_CENTRAL_PASSWORD>
export PRISM_ELEMENT_CLUSTER_NAME=SKADE01-1
export NUTANIX_PC_FQDN_ENDPOINT_WITH_PORT=https://10.48.58.80:9440
export CONTROL_PLANE_IP=10.48.107.200
export IMAGE_NAME=nkp-rocky-9.5-release-1.32.3-20250430150550.qcow2
export SUBNET_NAME=VLAN567
export CONTROL_PLANE_REPLICAS=1
export CONTROL_PLANE_VCPUS=8
export CONTROL_PLANE_MEMORY_GIB=12
export WORKER_REPLICAS=3
export WORKER_VCPUS=4
export WORKER_MEMORY_GIB=8
export SSH_KEY_FILE=/root/.ssh/id_ed25519.pub
export NUTANIX_STORAGE_CONTAINER_NAME=default-container
export LB_IP_RANGE=<IP_ADDRESS_RANGE>
export REGISTRY_URL=https://registry-1.docker.io
export REGISTRY_USERNAME=<DOCKER_HUB_USERNAME>
export REGISTRY_PASSWORD=<DOCKER_HUB_PASSWORD>
Passwords can be encapsulated in single quotes (eg 'MY_PASSWORD') if required.
| Variable | Setting | Notes |
|---|---|---|
| CLUSTER_NAME | ch-nkp | Entity Prefix |
| NUTANIX_USER | admin | Prism Cntrl admin |
| NUTANIX_PASSWORD | Password for admin | |
| PRISM_ELEMENT_CLUSTER_NAME | SITE-A | Target PE cluster |
| NUTANIX_PC_FQDN_ENDPOINT_ WITH_PORT | https://10.48.58.80:9440 | Prism Cntrl URL |
| CONTROL_PLANE_IP | 10.48.107.200 | IP for Control VM* |
| IMAGE_NAME | nkp-rocky-9.5-release-1.32.3-20250430150550.qcow2 | As per Part 1 |
| SUBNET_NAME | VLAN567 | NKP VMs Subnet |
| CONTROL_PLANE_REPLICAS | 1 | NKP minimum |
| CONTROL_PLANE_VCPUS | 8 | NKP minimum |
| CONTROL_PLANE_MEMORY_GIB | 12 | NKP minimum |
| WORKER_REPLICAS | 3 | NKP minimum |
| WORKER_VCPUS | 4 | NKP minimum |
| WORKER_MEMORY_GIB | 8 | NKP minimum |
| SSH_KEY_FILE | /root/.ssh/id_ed25519.pub | As per Part 1 |
| NUTANIX_STORAGE_CONTAINER_NAME | default-container | Container name |
| LB_IP_RANGE | 10.48.107.201-10.48.107.205 | IP Range** |
| REGISTRY_URL | https://registry-1.docker.io | As per Part 1 |
| REGISTRY_USERNAME | As per Part 1 | |
| REGISTRY_PASSWORD | As per Part 1 |
*With internet access
**Used when exposing containers to the network
Nice. With the variables set, let’s feed them into the NKP flags:
nkp create cluster nutanix --cluster-name $CLUSTER_NAME \
 --endpoint $NUTANIX_PC_FQDN_ENDPOINT_WITH_PORT \
 --control-plane-endpoint-ip $CONTROL_PLANE_IP \
 --control-plane-vm-image $IMAGE_NAME \
 --control-plane-prism-element-cluster $PRISM_ELEMENT_CLUSTER_NAME \
 --control-plane-subnets $SUBNET_NAME \
 --control-plane-replicas $CONTROL_PLANE_REPLICAS \
 --control-plane-vcpus $CONTROL_PLANE_VCPUS \
 --control-plane-memory $CONTROL_PLANE_MEMORY_GIB \
 --worker-vm-image $IMAGE_NAME \
 --worker-prism-element-cluster $PRISM_ELEMENT_CLUSTER_NAME \
 --worker-subnets $SUBNET_NAME \
 --worker-replicas $WORKER_REPLICAS \
 --worker-vcpus $WORKER_VCPUS \
 --worker-memory $WORKER_MEMORY_GIB \
 --csi-storage-container $NUTANIX_STORAGE_CONTAINER_NAME \
 --kubernetes-service-load-balancer-ip-range $LB_IP_RANGE \
 --ssh-public-key-file $SSH_KEY_FILE \
 --registry-url $REGISTRY_URL \
 --registry-username $REGISTRY_USERNAME \
 --registry-password $REGISTRY_PASSWORD \
 --insecure=true \
 --self-managed=true \
 --verbose 5
Here is a breakdown of the flags used:
| Switch / Flag | Input | Detail |
|---|---|---|
| –cluster-name | name | Name used to prefix the cluster and all the created resources |
| –endpoint | url | Prism Central URL. Accepted formats: host, host:port, http[s]://host[:port]. Accepted host formats: IP, FQDN |
| –control-plane-endpoint-ip | ip | The control plane endpoint address. To use an external load balancer, set to its IP or hostname. To use the built-in virtual IP, set to a static IPv4 address in the Layer 2 network of the control plane machines. [Not for production use: To use a single-machine control plane, set to the IP or hostname of the machine.] |
| –control-plane-vm-image | string | Name of OS image to use for control plane machines |
| –control-plane-prism-element-cluster | string | Name of the Prism Element cluster to use to create a control plane machine |
| –control-plane-subnets | strings | Names of Prism Central subnets to use for control plane machines. Example: subnet1,subnet2,subnet3 (default []) |
| –control-plane-replicas | int32 | Number of control plane nodes (default 3) |
| –control-plane-vcpus | int32 | The number of vCPUs(equivalent to CPU sockets) to use in a control plane machine (default 4) |
| –control-plane-memory | int32 | The size of memory (in GiB) of a control plane machine (default 16) |
| –worker-vm-image | string | Name of OS image to use for worker machines |
| –worker-prism-element-cluster | string | Name of the Prism Element cluster to use to create a worker machine |
| –worker-subnets | strings | Names of Prism Central subnets to use for worker machines. Example: subnet1,subnet2,subnet3 (default []) |
| –worker-replicas | int32 | Number of workers (default 4) |
| –worker-vcpus | int32 | The number of vCPUs(equivalent to CPU sockets) to use in a worker machine (default 8) |
| –worker-memory | int32 | The size of memory (in GiB) of a worker machine (default 32) |
| –csi-storage-container | string | Name of the Prism Central storage container to associate with the storage class created on the cluster |
| –kubernetes-service-load-balancer-ip-range | string | A hyphen separated IP range to configure the Kubernetes Service Load Balancer provider with. Example: 10.0.0.0-10.0.0.10 |
| –ssh-public-key-file | string | Path to the authorized SSH key for the user |
| –registry-url | url | URL of a container registry |
| –registry-username | string | Username used to authenticate with the registry |
| –registry-password | string | Password used to authenticate with the registry |
| –insecure | boolean | If true, the Prism Central server certificate will not be validated |
| –self-managed | boolean | When set to true, the required prerequisites are created before creating the cluster and the resulting cluster has all necessary components deployed onto itself, so it can manage its own cluster lifecycle. When set to false, a management cluster is used. (default false) |
| –verbose | int | Output verbosity |
Deployment Video
So here we go then, the culmination of everything in the NKP series so far; NKP successfully deploying and running.
Take a look at the just over 6 minute video below to catch the action:
Kubernetes!
As you’ll have seen from the video; that’s it job done, the Nutanix Kubernetes Platform installation is complete!
We also covered a bit of light Kubernetes testing using the standard kubectl command; as used in almost all Kubernetes installations. Here are the commands used in the video.
Create an nginx webserver pod:
export KUBECONFIG=/root/ch-nkp.conf
kubectl create deployment nginx --image=nginx:latest
Expose the nginx pod to the network via NKP’s load balancer:
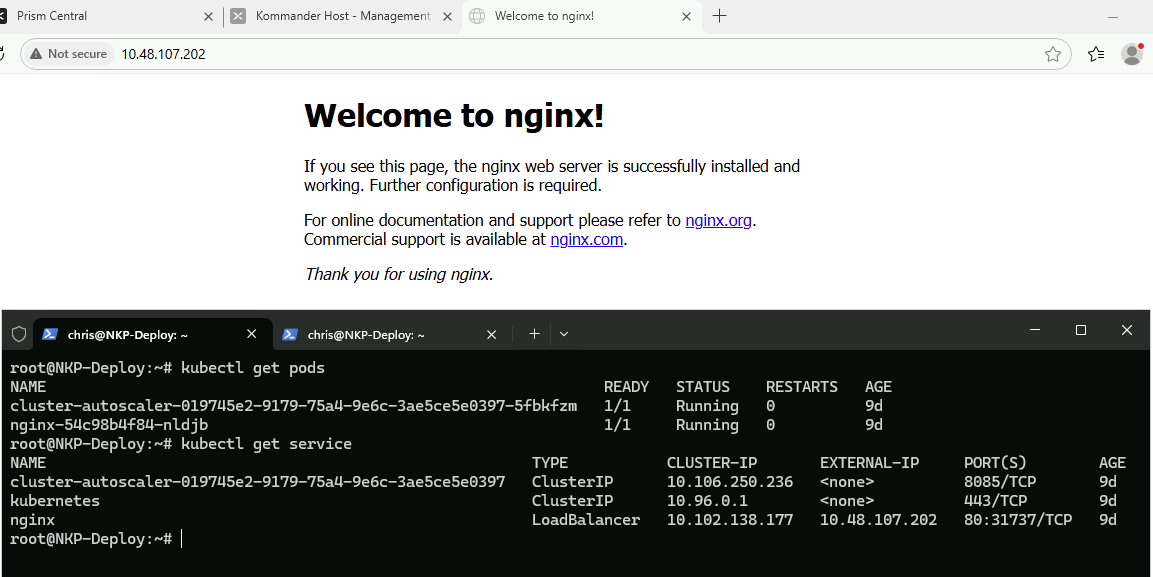
kubectl expose deployment nginx --port=80 --type=LoadBalancerGet pod info:
kubectl get podsFind the nginx pod IP address:
kubectl get serviceBrowse to the nginx pod external IP and there we have it:
Conclusion and Wrap Up
In this second part of my multipart series, we’ve delved deeper into the Nutanix Kubernetes Platform (NKP) installation process. We’ve successfully set up an NKP installation and explored its capabilities.
As we wrap up this post, I’d like to recap the key takeaways. I’ve:
- Demonstrated how to install and configure NKP for a lab environment (Parts 1 and 2).
- Discussed the importance of container management in today’s digital landscape (Part 1).
- Highlighted the benefits of using Nutanix as a platform for Kubernetes deployments (Parts 1 and 2).
If you’re new to Kubernetes or looking to streamline your containerised applications, I hope this series has provided valuable insights and practical guidance. Stay tuned for future posts where we’ll continue exploring the world of NKP and its many possibilities!
That’s it for now. If you have any questions or would like to share your experiences with NKP, please don’t hesitate to reach out in the comments below.
This is part two of a multipart series. Other parts of the series can be found:
- Nutanix Kubernetes Platform Deployment - Part 1: NKP Lab Deployment Preparation
- Nutanix Kubernetes Platform Deployment - Part 2: (This part) NKP Lab Deployment
Thank you for joining me on this journey into the world of the Nutanix Kubernetes Platform.
-Chris