*** Checkout Easy Bootable Antivirus CD/USB: UPDATED for an even easier process!***
With the prevalence of Viruses / Rootkits / Spyware and all sorts of other malware these days, quite often I get asked to take a look at machines that are suspected of infestation with one or more of the above "nasties".
Quite often this comes about because the nasties have "grown resistant" to the antivirus tool being used - that is they do not clean as expected. Sometimes this can be because the nasty hooks itself deep into the operating system or it locks itself as in use and hence cannot be deleted.
One way around this is to boot the computer from an alternative operating system located on a device such as a CD or USB pen drive. This will get around both issues, thus making the removal much easier.
Here is a guide showing how easy it can be to create such a CD or USB and how to use it.
It's entirely your choice whether to create a CD or a USB. You only need one or the other.
If you choose the USB option, you need to be sure that your hardware supports booting from USB (older hardware doesn't always support this) and know how to make it do so. If you are unsure, use the CD option.
Software
As I'm sure you can appreciate, there is a plethora of antivirus software available. Some come with bootable media, some not.
For ease of use, I'm going to use Avira's AntiVir Rescue System Bootable CD. The main reasons for this are:
Direct download to the ISO file is here
Option 1 - Create CD
Next step is to burn the ISO file onto CD.
As an ISO file contains is a single file containing other files (boot code etc) it must be burnt on to CD in a special way, with software that understands how to do this.
If you are unsure if your software is capable of doing this then I suggest you use ImgBurn.
A tutorial for burning ISO files with ImgBurn is available here.
Option 2 - Create USB
Here we are going to use our good friend UNetbootin.
From within UNetbootin:
So we have our boot media (be that a CD or a USB) and we are ready to start cleaning off that nasty malware that has been plaguing our lives.
As most nasties spread due to lack of security patching, upon first boot I would highly recommend a visit to Windows Update
Follows is and additional step only required if problems are encountered during the above process.
Cleaning Nasties - Advanced: Command Line
One thing noticed during testing is that occasionally the Avira GUI would freeze necessitating a reboot to get going again. The resolution is to scan from the command line. Here's how:
In this post looked at the easy creation of two types of alternative boot media to aid in the removal of malware.
Also discussed was an advanced method should issues occur.
- Chris
With the prevalence of Viruses / Rootkits / Spyware and all sorts of other malware these days, quite often I get asked to take a look at machines that are suspected of infestation with one or more of the above "nasties".
Quite often this comes about because the nasties have "grown resistant" to the antivirus tool being used - that is they do not clean as expected. Sometimes this can be because the nasty hooks itself deep into the operating system or it locks itself as in use and hence cannot be deleted.
One way around this is to boot the computer from an alternative operating system located on a device such as a CD or USB pen drive. This will get around both issues, thus making the removal much easier.
Here is a guide showing how easy it can be to create such a CD or USB and how to use it.
It's entirely your choice whether to create a CD or a USB. You only need one or the other.
If you choose the USB option, you need to be sure that your hardware supports booting from USB (older hardware doesn't always support this) and know how to make it do so. If you are unsure, use the CD option.
Software
As I'm sure you can appreciate, there is a plethora of antivirus software available. Some come with bootable media, some not.
For ease of use, I'm going to use Avira's AntiVir Rescue System Bootable CD. The main reasons for this are:
- Definition updates - The Avira AntiVir Rescue System ISO download file is updated several times a day with the very latest definition files. This means that the file is always up to date. No need for additional updates once booted.
- Size - The ISO file is only around 65Mb. I've seen other AV media weigh in at 350Mb plus...
- It's free!
Direct download to the ISO file is here
Option 1 - Create CD
Next step is to burn the ISO file onto CD.
As an ISO file contains is a single file containing other files (boot code etc) it must be burnt on to CD in a special way, with software that understands how to do this.
If you are unsure if your software is capable of doing this then I suggest you use ImgBurn.
A tutorial for burning ISO files with ImgBurn is available here.
Option 2 - Create USB
Here we are going to use our good friend UNetbootin.
From within UNetbootin:
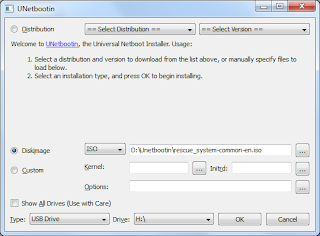
- Select Diskimage and locate your ISO file (in this case rescue_system-common-en.iso)
- Select your USB drive
- Click OK and let UNetbootin extract and copy the installation and boot sector files on to the USB
- Once complete, Reboot or close UNetbootin as required
So we have our boot media (be that a CD or a USB) and we are ready to start cleaning off that nasty malware that has been plaguing our lives.
- Insert the CD / USB and power on the device to be cleaned. Ensure that you select the correct device to boot from; CD or USB. [This is a achieved differently depending on hardware].
- Assuming you have selected correctly, the first screen you are met with is as follows:
- Enter 4 (Advanced 1024x768) and hit return. The tool will continue to boot
- Once booted an initialised, click the Union Jack flag in the bottom left hand corner to change the display language to English
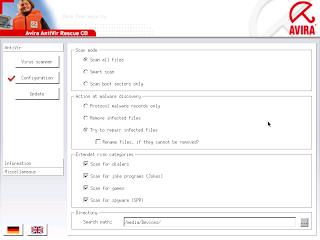
- Click Configuration
- Select Try to repair infected files:
- Click Virus scanner and Start scanner to start the scan:
- Sit back and relax, get some coffee. This may take a while
- Depending on the type of infection you may be asked additional questions... you may not...
- When all done, click Miscellaneous and Shutdown to safely dismount the file system:
As most nasties spread due to lack of security patching, upon first boot I would highly recommend a visit to Windows Update
Follows is and additional step only required if problems are encountered during the above process.
Cleaning Nasties - Advanced: Command Line
One thing noticed during testing is that occasionally the Avira GUI would freeze necessitating a reboot to get going again. The resolution is to scan from the command line. Here's how:
- Boot to Step 4 above
- Click Miscellaneous and Commandline to exit the GUI to the command line console:
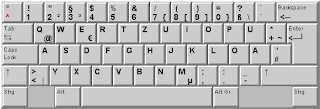
- Now comes the fun part; as you can see the console is in German....!
- For reference, here is a German keyboard layout. This can be used to workout which keys are which:
- The command to run a full scan is (notice the capital D on Devices):
- Once the scanner starts, it should look something like this:
- Use the command reboot to safely dismount the file system and reboot once complete
antivir -s -e -ren /media/Devices/hda1Which (on a UK keyboard) translates to:
antivir /s /e /ren &media&Devices&hda1
In this post looked at the easy creation of two types of alternative boot media to aid in the removal of malware.
Also discussed was an advanced method should issues occur.
- Chris


