


First off, is it Symantec or Veritas NetBackup? :oS
Overview
- Reference Process: Veritas TECH56473 / 000081333
- My Notes on the Reference Process
- 1. Setup and Install Windows
- 2. Configure Network
- 3. Install NetBackup Client
- 4. Enable NetBackup client logs
- 4A. Additional - PageFile
- 5. Start the Restore Process
- 5A. and 5B. NetBackup Application
- 5C. File Restore Complete
- 5D. System_State / Shadow Copy Components.
- 5D. 1. System State Restore Client Config
- 5D. 2. System State Restore
- 5E. Check the logs
- 6. Double-check
- 7. Restore Other Data
- 8. Stop the service
- 9. Transfer logs from restore before rebooting
- Post First Boot
- 10. Post Reboot Action.
- Additional Post restore actions
As time marches on, those Windows server installs out there get older and older. So does the hardware it is running on. Sure, most servers these days are virtual or cloud based so no one worries about hardware nowadays do they? Well, unfortunately there is still plenty of “physical” servers out there; actual hardware running actual an Windows O/S “on the tin” so to speak.
So sure enough I was asked to run a disaster recovery of a Windows 2008R2 server that had managed to loose it’s O/S drive. Both drives of a mirrored pair had failed. Yes, I know, unlucky to loose both O/S drives, but there you go.
Follows is the COMPLETE process I used to successfully recover the server using Veritas NetBackup. The process may hold true for other types of tape backup/restore software, however NetBackup was the software used in this instance. Yes the notes are scrappy, but I sometimes find that having additional notes from someone that has been through the process helpful. My aim here is to be helpful.
Reference Process: Veritas TECH56473 / 000081333
The process I followed is based on the Vertias KB article: Use NetBackup to perform a restore for a total and complete recovery of Windows client(s) that include C: (and other system) drive(s), Shadow Copy Component, and/or System_State from a reliable full MS-Windows backup without IDR or BMR in the event of a Disaster (or need to fall back to a known working state).
Available here: https://www.veritas.com/support/en_US/article.TECH56473 or here: https://www.veritas.com/support/en_US/article.000081333. Should those links die and you are in an emergency situation, I’ve also attached a PDF copy of the Veritas KB article here: Veritas-TECH56473.pdf
My Notes on the Reference Process
Follows are my notes to supplement the process.
1. Setup and Install Windows
I used a “vanilla” version of Windows. I wanted the install as clean as possible; no other stuff, just Windows in it’s purest form given that I was going to overwrite my Windows install from the Windows install on tape.
Should you not have a copy of a vanilla Windows to match the version you are restoring, You can download a copy from here:
- Windows 2003R2 x86 - HERE
- Windows 2003R2 x64 - HERE
- Windows 2008 Standard x86 & x64 - HERE
- Windows 2008 Datacenter x86 & x64 - HERE
- Windows 2008R2 x64 - HERE
- Windows 2012 & 2012R2 - HERE
Don’t forget to service pack your install to match the version of Windows you are restoring. Strange things happen when you restore different service pack versions!
2. Configure Network
I kept it simple and did not team my NICs as they were in the O/S being restored. Again, I wanted to keep it as simple as possible, so I simply configured one production and one backup NIC with the correct IP config.
3. Install NetBackup Client
Again, you want to match your NetBackup client version with the version on your NetBackup master / media server.
4. Enable NetBackup client logs
The process suggests setting your netbackup logging to 5. You may want to not go as high as 5. My log was 122MB after my O/S and system state restores!!!
4A. Additional - PageFile
Move your pagefile to another drive and reboot prior to moving on. From bitter experience and depending on the size of your C:\ drive / partition, it’s more than possible that you’ll run out of space thanks to pagefile growth.
5. Start the Restore Process
If you are having problems getting the netbackup master/media server(s) to talk to the newly installed NetBackup client, ensure that the server being restored can resolve the NetBackup master / media servers by name. Add hosts file entries if needed.
Also check the following registry settings on the server being restored:
HKEY_LOCAL_MACHINE\SOFTWARE\Veritas\NetBackup\CurrentVersion\Config
- Browser - Needs to match hostname
- Client_Name - Needs to match hostname
- Server - Needs to contain hostnames of all you backup master / media servers*
*Ensure that all these hostnames resolve to the correct IP addresses and they ping OK
5A. and 5B. NetBackup Application
As per the process, these need to be completed from the Netbackup master server
5C. File Restore Complete
If you set the NetBackup logging to “5” then good luck finding the wood for the trees!! Yep, don’t reboot
5D. System_State / Shadow Copy Components.
The statement “CAUTION: This is the most critical part of the restore that could result in a bootable system or non-bootable system.” makes me LOL…. I’m sure Veritas thought “Well, that’s all the bases covered… It’ll either work or it won’t….”
5D. 1. System State Restore Client Config
Bit of a double negative in the process here. I read this as:
| Restore type | Use Switches |
|---|---|
| Windows 2003 and below on non-original hardware | none |
| Windows 2003 and below on original hardware | \VERITAS\NetBackup\bin\w2koption -restore -same_hardware 1 |
| Windows 2008 and above on original hardware | none |
| Windows 2008 and below on non-original hardware | none |
5D. 2. System State Restore
Restore the system state Yep, don’t reboot
5E. Check the logs
If you set the NetBackup logging to “5” then good luck finding the wood for the trees!! Yep, don’t reboot
6. Double-check
Because one check is never enough!
7. Restore Other Data
Restore ‘em if you got ‘em.
8. Stop the service
THE MOST IMPORTANT STEP!! Make sure you manually shutdown the NetBackup client service before you reboot. For some reason, my server wouldn’t open a cmd prompt at this point.. Therefore I used services.msc and manually stopped the NetBackup service in there.
9. Transfer logs from restore before rebooting
As per the process, my NetBackup logs were not on the system drive, so I was confident I could still get a them even after a reboot. If I need to reboot the server from, say, an Ubuntu CD just to get the logs off, then so be it.
REBOOT (FINALLY!!!)
Post First Boot
On my trip trough this process we are all good up until this point. We were then met by the following:
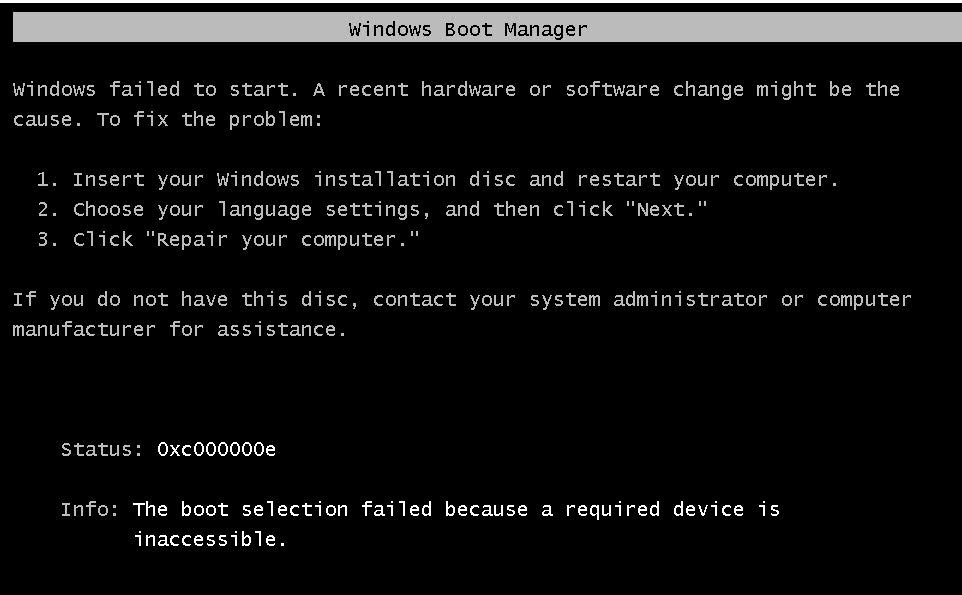
Yep, a non-booting system. OK the BCD has got a tad screwed. Here is how I fixed it:
- Boot from Windows install disc
- Click on Repair your computer after you go through language, time etc.
- Select your Windows installation drive, which is usually C:\, and click Next
- Choose Command Prompt when the System Recovery Options box appears
- Enter the following command:
bootrec /rebuildbcd - Answer “Y” to add C:\Windows to BCD.
A quick reboot and away we went. If you are seeing different BCD errors, have a look here: Fix Boot/BCD 0xc000000f Error
10. Post Reboot Action.
As per the notes, yes the first boot took a while.
Additional Post restore actions
We had to re-add the server to the AD and reboot again, but other than that the O/S restore was complete.
So there we have it… Phew!
A bit of a megga-post, but hopefully this will help you (and me!) next time either of us have to DR a server on a 3am call out!
-Chris